
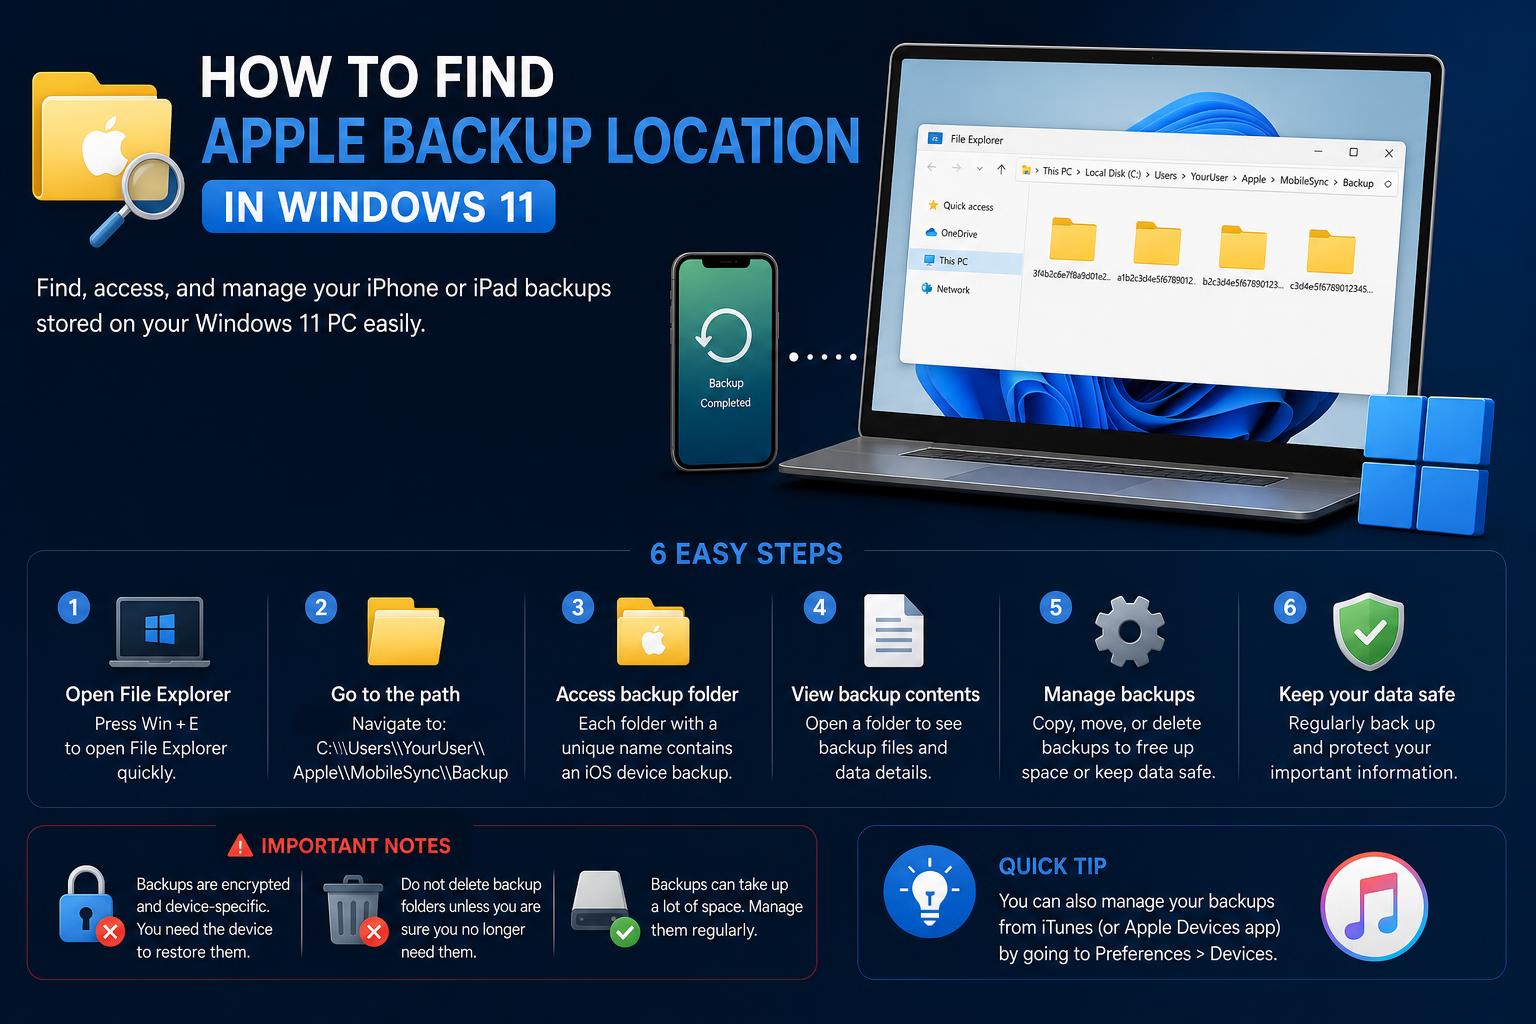
- Apple device backups are stored in hidden folders on Windows, with paths depending on how iTunes or Apple Devices app was installed.
- Efficient backup management includes finding, relocating with symbolic links, and periodically deleting or archiving old backups for optimal PC space.
- Specialized software is needed to view or extract backup contents, as backup files are not readable by default in Windows Explorer.
Dealing with Apple device backups on Windows 11 can quickly spiral into a maze of hidden folders, cryptic file names, and confusing app differences. Maybe you want to reclaim space on your hard drive, check your backup’s contents, or just secure your iPhone data before a big update. Whatever brings you here, you’re in the right place. This guide will walk you step-by-step through everything you need to know about finding, managing, or even moving the Apple (iTunes/Apple Devices) backup location in Windows 11 — so you stay in control of your data, not the other way around.
Let’s admit it, Apple’s ecosystem is usually seamless… until you cross into Windows territory. Backups can be tricky, especially when it comes to where they’re stored and how to manage them efficiently. In this comprehensive guide, we’re blending official Apple advice, proven community wisdom, and advanced techniques, covering both the Apple Devices app and classic iTunes installations. You’ll also discover tips for exploring, moving, or maintaining these backups safely, tailored for both novice and power users alike.
Understanding Apple Backups on Windows 11: The Basics
Before you start tweaking your setup or diving into cryptic directories, it’s key to know what Apple device backups actually are and where they go on modern Windows. When you connect your iPhone, iPad, or iPod to your PC and create a backup using iTunes or the newer Apple Devices app, the software copies a huge amount of your device’s vital data — from photos to messages, app states, settings, and more — into a secretive folder on your Windows drive. The point? You’ll never lose your digital life, even if your device is lost, replaced or wiped.
But that convenience comes with a catch: backups can grow large and chew up your main drive, especially if you have multiple iOS devices or regular backup cycles. Moreover, Apple saves these in obscure locations that aren’t exactly friendly to everyday Windows users, making it hard to manage your storage, access, or move these files unless you know exactly what you’re doing.
Default Apple Backup Locations in Windows 11
There isn’t just one spot for all Apple device backups on Windows — it depends on how you installed the software.
- If you’re using iTunes downloaded from Apple.com: The backup folder is usually at:
C:\Users\\AppData\Roaming\Apple Computer\MobileSync\Backup\ - If you installed iTunes from the Microsoft Store, or you’re using the Apple Devices app: Look instead for:
C:\Users\\Apple\MobileSync\Backup\
Simply replace with your actual Windows username. These folders store all the backups in their own subfolders, named with unique strings of letters and numbers for each device.
The challenge? These folders are hidden by default in Windows Explorer, and backups themselves aren’t intuitively labeled, making it hard to know whose device is whose — especially in family computers or shared environments.
How to Find Your Apple Backup Folder in Windows 11
Accessing your Apple backup location isn’t tricky once you know the shortcuts. Here’s how to get there, no matter your Apple software:
- Open the Run dialog: Press Windows key + R on your keyboard.
- Depending on your setup, type one of the following and hit Enter:
- If using the Apple Devices app or iTunes from the Microsoft Store: %USERPROFILE%
- If it’s classic iTunes from Apple’s website: %AppData%
- Navigate into the respective directory:
- For Microsoft Store/iTunes: Open the Apple > MobileSync > Backup folder.
- For classic iTunes: Go to Apple Computer > MobileSync > Backup.
Pro tip: You can also copy-paste the complete backup path above into the Run dialog, replacing “” with your actual Windows username.
How to Repair Windows 11 Using Command Prompt: Advanced Techniques & Best Practices
How to Back Up Your iPhone, iPad, or iPod Touch on Windows
Creating a manual backup before diving into backups management is a smart move, especially before any significant changes to your system or device. To start a backup using iTunes or the Apple Devices app:
- Open iTunes or the Apple Devices app on your PC.
- Connect your device via its USB cable.
- If prompted, enter your device passcode and “Trust” the computer.
- Choose your device inside iTunes (look for the small device icon on the top left) or under Devices in the Apple Devices app.
- Find the General tab (in Apple Devices) or Summary (in iTunes).
- To save Health and Activity data, tick “Encrypt Local Backup” and set a password. Store the password somewhere safe — without it, your encrypted backups cannot be restored.
- Click “Back Up Now”. When the process completes, iTunes or the Apple Devices app will show the most recent backup date and time.
For Apple’s official detailed instructions, visit their help page.
Managing Apple Device Backups in Windows 11
Finding your backups is only part of the journey. Managing these files — whether deleting old ones, archiving precious states, or simply peeking into what’s stored — is equally important, especially as storage fills up. Here’s what you need to know:
- To view all backups: Open Apple Devices app or iTunes, connect your device, and under the General tab or Summary (it may differ by version), click on “Manage Backups”.
- Here, you’ll see a list of your backups: Right-click any backup to Show in Explorer, archive, or delete as needed.
- If your backups don’t appear: Double-check you’re using the right account and that you haven’t manually moved the backup location outside what Apple expects.
Note: The software does not provide tools to inspect the contents of a backup. The actual backup folders are full of files with randomized names and unintelligible extensions, making it nearly impossible to browse manually without extra help.
How to Move iTunes or Apple Devices Backups To Another Location
Running low on C drive space? Moving your iPhone backups is a practical way to free up gigabytes. Follow these carefully — a mistake can break future backups or make old ones inaccessible.
Step 1: Locate the Backup Folder
First, use the navigation above to find the exact backup folder. Be specific about which version of iTunes or Apple Devices you’re using, as the directory will differ. Copy the backup folder (the whole “Backup” directory) to your new desired location, such as a secondary hard drive or external disk (e.g., E:\NewBackupFolder).
Step 2: Remove or Rename the Old Backup Directory
It’s safest to rename your old “Backup” folder to something like “Backup_old” instead of deleting it immediately, just in case you need to revert.
Step 3: Create a Symbolic Link
Apple’s apps don’t have an “update backup location” button, so you need a symbolic link (mklink in Windows) to trick iTunes or Apple Devices into reading/writing backups at the new spot. Here’s how:
- Open Command Prompt as administrator (search “cmd”, right-click, and select “Run as administrator”).
- For iTunes from Apple.com:
mklink /J “C:\Users\\AppData\Roaming\Apple Computer\MobileSync\Backup” “E:\NewBackupFolder”
- For iTunes/Apple Devices from Microsoft Store:
mklink /J “C:\Users\\Apple\MobileSync\Backup” “E:\NewBackupFolder”
- Be sure to replace and E:\NewBackupFolder with your actual username and your new folder path.
Now, whenever iTunes or the Apple Devices app backs up, it reads and writes directly to your new location — no more crowded C drive!
Pro tip: Always test by performing a new backup immediately after creating the link. If you see errors, double-check your symbolic link syntax and folder permissions.
Tips for Effective Backup Management
- Regularly review and delete old backups that are no longer needed, especially if several family devices are connected to the same computer.
- Always back up before moving folders or creating symlinks, as mistakes here can result in lost data.
- Consider moving your backup location to external drives or a secondary partition to prevent your primary drive from filling up, particularly on laptops with small SSDs.
- If you’re dealing with encrypted backups, never lose your backup password. Without it, even Apple cannot help you recover your data!
- If your backup folder disappears or acts unusually, check for updates to the Apple Devices app or iTunes, which sometimes change folder paths between versions. Always ensure your software stays current for maximum compatibility. Official update guidance is on the .
How to View or Extract the Contents of an iPhone Backup
One of the common frustrations is that Apple’s backups on Windows are not directly readable — browse any backup directory, and you’ll see a sea of mysterious files with random strings, giving no clear indication what’s actually inside. If you need to recover specific data (like old text messages or photos) from a backup, you generally need specialized software.
There are trusted, reliable tools — both free and paid — that decrypt and organize backup contents into readable formats. Examples include:
Always ensure you’re using reputable software; avoid random or obscure tools as they may introduce malware or compromise your device. If privacy or personal data security is a priority (as it should be), check that any tool you use comes well-recommended or is featured on respected tech sites.
For Apple’s full guide on managing backups, explore both the and their .
Troubleshooting Backup and Restore Issues
Sometimes, you might encounter errors while restoring from a backup, or issues where backup files don’t appear in-app. Here’s what often helps:
- Check that you’re logged into the correct Windows account. Backups are user-specific and won’t appear if you’re in the wrong profile.
- If using an external or network drive for backups (using a symlink), ensure the drive is connected and accessible before launching Apple Devices or iTunes.
- If your backup seems to be missing, verify that you haven’t renamed or moved the Backup folder in ways not reflected in your symlink command.
- On rare occasions, software updates (iTunes, Apple Devices app, or even Windows updates) may affect backup location behavior. After updates, reconfirm your symlink and backup path setup.
- If you receive device restore errors (“can’t restore from backup”), check for corrupted backups (often caused by abrupt disconnects or drive failures). Consider deleting and rebuilding your backup under guidance from Apple’s support site.
Bonus: Automating Backup Folder Cleaning
With frequent device syncs and multiple user accounts, backup folders can bloat fast. For power users, tools like CCleaner or custom batch scripts can help audit, archive, or automatically clean up old backups. Always review before bulk-deleting — you can’t undo deletion if an important device snapshot gets trashed with the rest.
Understanding and customizing your Apple backup workflow on Windows 11 will help you reclaim space, boost system performance, and maintain better oversight of your critical data. Whether you want to move your folders, dig into your iPhone data, or simply avoid headaches with future device switches, these strategies and detailed instructions will keep your files organized and your information secure.