
- Comprehensive troubleshooting covers both integrated and external cameras, addressing physical checks, privacy settings, and driver issues.
- Step-by-step solutions walk through checking permissions, using Device Manager, and updating system components to tackle the most persistent webcam issues.
- Additional recommendations include BIOS configuration and leveraging Windows' built-in troubleshooters for advanced cases.
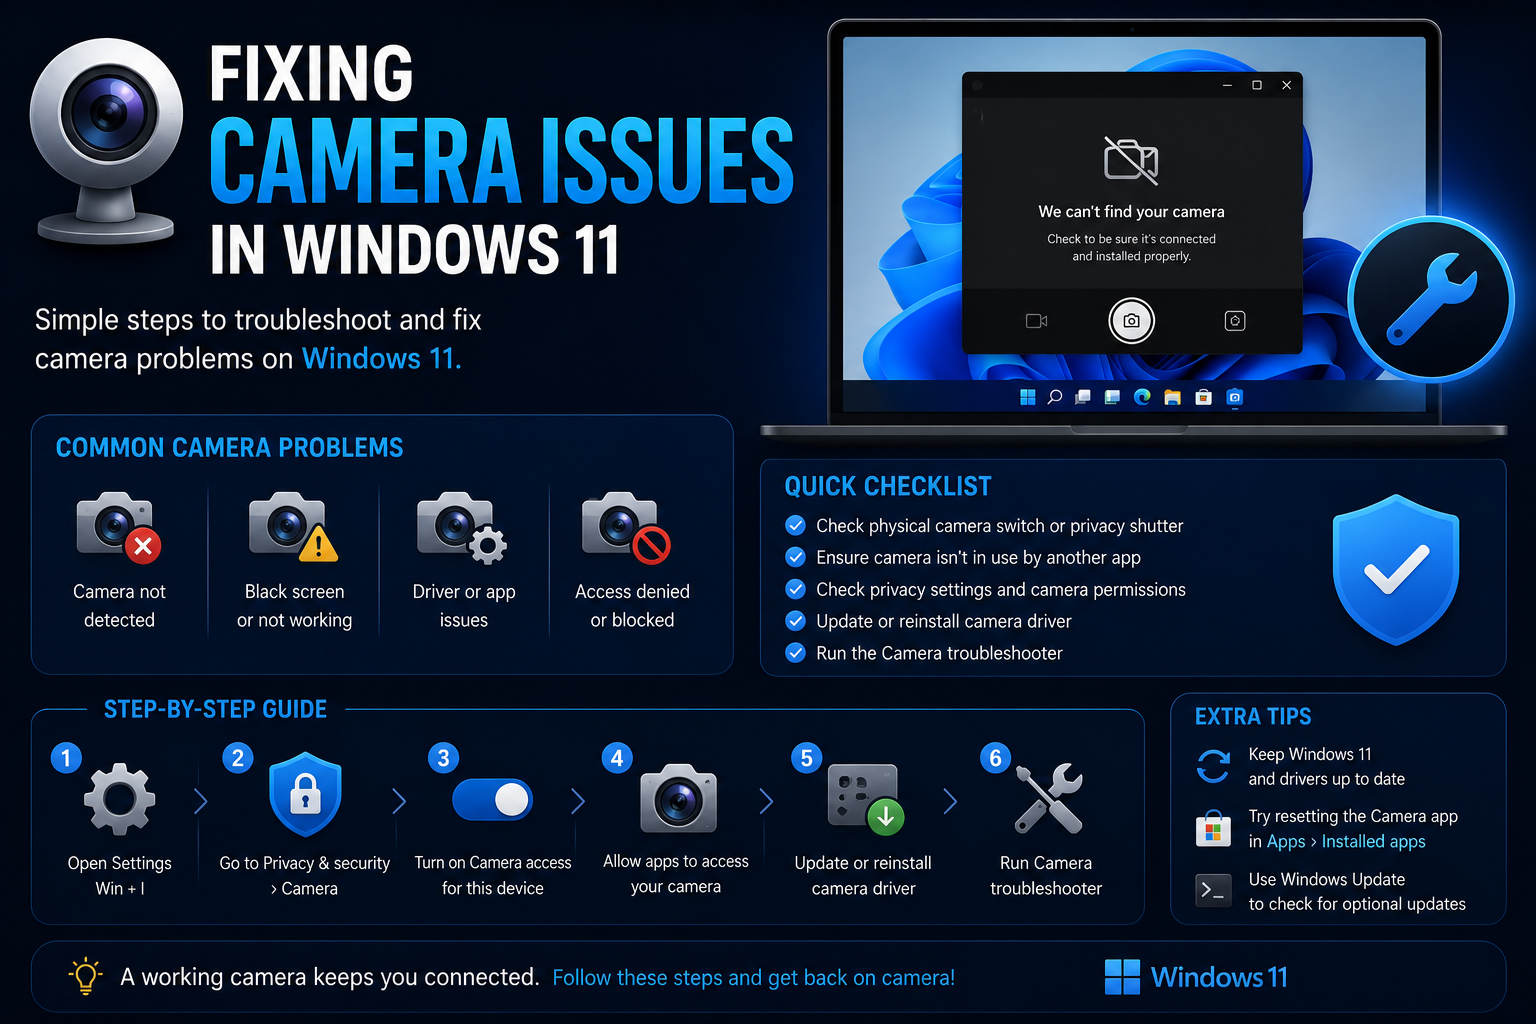
If you’ve sat down to join an important video call or just wanted to snap a quick photo on your Windows 11 device, only to find your camera refusing to cooperate, you’re not alone. Camera problems are one of the most frustrating setbacks for Windows users, especially when they seem to pop up out of nowhere or right after an update. With work, school, and friendships relying more than ever on video connections, a malfunctioning camera can really put the brakes on your day.
The good news? You don’t need to be a tech wizard to resolve most webcam issues on Windows 11. Whether you’re using an integrated camera on your laptop, an all-in-one PC, or an external webcam, this comprehensive guide covers not only the basics but also advanced fixes, physical checks, permission settings, driver reinstallation, and unique troubleshooting tactics for those particularly stubborn cases. So let’s roll up our sleeves and get that camera working again!
Understanding the Problem: Laptop, Desktop, or External Camera?
Before jumping into specific fixes, it’s crucial to determine whether you’re dealing with a built-in camera, like the kind found on laptops and all-in-one PCs, or an external webcam connected via USB. Knowing your camera type helps narrow down potential causes and the best troubleshooting path.
- Integrated cameras are part of your laptop or AIO PC hardware, usually at the top of the screen. They rely on built-in drivers provided by the device manufacturer or Microsoft.
- External cameras are attached via USB. They may require separate drivers or software from the manufacturer and are more prone to connection issues.
Quick Physical Checks: Don’t Overlook the Basics!
Let’s start simple. Many camera issues are caused by physical obstructions or simple connection slips. Here are a few things to scan for before diving into software fixes:
- Check if the lens is covered by a privacy shutter, film, or case. Many new laptops and webcams include these for privacy. Make sure they’re fully open.
- Inspect for dust or grime on the camera lens. Gently wipe it with a clean, soft cloth. A dirty lens can lead to blurry or dark images, causing apps to “think” the camera is not working.
- On external USB cameras, double-check the connection. Try reconnecting the USB cable, using a different port, or testing the webcam on another device to rule out hardware failure.
If your camera passes all physical checks but still doesn’t work, move on to software-based troubleshooting.
Troubleshooting Built-In Camera Problems in Windows 11
Issues with an integrated camera are often traced back to software conflicts, driver problems, privacy settings, or the effects of recent system updates. Let’s walk through the most effective approaches to get your camera back online.
1. Check Camera Privacy Settings
Windows 11 includes robust privacy controls, letting you specify which apps — and even which users — can access your camera. Incorrect settings can prevent your camera from functioning in multiple apps, even if the hardware is okay. Review your privacy settings by following these steps:
- Click the Start button, then type Camera privacy settings in the search bar. Select Open.
- Find the Camera access option and make sure the switch is On.
- Scroll to Let apps access your camera and ensure this is also On.
- Scroll further to Choose which Microsoft Store apps can access your camera, enabling access for the apps you use most often, such as Teams, Zoom, or Skype.
- Below that, look for Let desktop apps access your camera and switch it On. This is vital for programs like web browsers and third-party video chat software.
Tip: If you just updated Windows or installed a new user account, these privacy permissions may have been reset.
2. Test the Camera in the Windows Camera App
To determine if your problem is system-wide or isolated to specific apps, use the built-in Camera app:
- Type Camera into the Start menu and open the app.
- If the camera works here but not in Zoom or Teams, your issue is likely with those apps’ settings. Visit their privacy and permissions options to ensure camera access is enabled.
- If you get errors like “No camera found” or “Cannot start camera,” proceed to the next set of steps.
Pro tip: Some errors, such as upside-down images or a black screen, can also indicate a driver or hardware issue.
3. Enable the Camera in Device Manager
If Windows thinks your device’s camera is disabled, Device Manager is the tool to reactivate it:
- Right-click the Start button and select Device Manager.
- Expand the section labeled Cameras, Imaging Devices, or sometimes Sound, video, and game controllers. Locations can vary by device and update.
- Find your camera, such as “USB2.0 HD IR UVC WebCam”, right-click it, and look for an Enable device option. If you only see Disable device, it is already enabled.
If enabling the camera doesn’t change anything, it’s time to look closer at drivers.
4. Update or Reinstall Camera Drivers
Outdated, corrupted, or missing drivers are common causes of camera failures, especially after major Windows updates. Reinstalling or updating the drivers can be the magic bullet:
- Return to Device Manager and locate your camera device.
- Right-click and select Update driver, then let Windows search for the latest version automatically.
- If an update is not found or does not help, right-click the camera again and select Uninstall device.
- Check the box for Delete the driver software for this device and confirm.
- Afterward, click Action on the Device Manager menu bar and choose Scan for hardware changes. Windows will attempt to reinstall the default drivers. Alternatively, you can restart your computer to prompt automatic reinstallation.
Advanced tip: To better understand problems with your camera, check out these advanced diagnostic techniques in this advanced guide on hardware and software.
5. Windows Update: Don’t Neglect System and BIOS Upgrades
Surprisingly, some camera issues stem from outdated or buggy Windows builds. Checking for updates can resolve lingering hardware conflicts, especially after a major update:
- Open Settings > Windows Update and install any pending updates.
- Visit your device manufacturer’s site for BIOS updates, which can fix compatibility issues at a low system level. For specific instructions, check your manufacturer’s documentation.
Remember: Always back up critical data before performing a BIOS update.
6. Try the Windows Troubleshooter
Feeling stuck? Windows 11 offers a built-in troubleshooter for camera issues:
- Go to Settings > System > Troubleshoot > Other troubleshooters.
- Find Camera and click Run.
- Follow the prompts to let Windows scan and attempt automatic repairs.
While this tool doesn’t always find the problem, it can reset broken settings or detect missing components.
7. Restore Points and System Resets
If your camera stopped working after a driver update, Windows Update, or an unknown modification, you can roll back to an earlier point when everything was working properly. Access the restore point option, select an earlier point, and restore your system if necessary.
- Type “Create a restore point” in the Start menu, open System Recovery, and choose a date before the problem appeared.
- If you have exhausted all options and nothing works, consider performing a system reset after backing up your important files. This will return your computer to its original state, but it should be used as a last resort.
Note: Only perform a reset if your workflows are blocked and you have safe backups.
8. Manufacturer-Specific Controls and Laptop Features
Many laptops include function keys or physical switches that enable or disable the webcam. This is commonly done with combinations such as Fn + F10 or a key with a camera icon. In addition, some models have physical covers or small switch-style controls that block the lens. Make sure these are in the correct position for the camera to work.
Check the user manual or the manufacturer’s support page if you have any doubts about your device’s controls.
Troubleshooting External Cameras (USB Webcams)
External cameras offer greater flexibility through USB ports, but they can also present problems related to drivers, USB ports, or BIOS settings.
1. Check USB Connections
- Reconnect the camera and try different USB ports, preferably on opposite sides of the laptop or different ports on a desktop PC.
- If you can, connect the webcam to another computer. If it is not detected there either, the problem is most likely with the device itself.
- For USB 3.0 cameras, avoid connecting them to older USB 2.0 ports, as this can cause incompatibility.
2. Install or Reinstall Manufacturer Software
- Many webcams work without issues, but it is advisable to download the official drivers and utility software from the manufacturer, such as Logitech, Microsoft, or another brand. You can also check the manufacturer’s guide for additional details.
- After installing them, restart your PC. This can fix persistent errors or driver conflicts.
3. Check Device Manager
- In Device Manager, external cameras usually appear under Cameras, Imaging Devices, or Sound, video, and game controllers.
- Follow the process of updating, uninstalling, and reinstalling drivers as described for internal cameras.
4. Check USB BIOS Settings
Some BIOS setups allow USB ports to be enabled or disabled. If USB is disabled in the BIOS, Windows will not detect the webcam. To verify this:
- Restart and access BIOS/UEFI with F2, Del, or Esc, depending on the manufacturer.
- Look for sections such as Advanced or USB Configuration. Make sure USB support options are enabled.
- Save changes with F10 and restart Windows.
Dealing with App-Specific Camera Problems
Many times, the camera works fine system-wide but fails in certain applications, especially after updates. Let’s see how to review those situations.
1. Permissions in Third-Party Applications
Apps such as Zoom, Google Meet, Microsoft Teams, and Skype have their own permission and camera selection settings. If the problem is limited to one app:
- Check the app’s internal settings to select the correct camera.
- Allow access permissions the first time you use it, paying attention to any pop-up prompts.
- In browsers, check privacy permissions when joining the web conference.
2. Problems After a Windows Update
Some users have reported persistent failures after the 23H2 update in Windows 11, even after reinstalling drivers. If that is your case, try returning to an earlier restore point or contact the manufacturer’s technical support for specific updates or patches.
3. Driver Conflicts or Corrupted Profiles
Deeper problems may be linked to a corrupted user profile. Creating a new user account and checking whether the webcam works there helps determine whether the problem is system-wide or profile-specific.
Manufacturer Insights: ASUS, HP, and Others
Several brands offer specific guides:
- ASUS: Its official FAQ explains physical checks, function keys, BIOS updates, and driver management with MyASUS. The F10 key often activates the camera on many ASUS models.
- HP: HP support forums cover driver solutions and privacy settings.
- Other brands: always check the manufacturer’s official resources for specific instructions.
Special Situations and Community Tips
- Forums and Reddit contain many cases of mysterious failures after updates. Often, reinstallations or settings adjustments do not solve the issue, and users need to turn to technical support or warranty service.
- If the hardware fails on multiple computers, it could be a faulty unit, or the warranty may cover repair or replacement.
- In some cases, users consider Linux alternatives to avoid Windows-specific bugs if the camera does not work and is critically needed in compatible software.
Advanced Diagnostics for Tech-Savvy Users
For advanced users, if problems still persist, you can try:
- Running “sfc /scannow” and “DISM /Online /Cleanup-Image /RestoreHealth” in CMD to repair damaged system files.
- Booting into Safe Mode to check whether the problem disappears, which would indicate conflicts with other programs or services.
- Checking Event Viewer for camera-related errors.
Recommendations to Avoid Future Problems
- Keep Windows, drivers, and BIOS updated, but avoid major updates without first checking their stability.
- Download drivers only from official manufacturer websites.
- Make backups before making important system or firmware changes.
- Check physical controls and privacy covers when transporting or moving your device.
This walkthrough of different solutions will help you tackle most camera-related problems in Windows 11. The key is to proceed step by step and rule out the simplest causes before moving on to more complex tasks. If everything fails, technical support and the community are ready to offer additional help or suggest hardware changes if needed. Reconnect and get back to capturing important moments with your webcam!
Matter 1.4 Offers Major Innovations in Energy Management and Cross-Platform Compatibility