
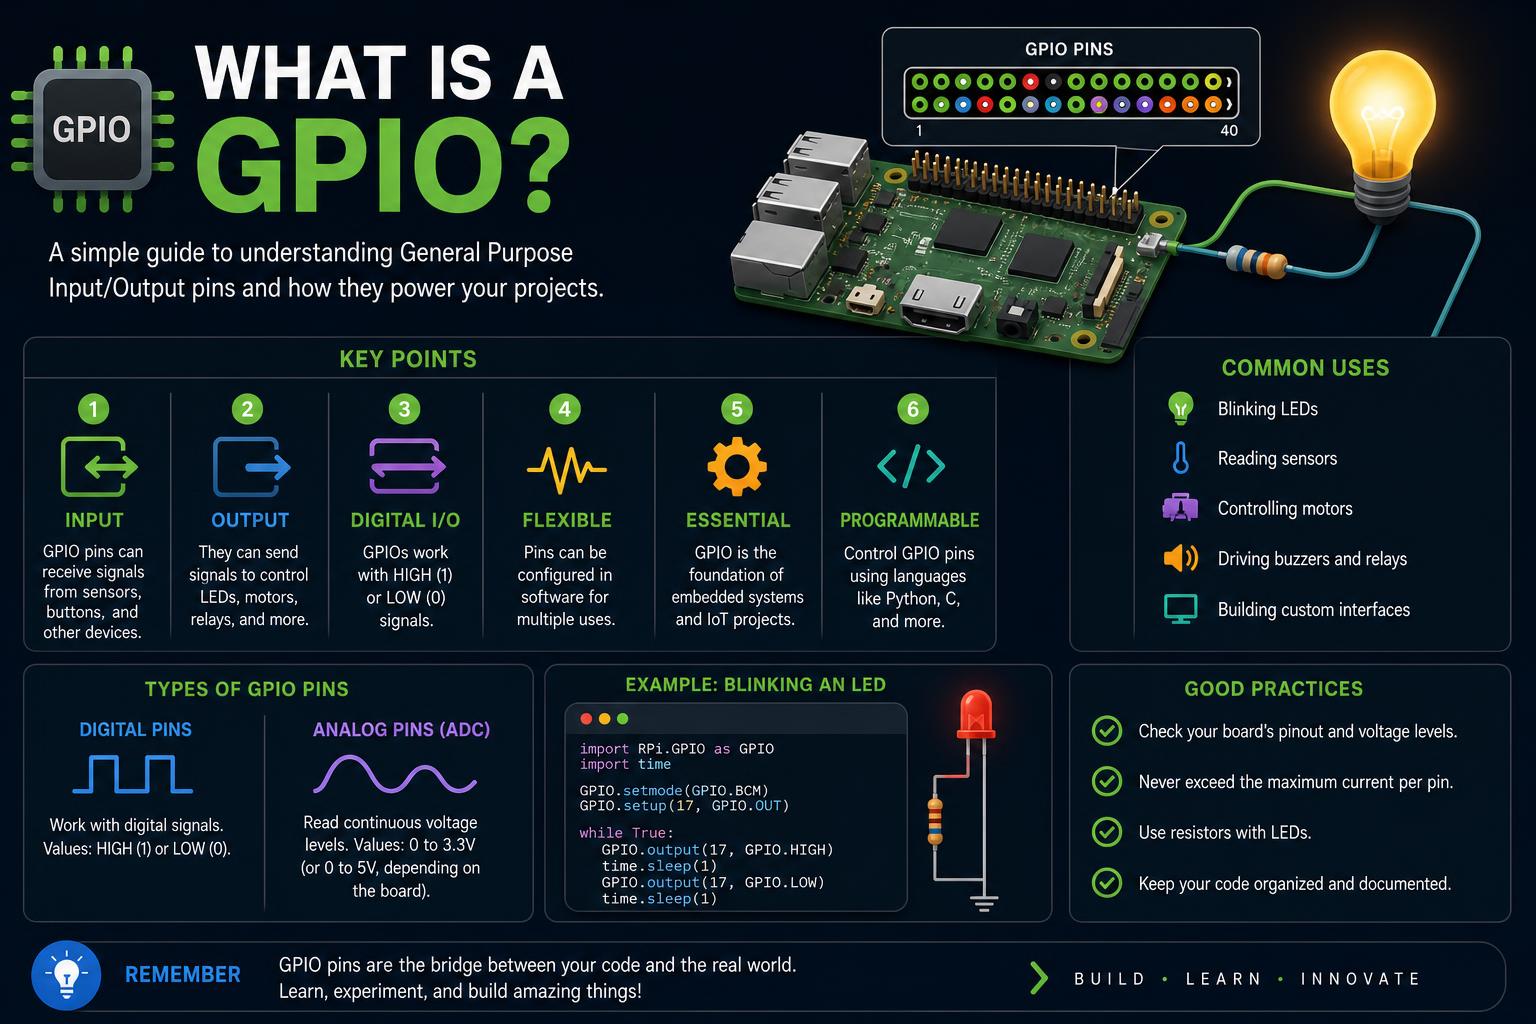
- GPIO pins provide flexible digital input and output for microcontrollers and boards.
- Internal architecture combines protection, programmable registers, and powerful output configurations.
- Practical uses range from home automation and education to advanced automotive applications.
- Mastering GPIO unlocks endless electronics and automation possibilities.
When tinkering with electronics or diving into the world of microcontrollers, you’ve probably stumbled across the acronym GPIO. But what exactly is GPIO, and why is it the centerpiece for so many tech projects? Whether you’re a hobbyist setting up a Raspberry Pi at home or you work in automotive innovation, understanding GPIO is fundamental to bringing ideas to life.
Here, we’ll peel back the layers on what GPIO is, how it works at both hardware and software levels, dive into its internal architecture, and explore its real-world applications. This will arm you with everything you need to fully harness GPIO’s potential, whether you’re automating your home, controlling devices on a vehicle, or just curious about the nuts and bolts powering today’s connected world.
What Does GPIO Mean?
GPIO stands for General Purpose Input/Output. At its core, this term covers a set of digital pins found on a variety of integrated circuits (ICs) and microcontroller boards, from basic Arduinos to advanced platforms like the Raspberry Pi, BeagleBone, and single-board computers used worldwide. These pins offer a flexible interface between your microcontroller or processor and the outside world.
Unlike dedicated communication ports, each GPIO pin can be individually programmed as either an input—receiving data or signals from external sources like switches, sensors, or other chips—or as an output, transmitting digital signals to activate things like LEDs, motors, relays, and other devices. This flexibility is where the “general purpose” aspect comes from—each pin can be assigned whichever role your project demands.
How Do GPIO Pins Work?
GPIO pins serve as your board’s gateway for sending and receiving digital signals, which are interpreted by software as either HIGH (1) or LOW (0) voltage levels. Input pins monitor the status of external devices (for example, whether a push button is pressed), while output pins allow the microcontroller to perform tasks—such as illuminating an LED, toggling a relay, or spinning a motor.
This interaction is enabled by a web of functional registers and circuitry, allowing each pin to be configured and controlled programmatically. Your microcontroller leverages these registers to directly manipulate hardware connected to the GPIOs, whether setting modes, writing states, or reading inputs.
Internal Architecture of GPIO
The architecture behind GPIO involves specialized sub-circuits and registers for control and safety, far more complex than just “off” or “on.” Each GPIO port includes multiple pins, internally supported by dedicated hardware components inspired by chips like the STM32F7 and RX63N families.
- Functional Registers: Memory locations storing modes (input/output), output data, pull-up/pull-down settings, and more for each pin. For example, setting pin 3 as an output involves configuring the corresponding register bits.
- P-MOS & N-MOS Transistors: These transistors actively drive pins high (VDD) or low (VSS), supporting push-pull and open-drain configurations to ensure robust communication and compatibility with various devices.
- Protection Diodes: Safeguard pins from voltage spikes outside acceptable ranges, preventing damage during voltage fluctuations above VDD or below ground.
- Schmitt-Trigger Inputs: Stabilize signals from noisy sources like mechanical switches or sensors, ensuring reliable state detection.
Each port (e.g., GPIOA, GPIOB) replicates these features, with unique registers controlling groups of pins. This allows independent configuration of input and output roles within a port depending on your project needs.
How to Control GPIO in Practice
You control GPIO primarily through software, using firmware libraries or your operating system’s API. For example, on Arduino, you use pinMode() to set a pin’s role, then digitalWrite() or digitalRead() to send signals or read inputs. The Renesas RX63N with the GR-SAKURA board simplifies this process with commands for setting pins as input or output, making it accessible for both beginners and experts.
If you want a button press to turn on an LED, you configure the button pin as input and the LED pin as output. Your software polls the button state and updates the LED accordingly. Using meaningful names for pins (like PIN_SW or PIN_LED) improves code clarity and simplifies debugging.
Key Output Modes: Push-Pull vs. Open-Drain
GPIO outputs typically operate in two modes—push-pull and open-drain—managed by internal transistor switching:
- Push-Pull: Both transistors actively drive the pin high or low, providing strong signals suitable for powering LEDs, relays, and digital logic.
- Open-Drain: Only the N-MOS transistor conducts, pulling the line low when active, while allowing it to float high via an external pull-up resistor. Ideal for sharing communication lines like I2C or interfacing with higher voltage devices.
Protection and Special Features
Many GPIO pins incorporate advanced safeguards and features to enhance robustness:
- Debouncing: Software filters to prevent false triggers caused by mechanical switch chatter.
- PWM (Pulse Width Modulation): Simulate analog behavior by toggling digital signals at controlled duty cycles, useful for motor control or LED brightness.
- Current Buffers and Isolation: Use relays, buffers, or opto-isolators to handle larger loads and protect the microcontroller from high currents.
- Interrupts: Trigger processor responses to signal changes, enabling real-time and low-power applications.
GPIO in Action: Everyday Applications
GPIO are incredibly versatile. They serve as the bridge between software commands and physical outputs:
- Home Automation: Control lighting, appliances, or security sensors connected to relays or wireless modules.
- Educational Projects: Use platforms like Raspberry Pi or Arduino to demonstrate coding and circuit principles, making learning interactive.
- Automotive Innovation: Devices such as AutoPi leverage GPIO to connect to vehicle systems (like CAN bus) for remote diagnostics, keyless entry, or starting engines remotely.
- Industry and Prototyping: Interface with sensors, actuators, and test equipment efficiently in manufacturing, robotics, and scientific experiments.
This extensive control over GPIO allows monitoring and managing key vehicle features—temperature sensors, door status, engine data—and integrating custom relays for automation.
Special Implementation Details
GPIO functionality extends beyond microcontrollers; many integrated circuits (ICs), including expanders and codecs, offer GPIO lines as additional features. For instance, the Intel 8255 provided 24 GPIO lines for industrial and PC use, while modern chips like the Realtek ALC260 embed GPIOs for audio alongside other functionalities.
Boards vary in how they expose GPIOs: some offer simple pin headers, others include specialized connectors with protections like Schmitt triggers, opto-isolators, or high-current buffers. These enhancements protect against noise and damage, making them suitable for demanding environments.
Access methods include memory-mapped I/O, direct register manipulation, or vendor-specific APIs. Many platforms allow remapping signals or configuring advanced features, providing high flexibility for complex projects.
Best Practices & Tricks for Beginners
Starting with GPIO is easier than it might seem. Keep these tips in mind:
- Use Clear Pin Naming: Employ human-readable labels like PIN_LED or PIN_SW instead of raw pin numbers for better readability and troubleshooting.
- Debounce Switches: Implement software delays (~50 ms) when reading mechanical inputs to prevent false triggers caused by bouncing.
- Verify Wiring: Double-check connections to avoid unpredictable behavior or hardware damage.
- Match Voltage and Current: Ensure external devices operate within your board’s voltage and current limits; use relays or buffers for higher loads.
- Utilize Libraries: Leverage available libraries provided by your platform to streamline GPIO control and reduce complexity.
Extending GPIO: Communication Protocols and Advanced Uses
Although GPIO pins primarily switch between on and off states, they are frequently used for more complex communication protocols:
- I2C: Uses two lines (SDA and SCL) for multi-device communication, with GPIOs configured accordingly.
- SPI: Employs multiple GPIOs (MOSI, MISO, SCLK, CS) for high-speed device interfaces like displays and sensors.
- Bit-Banging: Software toggling GPIOs to emulate protocols when dedicated hardware is unavailable, useful for quick prototypes.
Troubleshooting and Challenges
While GPIO operation is generally straightforward, some common issues include:
- Voltage Levels: Stick to the native voltage (3.3V or 5V). High voltages can damage pins; use level shifters if necessary.
- Current Capacity: Limit current draw per pin (typically 10–40 mA). Use external drivers for larger loads.
- Timing Accuracy: Proper timing is critical in communication protocols; software delays and race conditions can cause unreliable data exchange.