
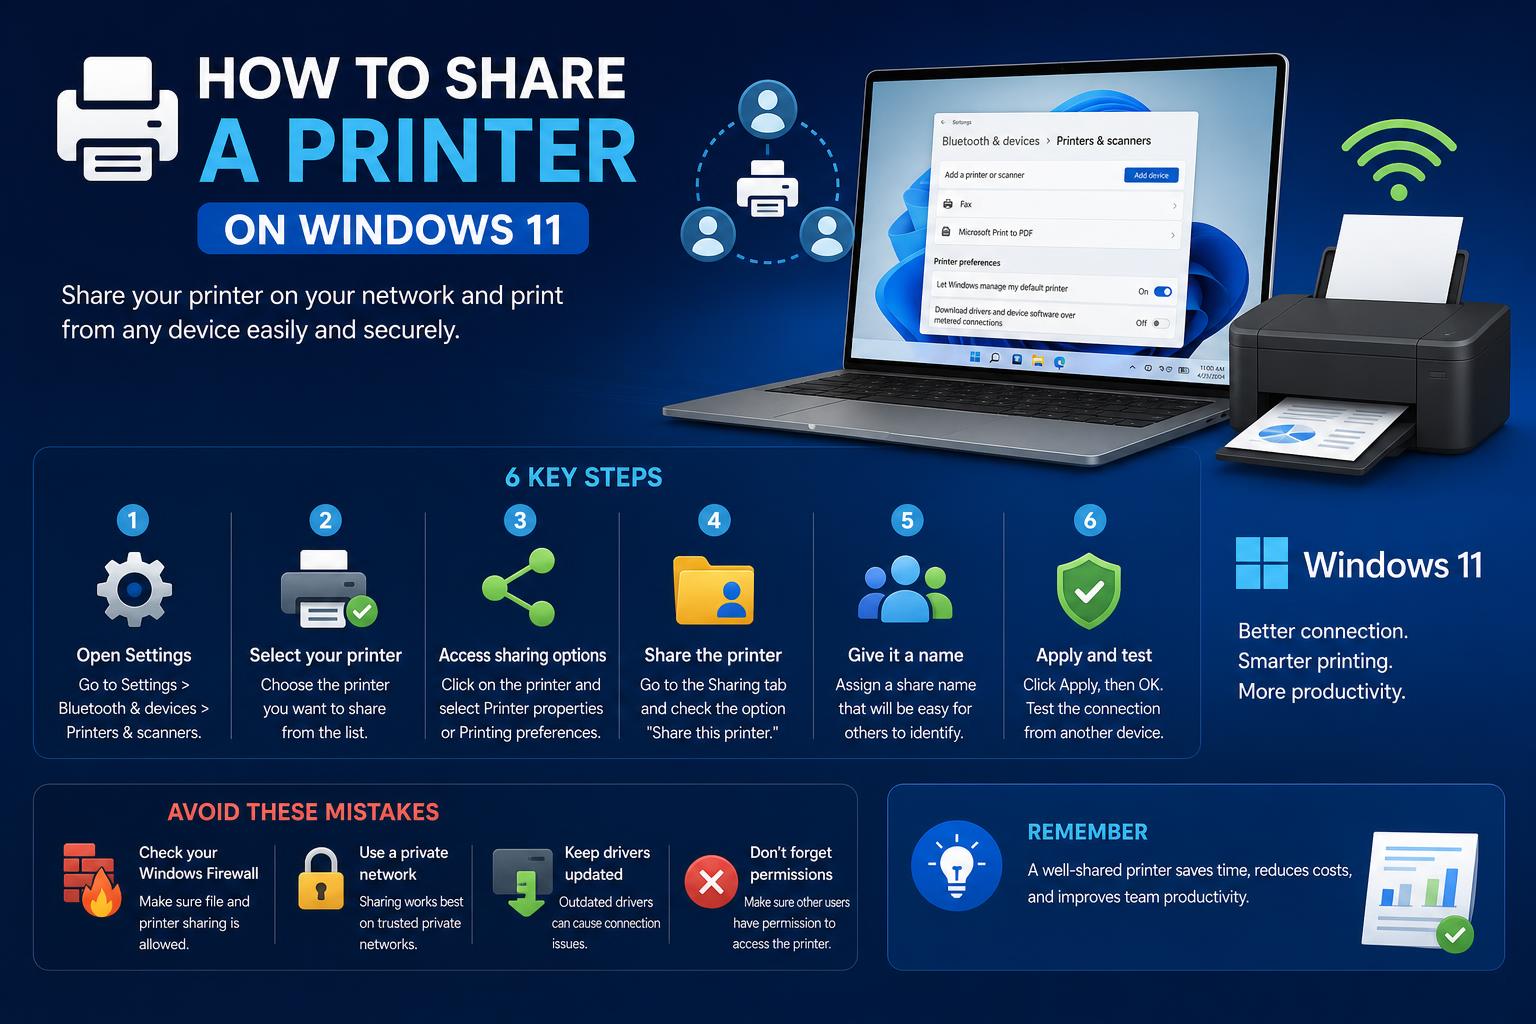
- Setting your network to private is essential for secure printer sharing.
- Enable both 'File and Printer Sharing' and 'Network Discovery' on all devices.
- Advanced tools like USB Network Gate help share printers across remote locations or other OS.
Getting your printer to work seamlessly across multiple Windows 11 devices is a game-changer for both home offices and workplaces. Whether you’ve set up a brand new computer or upgraded your existing system, knowing how to share your printer on Windows 11 lets you and your housemates, family, or team skip the hassle of moving files between devices just to print a document.
But let’s be honest—printer sharing on Windows 11 can sometimes feel more confusing than it should, especially when different versions of Windows, network types, and even those quirky office scenarios come into play. In this guide, you’ll find a detailed, user-friendly walkthrough covering every angle: setting up, verifying network settings, troubleshooting common obstacles, and even handling advanced needs like sharing across remote offices or multiple operating systems. Let’s dive into the details that Microsoft leaves tucked away and explore advanced tips from community experiences and expert tools.
Printer sharing is especially useful when many users or devices need access to a single printer without installing drivers on each one. This approach is more efficient and resource-saving, ideal for homes, small businesses, or organizations with multiple computers on a shared network. Furthermore, remote and hybrid work environments demand flexibility, making effective printer sharing a critical feature.
Requirements for Sharing a Printer
- Your printer should be physically connected to a primary Windows 11 device.
- The device must be powered on and connected to the network whenever printing is needed from other computers.
- Printer sharing needs to be enabled on Windows 11 for other devices to detect and use the printer.
- A stable, typically private, network connection is essential for security and proper discovery.
Step 1: Make Sure You’re on a Private Network
Setting your network to ‘Private’ in Windows 11 is essential for successful printer sharing. Private networks allow trusted devices to discover and connect, whereas public networks restrict such visibility for security reasons. To verify or change this:
- Click the Start button and open Settings > Network & Internet.
- Select Wi-Fi or Ethernet in the sidebar, depending on your connection type.
- Click on your current network connection.
- Under Network profile type, select Private network.
This step ensures that other trusted devices on the same network can discover and access the shared printer.
Step 2: Enable Printer and File Sharing
On private networks, Windows 11 generally enables network discovery and file and printer sharing by default, but it is always advisable to double-check. To do so:
- Go to Settings > Network & Internet.
- Click on Advanced network settings.
- Select Advanced sharing settings.
- Expand the Private networks section.
- Make sure that the Network discovery and File and printer sharing toggles are set to On.
With these settings enabled, your Windows 11 PC will be able to broadcast the shared printer and accept connections from other devices on the network.
With the network configured, you can now share a printer installed on your main Windows 11 computer. The steps are:
- Go to Settings > Bluetooth & Devices > Printers & Scanners.
- Select the printer you want to share.
- Access Printer properties.
- Go to the Sharing tab.
- Click on Change Sharing Options.
- Check the Share this printer box.
- Note the Share name; this will be what other devices use to locate the printer, so choose an easy-to-remember name.
- Click OK to save.
Once shared, the printer will be accessible to other devices on the same network, provided they are also properly configured.
Step 4: Find the Host Computer’s Name or IP Address
To connect from another machine, you need to know the name or IP address of the Windows 11 computer sharing the printer, along with the share name.
To find the computer’s name:
- Go to Settings > System > About.
- Look under Device specifications for the Device name field.
To locate the IP address:
- Go to Settings > Network & Internet.
- Select Wi-Fi or Ethernet.
- Go to the IPv4 address section; your machine’s current local IP will be displayed there.
This information will be needed on other computers to access the shared printer.
Step 5: Connect from Other Windows Devices
On each additional computer on the same network, follow these steps to install the shared printer:
- Go to Settings > Bluetooth & Devices > Printers & Scanners.
- Click Add device or Add a printer or scanner.
- Scroll down to Add manually or, if the shared printer appears automatically, select it directly and press Add Device.
- Enter \\computer_name\printer_name or \\ip_address\printer_name (for example, \\LivingRoomPC\HPDeskjet).
- If prompted, enter the credentials of the host computer.
- Complete the installation by following the prompts.
After this, the shared printer will function like a local one, allowing you to send print jobs and manage them from the client machine.
Changing Default Printers and Printer Management
If Windows automatically changes your default printer or you want it to always print to the shared one, you can easily adjust this.
- In Printers & Scanners, turn off Let Windows manage my default printer.
- Select your preferred printer and click Set as default.
This simplifies the daily printing process and avoids conflicts with other printers.
Advanced Printer Sharing Techniques and Tools
For more complex environments, it may be necessary to use additional tools that offer greater flexibility and control, especially in remote or virtualized environments.
Using USB Network Gate for Advanced Needs
If you need to share printers across different locations, with multiple operating systems, or connected via USB, USB Network Gate expands Windows’ native capabilities. Key benefits include:
- Sharing printers across remote offices over VPN or the internet.
- Enabling cross-platform compatibility between Windows, macOS, and Linux.
- Connecting USB printers to virtual machines in environments like VMware or Hyper-V.
- Support for printers without specific drivers.
- Redirecting printers in remote sessions or virtual desktop environments.
This is paid software, but it is extremely useful for overcoming Windows’ native limitations in advanced setups.
Common Printer Sharing Problems and Real-World Fixes
Even with the correct configuration, sharing issues can still arise. Typical problems and solutions include:
- Windows updates interrupting sharing: Some updates affect network configurations and require post-update checks.
- Works for file sharing, but not for printing: Review the sharing settings and re-share the printer if necessary.
- Discovery issues: Verify that Network Discovery and File and printer sharing are turned on on both machines.
- Common errors like “Windows couldn’t connect to the printer” or “Word can’t print”: Fix these by removing and re-adding the printer, or by checking credentials on the host PC.
- Isolated networks: Routers that create guest networks block discovery. Always use a private network profile.
- Incompatibility between Windows versions: Keeping both systems updated and on the same workgroup can resolve many issues.
In persistent cases, seeking help from official Microsoft support or the printer manufacturer may be necessary.
When you enable sharing, you open resources on your network, so it is important to ensure that only trusted users have access and to use strong passwords on the host computer. Sharing over public networks is not recommended; in sensitive environments, configure additional permissions or firewalls to limit access.
Best Practices for Smooth Printer Sharing
- Update printer drivers after major Windows updates.
- Ensure the host computer is always powered on and connected when others need to print.
- Use descriptive, simple share names.
- Assign a static IP address to the machine sharing the printer to prevent connection drops.
Printer Sharing and Organizational Policies
In business or educational environments, security or IT policies may restrict printer sharing. It is important to consult those policies before setting up shared resources on managed devices.
Printer Sharing with Cross-Platform Devices
Need to print from Macs or Linux onto a printer shared by Windows 11? You may need to use third-party tools like USB Network Gate or configure shared resources using Samba, though this requires more configuration and attention to security.
- Restart both the host and client computers, ensuring both are on the same network and not on guest networks.
- Verify that File and Printer Sharing and Network Discovery are active on both sides.
- Reinstall the shared printer by manually typing the network path (\\computer_name\printer_name).
- If recent updates interrupted operation, review Microsoft support resources or roll back those updates if necessary.
- Seek guidance from official support guides or professionals if the issue persists.
Mastering printer sharing in Windows 11 gives you more flexibility and productivity. By following these steps and leveraging advanced tools or support when needed, you will avoid common frustrations and improve the printing experience across any setup.