
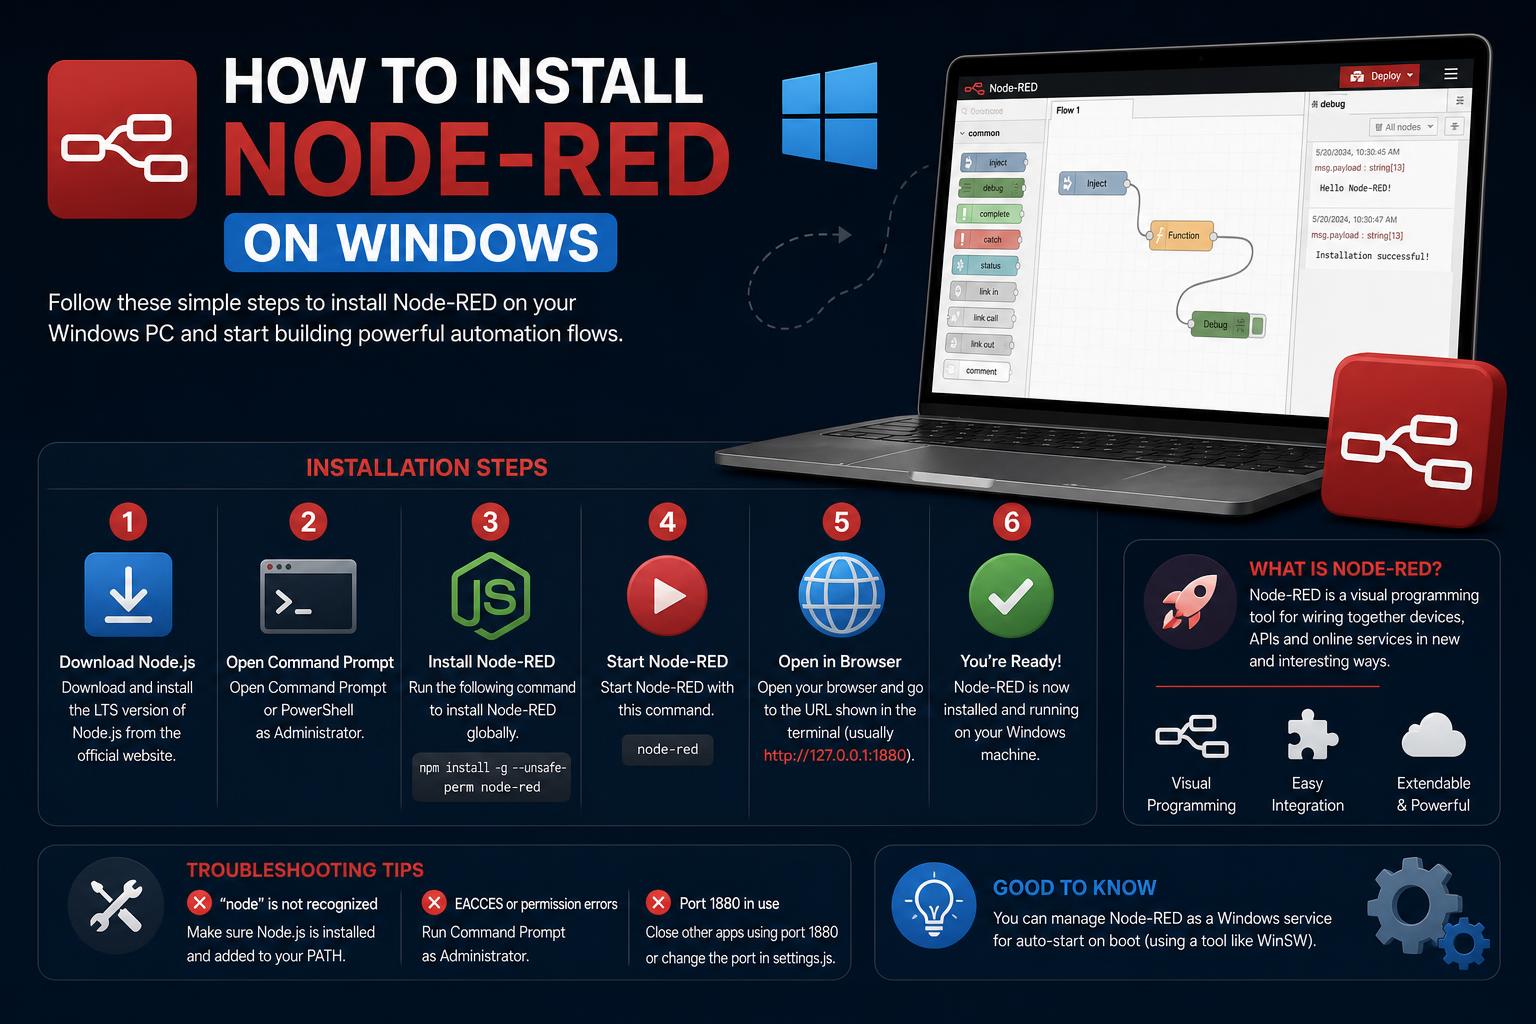
- Understanding prerequisites and system requirements before installation is crucial for a smooth Node-RED setup on Windows.
- There are multiple approaches for installing Node.js and Node-RED, such as using the Node.js MSI installer, Chocolatey, or a Node Version Manager.
- Proper verification, environment variable management, and user permissions help ensure a reliable environment for running and maintaining Node-RED flows.
If you’re ready to get creative with automation or IoT projects on your Windows PC, Node-RED is a fantastic tool to master. But even tech fans can stumble on the details of installation—especially as guides evolve and Windows environments throw the occasional curveball. This guide walks you through everything, step by step, with clear advice, modern best practices, and helpful explanations for every part of the process.
We’ll look at every method making waves in the Node-RED community, clear up confusion about user permissions, shells (CMD or PowerShell), global paths, and even cover useful tips for ongoing management. Whether you’re an absolute beginner, an enterprise user, or a tinkerer switching between multiple Windows accounts, we’ve got you covered. Grab your favorite caffeinated beverage—let’s make your Node-RED journey smooth!
What is Node-RED?
Node-RED is a powerful flow-based programming tool designed for connecting hardware devices, APIs, and online services using a convenient web-based editor. It’s an open-source project developed by the Node-RED team and maintained under the OpenJS Foundation. If you love automation, prototyping IoT, or want to orchestrate complex workflows, Node-RED unlocks incredible possibilities with a friendly drag-and-drop interface.
Before You Begin: Prerequisites and Supported Systems
You’ll need a computer running Windows (preferably Windows 10 or later) and local administrator rights. Node-RED depends on Node.js, so having a supported Node.js version is essential (even-numbered LTS versions like 20 or 22 are recommended). Not sure if your system is supported? Most instructions here are tailored for Windows 10 but generally apply for Windows 7 and Windows Server from 2008R2 onward. However, older systems lack current support and aren’t recommended.
- Local Administrator Rights: Needed for installing Node.js and some associated build tools.
- Internet Connection: Required for installations and updates via npm.
- Optional but Recommended: Familiarity with Windows command shells (PowerShell or CMD) and environment variables can be helpful.
Step 1: Download and Install Node.js
Node-RED runs on Node.js, so that’s our first stop. Head over to the official Node.js website and download the latest long-term support (LTS) version that’s recommended for your system.
- Choose 64-bit MSI for most modern Windows PCs (32-bit builds are available but not recommended for 64-bit Windows).
- If you’re sharing Node-RED across users or testing multiple versions of Node.js, consider a version manager like nvm-windows.
Install Node.js by running the MSI installer you downloaded. Accept all default options unless you have very specific requirements. Administrator rights will be needed, so be ready for a prompt if you’re not logged in as admin.
Once installation completes, close all open command prompts and open a new one—this ensures the environment variables are refreshed.
Verifying Node.js and npm Installation
It’s always best to check your installation before proceeding. Open a command prompt (either CMD or PowerShell is fine). Enter the following commands:
- For PowerShell:
node --version; npm --version - For CMD:
node --version && npm --version
You should see version numbers for both Node.js and npm (e.g., v20.11.0 and 10.2.0). If you see errors, double-check that your installer completed and restart your system if necessary.
Step 2: Install Node-RED Globally with npm
Node-RED is distributed as an npm package, so we’ll use the Node Package Manager (npm), which comes with Node.js.
In your refreshed command prompt, type:
npm install -g --unsafe-perm node-red
This globally installs Node-RED and its dependencies, making the node-red command available system-wide (for the current user).
- If you run into permissions problems, double-check that your prompt is running as administrator.
- If your system blocks installation of build tools, verify it’s not locked down (e.g., a company-managed PC).
- Be patient; npm may show warnings about optional dependencies—these are generally safe to ignore, and Node-RED will work without them.
Understanding Shells: PowerShell vs CMD
PowerShell has become the default command shell on modern Windows, but you can still use CMD if you prefer. Both work for installing Node.js and Node-RED, though some users report rare npm installation issues inside PowerShell (these are uncommon as of 2024). If you’re ever stuck, try switching shells or running as administrator.
Alternative Installation Methods
There are times when using the MSI or npm isn’t your best option. Consider these alternatives for particular needs:
- Chocolatey Package Manager: If you’re comfortable with package managers like apt-get (Linux) or brew (Mac), Chocolatey lets you install Node.js with
choco install nodejs-lts. Just note: NPM global installs may use different directories—read their documentation for quirks. - Node Version Manager (NVM): For developers who switch between Node.js versions often, nvm-windows can be invaluable. Just remember: every new version will need its own global packages, so you’ll reinstall Node-RED if you switch versions!
Step 3: Running Node-RED for the First Time
With Node-RED installed, it’s time for the fun part: running your first flow. In your fresh terminal (PowerShell or CMD), simply run:
node-red
A flood of log messages will appear. Don’t worry—these are normal diagnostic outputs. Look for a line similar to:
Server now running at http://127.0.0.1:1880/
Open your web browser to this address or http://localhost:1880 to access the Node-RED editor and start creating your first automation flows.
Note: This command must remain running for Node-RED to stay active. If you close the terminal, Node-RED stops.
Running Node-RED Automatically on Startup (Optional for Advanced Users)
If you plan to use Node-RED more like a background service or on a production device, configuring automatic startup makes life easier.
- Search for “Task Scheduler” from the Windows Start Menu.
- Choose “Create Task…” and configure a new scheduled task to run
C:\Users\<username>\AppData\Roaming\npm\node-red.cmdat login or at system startup. - Set the user context to the account you used for initial Node-RED installation. This guarantees the right environment and permissions.
- Optionally add conditions such as “Only run if network is available.”
For more robust process management (with features like automatic restarts on failures), check out tools like PM2.
User Accounts, Global Directories, and Managing Permissions
By default, Node.js (and globally installed npm packages like Node-RED) are installed for the current user. On Windows, global npm installs are typically located inside %APPDATA%\npm.
If you want to make Node-RED available to all users, or manage settings for multi-user environments, additional steps may be needed:
- Adjust permissions for the global npm install directory (e.g.,
%APPDATA%\npm) so other users can read and execute files. - Add this directory to the PATH system variable for all users: Type ‘environment’ in the Windows start menu and select ‘Edit the system environment variables,’ then edit the PATH variable for all users.
- Alternatively, change the npm global installation prefix using:
npm config set prefix "C:\\ProgramData\\npmglobal"
or for PowerShell:
npm config set prefix "$env:ALLUSERSPROFILE\npmglobal"
You may want to change the npm cache location as well for consistency. Update the PATH as before so the new folder is available in all shells.
Build Tools and Native Modules
Certain Node-RED nodes depend on native C/C++ modules that require compilation. On Windows, you’ll often need to install Microsoft’s Windows Build Tools to enable full compatibility. For most users, the Node.js installer handles this for you if you tick the box for “Install additional tools for Node.js.”
If you skipped it, or want to do it manually, open an admin command prompt and run:
npm install --global --production windows-build-tools
Note: This may take several minutes, as it installs Visual Studio Build Tools and Python if not present.
If you’ve already installed Visual Studio for other development, these dependencies might be satisfied.
Customizing Your Node-RED Environment
Each time you launch Node-RED, it creates a .node-red directory in your user’s home folder—this is your individual workspace (userDir).
- On Windows:
C:\Users\<your user>\.node-red - This is where your configuration, flows, and custom nodes are stored.
- If you use PowerShell, you can refer to it as
~/.node-red.
You can specify alternative flows files or settings when launching Node-RED:
-p <PORT>: Specify a custom port number (default 1880).--safe: Start Node-RED in safe mode (flows won’t be executed at startup).-u <DIR>: Choose a different userDir directory.-v: Enable verbose logging for easier troubleshooting.-D <SETTING>=<VALUE>: Override individual settings from the command line.
Keeping Node-RED Updated
Node-RED evolves quickly; updating is a good idea, especially to benefit from new features and bug fixes. To upgrade, simply run:
npm install -g --unsafe-perm node-red
No need to add “sudo” as Windows handles privileges differently than Linux or macOS. After upgrading, restart Node-RED to use the latest version.
Troubleshooting Common Issues
- npm or Node.js not recognized? Close and re-open your command prompt or restart your PC, as environment variables may not have been reloaded.
- Installation fails due to permissions? Run the terminal as administrator, and check for company restrictions.
- Missing build tools errors? Manually install build tools as shown above or check Visual Studio installation.
- Weird shell errors? Try switching between CMD and PowerShell, as rare bugs can sometimes be shell-specific, but modern systems handle both reliably.
Alternative: Using Docker or Snap (Usually on Linux, Included for Completeness)
While primarily aimed at Linux users, it’s possible to run Node-RED inside Docker on Windows if you need full isolation or want to mimic a deployment. For Snap packages, Windows isn’t supported.
Check out the Node-RED Docker documentation for container-specific details, especially if you’re developing across multiple platforms.
Tips for Developers and Advanced Users
- If you need to run multiple Node-RED instances or manage multiple projects, leverage the command line options to specify unique userDirs, flow files, ports, and project names.
- Set up process managers like PM2 (learn more at https://pm2.keymetrics.io/) for advanced process monitoring and automatic restarts on code changes.
- If you want to try Node-RED in a more robust environment, consider deploying it on a Raspberry Pi, as many community members do for dedicated IoT projects. The official Raspberry Pi guide covers specialized installation scripts and best practices for that platform.
All in all, setting up Node-RED on Windows might seem challenging at first, but by breaking it down into manageable steps, anyone can get started. Whether you are automating a home, creating industrial solutions, or simply exploring the world of IoT and flow automation, the key is to review the details, keep Node.js and Node-RED updated, and dare to experiment. The Node-RED community (official forums) is always ready to help solve questions or share innovative ideas. Now, open your browser, visit the Node-RED editor, and turn your ideas into reality right from your Windows machine.