
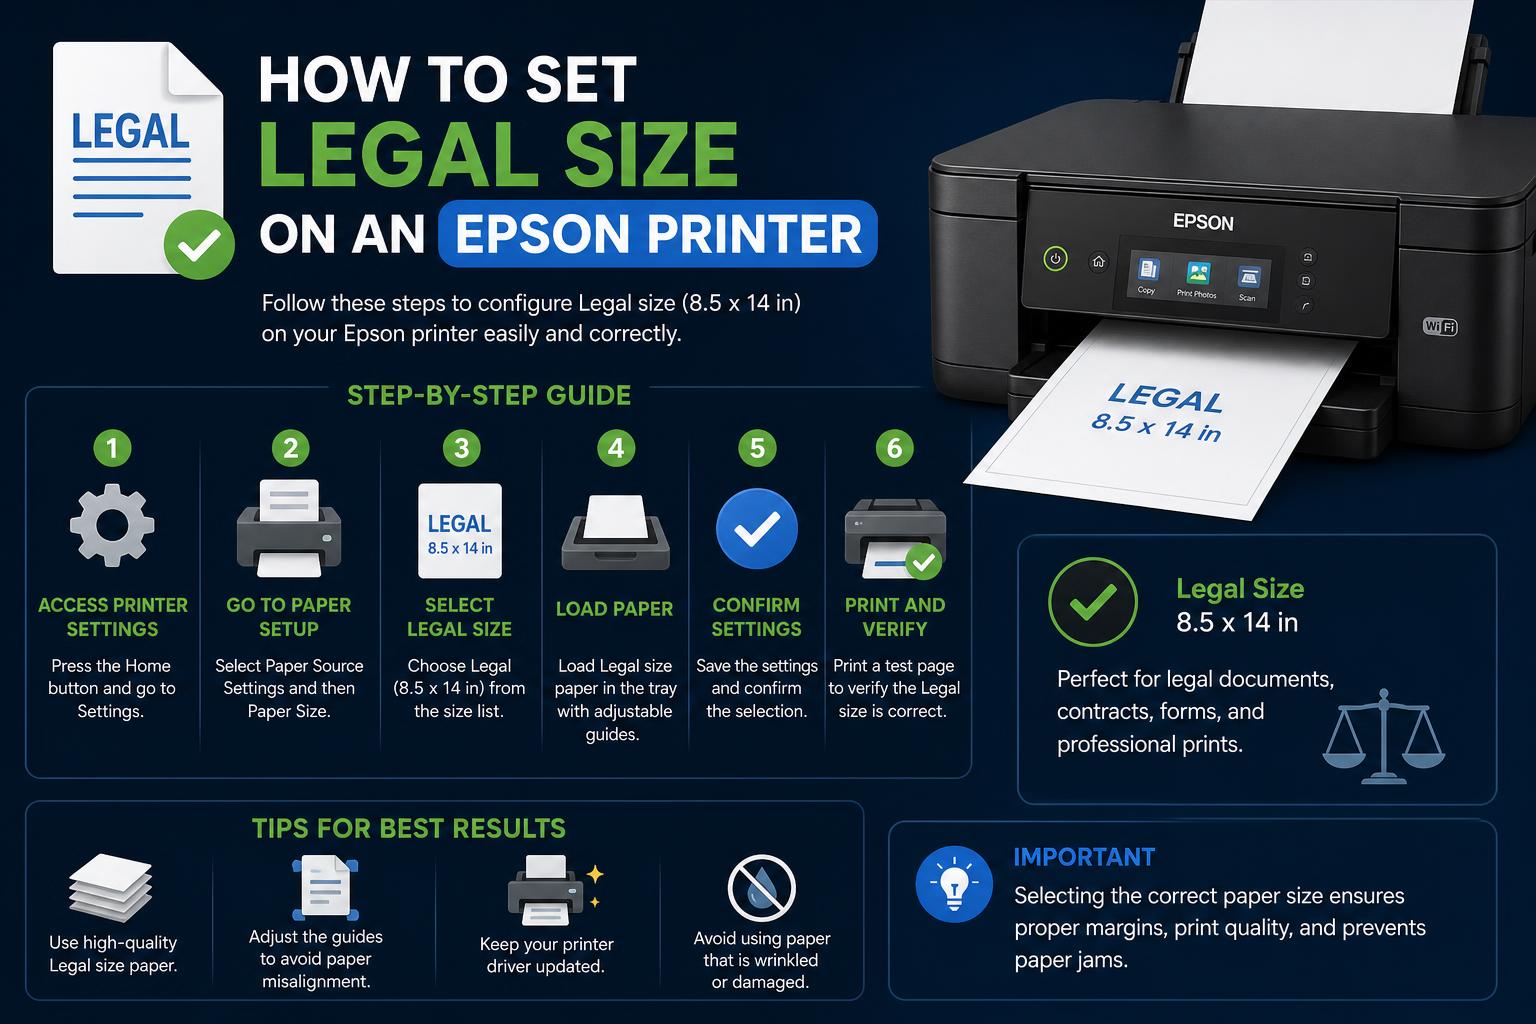
- Properly configuring legal size paper on Epson printers requires adjustments both on the device control panel and your computer's print settings.
- Troubleshooting mismatched sizes and paper feed issues often involves ensuring software and hardware selections coincide, and understanding how to create custom paper configurations.
- Each Epson model may have subtle differences in menu navigation, making a step-by-step process essential for success.
Setting up your Epson printer to handle legal size paper (8.5 x 14 inches) can sometimes feel like more of a hassle than it should. Maybe you’ve already spent far too long flipping through cryptic menus on either your printer’s LCD or in your print dialog box, or you’ve ended up with blank pages and paper misfeeds and thought, “Surely this should be easier!”
Rest assured, you’re not alone. Getting your Epson device to play nicely with legal size paper often requires a little more know-how than the average printer task. Maybe your documents print fine on letter but not on legal, or perhaps the settings aren’t even showing up as available. This guide pulls together every essential detail from official sources, real user issues, and advanced config tips, so you can finally get hassle-free, professional prints the first time.
Understanding Legal Size Paper and Epson Printers
First thing’s first — legal size paper measures 8.5 by 14 inches (216 x 357 mm), making it longer than the more common letter size. Not every Epson model supports legal size through every tray or feeder, so it’s always smart to double-check your printer’s specs on the official Epson website if you’re not sure. Models like the EcoTank ET-3843 and Workforce series generally support legal paper via their adjustable trays, but sometimes recognizing and configuring it needs a few extra tweaks.
How to Select Legal Size Paper Using the Control Panel
Most modern Epson printers have a built-in LCD control panel that lets you manage basic hardware settings without touching your computer. To set up your printer for legal size, you’ll want to go through these menus to match the physical paper you’ve loaded. The process will look very similar across models — here’s the general route:
- Press the Home button. This brings you to your printer’s main menu.
- Navigate to Settings or General Settings. On some models, you may just see Printer Settings directly.
- Within Printer Settings, select Paper Source Settings (sometimes it’s labeled Paper Setup or Paper Setting).
- Pick the tray or source that you’re loading your legal paper into. Many Epson machines allow you to set different defaults for each tray.
- Scroll to Paper Size and choose Legal (8.5 × 14”). Double check that the physical guides in your tray are adjusted to snugly fit the legal paper.
- Go to Paper Type and select what matches your loaded stock (typically Plain Paper for documents). Setting the correct type can help with print quality and ink usage.
- Some models, like the Workforce series, also offer a Favorite Paper Settings option to quickly recall commonly-used configurations.
- Once your selections are complete, hit the Home button to exit and save your settings.
This ensures your printer always knows what’s loaded—even before you send a job from your computer.
Custom Paper Setup for Unique Paper Sizes
What if your Epson printer won’t list legal size — or you need to use other custom sizes (like for invitations or specialty stock)? Many models let you create and save up to 30 custom paper profiles. This is especially useful for non-standard sizes, thick media, or anything not included in the defaults.
- Load your non-standard paper size into the tray. Make sure the guides fit snugly—misalignment often causes jams or blank prints.
- On your printer’s LCD, open the Menu and go to General Settings > Printer Settings > Custom Paper Setting.
- Select a slot or number to save this configuration.
- Choose Change Reference Paper: pick a preset that best matches the weight or finish of your custom paper (e.g., Photo Paper for glossy stock).
- Next, go to Advanced Paper Settings and adjust properties like Paper Thickness and, for roll media, Roll Core Diameter. If you see issues like horizontal banding, modify the Paper Feed Offset (default is 0).
- Adjust any other relevant settings as needed before exiting to save your profile.
Note: You can’t alter paper configurations created using the print driver or software from this LCD menu—they’re separate! Always be sure to match the settings chosen here with those in your driver for reliable prints.
Selecting Legal Size in Windows Printer Properties
Configuring your document on the computer side is just as important. If your printer is loaded with legal paper but the driver still shows letter or another size, you’ll get frustrating errors—or even blank pages.
On Windows machines, the computer-side configuration requires the following steps:
- Go to Devices and Printers via the Start menu (Windows 7/10/11) or Printers and Faxes (XP). Right-click your printer and select Printer Properties.
- Open the Optional Settings tab, then click Printer Settings.
- Each tray or source is listed—find the one where you’ve loaded legal paper and select Legal (8.5 × 14 inches) as the Paper Size Loaded.
- If you want extra insurance, tick the Paper Size Notice checkbox. This tells the printer to warn you if your job’s settings don’t match the physical paper, preventing smudges or cut-off prints.
- Click Apply and confirm changes before closing the dialog.
Trouble Finding Legal Size?
Sometimes, the legal option is missing—or the print dialog defaults to ‘Letter’ no matter what you do. Try these fixes:
- Reinstall the latest drivers from Epson’s Support page. Outdated drivers often miss newer paper options.
- Restart both your computer and printer after reinstallation or any major changes. This refreshes the device registry and network cues.
- If using applications with custom print dialogs (Word, Adobe, etc.), make sure the page size in your document setup matches—sometimes, the app setting overrides the system setting.
- Look for a User-Defined Size or Custom size in the print dialog. As a last resort, manually enter 8.5 x 14 inches to force compatibility.
Common Issues & Real-World Troubleshooting
It’s not unusual to do everything “right” and still see blank pages, paper jams, or “Out of Paper” errors. Here are some of the most common hang-ups and their solutions, based on real Epson user experiences:
- Printer Feeds Legal Size Paper but Doesn’t Print: If your machine pulls in legal paper but outputs blank sheets, check that both printer LCD and computer driver agree on paper size and type, and that the correct tray/source is selected each time. Try printing on letter size again—to eliminate ink, software, or connection issues.
- Paper Selection Not Available on Computer: If the legal size isn’t listed in your print dialog even after you reinstall drivers, double-check that your operating system and all printer-related software are updated. Sometimes, only after reinstalling and rebooting does the legal size option appear.
- Multiple Blank Sheets or Paper Jam: If the machine feeds multiple sheets or claims to be ‘out of paper,’ ensure the tray is loaded properly and guides are set flush to the paper—trays setting for smaller sizes will fail to grip longer legal sheets securely.
- Settings Don’t Match Between Printer and Computer: Epson printers will often throw errors or simply not print if the driver, control panel, and document setup are out of sync. Always verify all three before attempting large or critical print jobs.
If after these steps your printer is still malfunctioning, and especially if it works fine with other sizes and types, it may be worth exploring warranty options or contacting Epson support through their official channels. Hardware defects, while rare, can sometimes cause persistent feeding or recognition problems specific to larger paper sizes.
Best Practices for Reliable Legal Size Printing
With Epson printers, consistency is key. Matching settings at all points—from hardware tray to printer menu to software print dialog—will virtually eliminate the most common frustrations. Here are some pro tips for reliable results every time:
- Always load legal paper before configuring software settings. Let the printer detect the paper and set the guides properly.
- Update printer firmware and drivers regularly from the official portal.
- Use Favorite/Custom Paper Settings if you regularly switch sizes. That way, you avoid repetitive configuration every time.
- If you’re in an office environment with shared printers, double-check all queued jobs and printer resources before launching sensitive legal size prints, as previous users may have changed tray settings.
- If using AirPrint or other wireless printing solutions, ensure the “Paper Configuration” feature is enabled on your printer’s control panel. Disabling this feature can prevent certain advanced print functions (and AirPrint itself) from accessing all paper settings.
How to Create and Manage Custom Paper Profiles for Advanced Users
For designers, offices, and anyone needing unusual print media, Epson’s ability to create tailored paper profiles is a hidden gem. Setting unique thickness, texture, or offset values is especially handy for graphic production, invitations, or archival work.
- Prepare your chosen media and load it as you would legal or letter paper.
- On the printer LCD, go to Menu > General Settings > Printer Settings > Custom Paper Setting.
- Assign a custom slot and give it an intuitive name, if allowed by your model.
- Reference the closest preset (Baryta for photo, Matte for thick non-glossy, Fine Art for cotton, etc.).
- Access Advanced Paper Settings and tweak the parameters: thickness, feed offset, etc. This fine-tuning can resolve persistent print quality issues or banding on tricky stock.
- Save your profile for repeated use, minimizing wasted test prints and manual adjustments in the future.
Helpful Reminders
- Custom configurations set on the LCD panel usually do not override jobs sent from a software driver. When in doubt, verify and match all settings across both interfaces.
- Incorrect paper size settings can not only cause blank prints but also overpower the printer’s sensors, triggering warning messages or even risking jams—so never ignore setup prompts or notifications.
- If your printer throws errors about paper mismatch, try enabling the Paper Size Notice warning option in your Print Properties as extra insurance.
When All Else Fails: Warranty and Support Channels
If, after all these steps, your Epson is still stubbornly refusing to print on legal—or if it prints fine on smaller sizes but not legal, despite using proper guides—it’s probably time to contact Epson’s support or request warranty service. Especially if your device is relatively new, issues like double feeding, constant ‘out of paper’ errors, or repeated blank sheets despite working hardware signal a deeper fault.
You can search for your exact Epson model and open a support ticket on the or call their customer service for direct troubleshooting.
Printing on legal size paper with an Epson printer takes a little patience and extra care, particularly the first time. But once you’re familiar with matching hardware and software configs, saving favorite settings, and what to check if things go wrong, you’ll find even complicated jobs become part of your daily workflow. Taking a few moments to set up custom preferences and regularly update your drivers prevents hours of wasted time later. This preparation lets you handle contracts and legal forms as well as specialty invitations with confidence and consistency.