
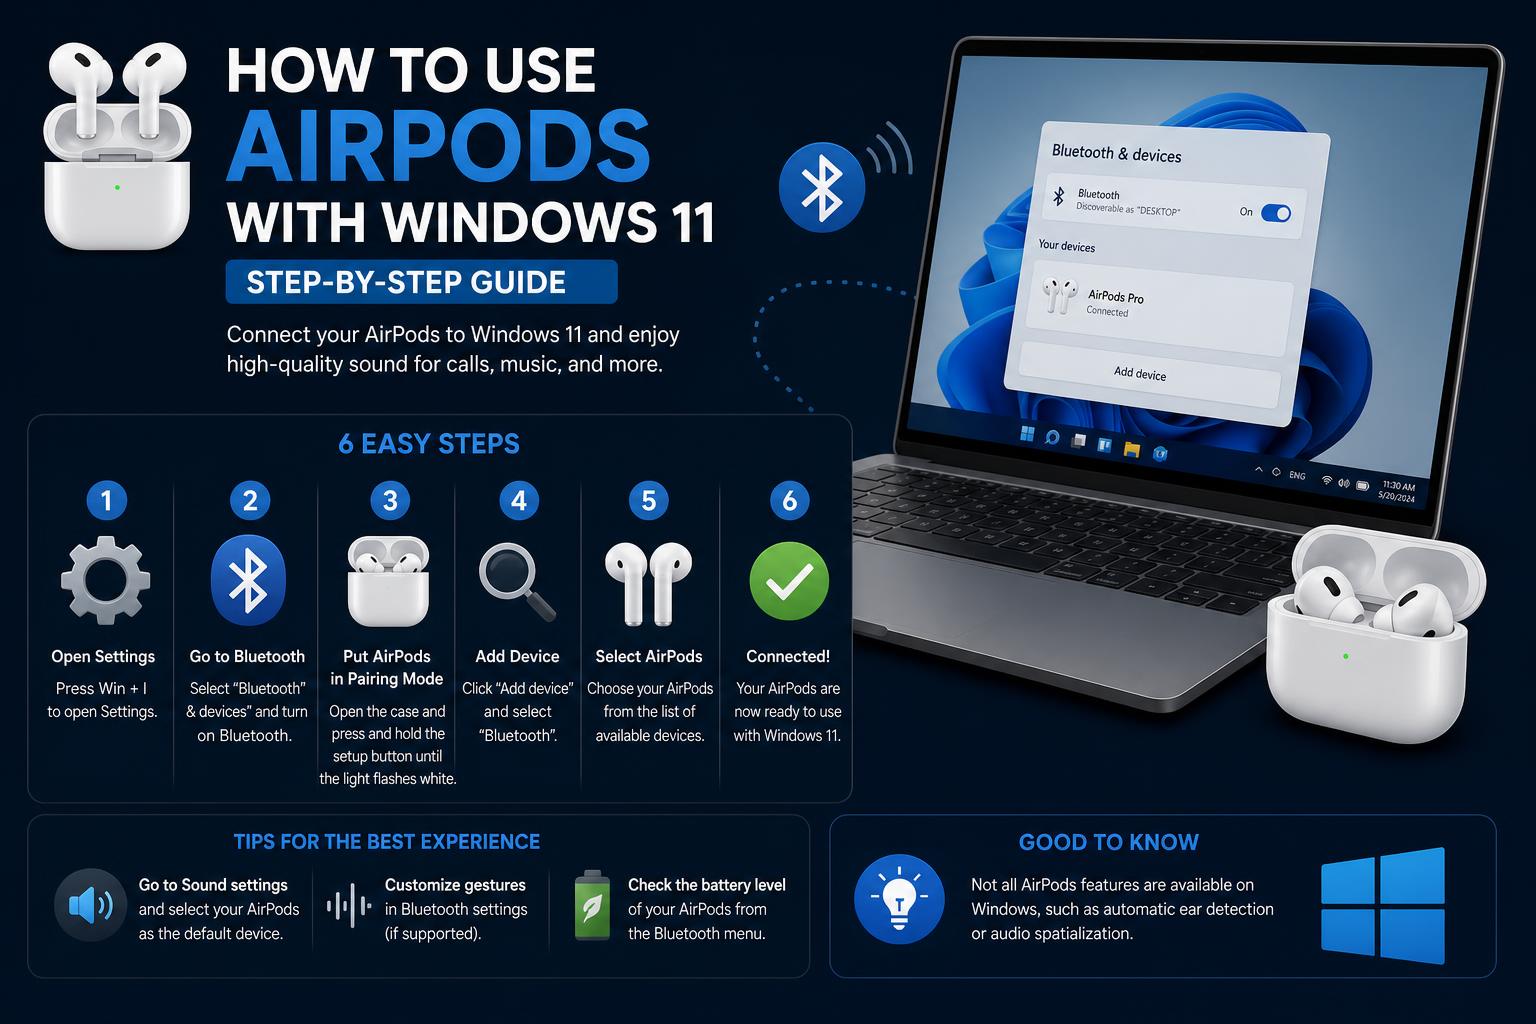
- AirPods connect easily to Windows 11 via Bluetooth, supporting all main audio features.
- The process only takes a few steps: pairing mode, adding via Bluetooth settings, and connecting.
- Some Apple-exclusive features won’t work, but sound and call functions are fully available.
Wondering if you can use your AirPods with your Windows 11 computer? You’re not alone! AirPods, while designed for Apple devices, are also versatile wireless earbuds that can work with many other platforms—including Windows PCs. If you’ve ever tried to connect your AirPods to your computer and ended up scratching your head at the process, this is the guide for you. We’ll walk through every detail, step by step, so you get the best, smoothest experience.
Pairing AirPods with a Windows 11 machine can seem tricky at first, especially if you’re used to the seamless experience on iPhones or Macs. But don’t worry—Windows 11’s improved Bluetooth interface and AirPods’ universal compatibility make it absolutely possible. This guide will not only give you the detailed instructions you need but also share some tips, troubleshooting steps, and a few expert tricks to help you enjoy music, calls, and movies on your Windows 11 PC through your AirPods. Let’s dive in!
Understanding Bluetooth Compatibility
AirPods are essentially Bluetooth headphones, which means they can work with any device that supports Bluetooth audio. Windows 11 supports Bluetooth just like most modern computers and laptops. Whether you own the AirPods (1st, 2nd, 3rd Gen), AirPods Pro, or AirPods Max, you can get them connected and working on your PC. However, because AirPods are optimized for Apple systems, you’ll be using standard Bluetooth features rather than Apple’s proprietary enhancements. This means some features—like auto-switching or custom gestures—won’t work, but the core functions (listening and calling) absolutely do.
Step-by-Step: How to Connect AirPods to Windows 11
Connecting your AirPods to a Windows 11 computer is mostly straightforward: you just need to get them into Bluetooth pairing mode, then have your PC search for and connect to them. No software installations are required—but attention to detail will make the process smooth. Here’s a thorough step-by-step breakdown:
- Charge Your AirPods First
Make sure your AirPods have enough battery. Ideally, the AirPods should have at least 20% battery before starting. Put both AirPods into the charging case (for AirPods Max, check charge status instead). - Put AirPods in Pairing Mode
This part differs depending on your AirPods model:
- AirPods (1st, 2nd, 3rd Gen), AirPods Pro (1, 2): With both AirPods in the case and the case lid open, press and hold the small, circular setup button on the back for about 5 seconds. The LED light inside (or on the case front for AirPods Pro) will start to flash white, indicating pairing mode.
- AirPods (4th, 5th Gen), AirPods Pro 3: Again, with both AirPods in the case and lid open, hold the case next to your device and double-tap the front until you see the status light flash white.
- AirPods Max: Press and hold the noise control button (located on the headphone) for about 5 seconds, until the LED flashes white.
- On Your Windows 11 PC: Open the Start Menu
At the bottom center of your screen (or left corner if repositioned), click the Windows logo. - Open Settings
Locate the gear-shaped icon and click it. This opens the Windows 11 Settings app. - Navigate to Bluetooth & devices
In the left navigation column, click Bluetooth & devices. - Add a New Device
Look for and click the blue ‘Add device’ button (usually in the upper area of the window, next to your currently connected devices or under Devices row). - Select Bluetooth
A pop-up will appear with pairing options: Bluetooth, Wireless display or dock, Everything else.
Click Bluetooth. - Pair to AirPods
Your computer will scan for available Bluetooth devices. After a few seconds, look for your AirPods (they may appear as ‘AirPods’, ‘Your Name’s AirPods’, or similar) among the listed devices.
Click on them to pair. - Complete the Pairing
Once your AirPods are selected, your PC will take a moment to establish a secure Bluetooth connection.
When it’s done, you should see a confirmation message: “Your device is ready to go”.
Click Done.
Tip: If you aren’t seeing your AirPods in the list, make sure they’re still in pairing mode (white flashing light). If the light has stopped flashing, repeat the pairing-step above to re-enter pairing mode.
Switching Between Devices
AirPods can only connect to one device at a time when paired through standard Bluetooth. That means if you regularly switch between a Windows PC and iPhone/iPad, you’ll have to reconnect each time. Once paired, reconnecting is simple: on your PC, go to Bluetooth devices and select your AirPods from the known devices list—no need to repeat the full process above unless you factory reset them.
Improving Connection Quality and Audio Experience
While AirPods are compatible with Windows 11, you might notice differences in audio quality compared to Apple devices. Some users report compressed sound or lag due to differences in Bluetooth codecs and drivers on Windows. To maximize quality, ensure Windows is updated, and try the following:
- Keep your AirPods and PC near each other for the best connection.
- Minimize other active Bluetooth devices in the vicinity to reduce interference.
- If possible, update your PC’s Bluetooth drivers, especially if you experience stuttering or drop-outs.
- Change your PC’s default audio output device to AirPods after connecting if you don’t hear sound through them right away. Right-click the volume icon, open ‘Sound settings,’ and make sure your AirPods are selected as the output device.
Note: Features like automatic ear detection, spatial audio, and seamless device switching remain exclusive to Apple environments and won’t function on Windows 11.
Disconnecting and Removing AirPods from Windows 11
Need to disconnect or unpair your AirPods from Windows 11? Here’s what to do:
- Go to Settings > Bluetooth & devices.
- Find your AirPods in the list of paired devices.
- Click the three-dot menu next to your AirPods, then select Remove or Disconnect as needed.
This will break the Bluetooth connection, but you can always pair them again using the earlier steps.
Troubleshooting Common Issues
Sometimes things don’t work perfectly on the first try. Here are some typical issues and solutions:
- AirPods Not Showing Up in Bluetooth List?
Ensure AirPods are in pairing mode (white flashing LED). Try restarting Bluetooth on your PC, or rebooting the computer if scan results seem incomplete. - No Sound After Connecting?
Check that the AirPods are set as your default audio output. Sometimes, Windows defaults to its speakers even after Bluetooth pairing. - Poor Audio Quality?
Windows Bluetooth drivers sometimes prioritize microphone use over stereo audio, leading to “telephone quality.” Try disabling the AirPods’ microphone in Windows’ “Sound settings” if you mostly want music or video playback. - Lag or Disconnection?
Move closer to your laptop or PC. If you have multiple Bluetooth devices in use, turn off those you aren’t using. Update your machine’s Bluetooth drivers via Windows Update or your device manufacturer’s website.
If problems persist, consider consulting the official Apple AirPods pairing guide for non-Apple devices, or checking in on reputable Windows help forums for advice tailored to your device model.
Frequently Asked Questions
- Can I use all features of AirPods on Windows 11?
While basic listening and call control (pause/play, answer calls if supported) work just fine, some features like spatial audio, instant device switching, and voice assistant shortcuts require Apple equipment and won’t be available on Windows 11. - Do AirPods Pro’s noise cancellation features work?
Yes, but control must be done manually via the AirPods stems themselves. The PC won’t be able to switch noise modes remotely. - Can I use one AirPod for calls?
Definitely. Remove one earbud if you prefer, and use just one for calls or music. Windows supports mono Bluetooth audio with AirPods. - Is microphone quality as good as on an iPhone?
Windows may default to low-bandwidth “headset mode” for Bluetooth mics which can reduce clarity. For meetings or calls, consider an external USB mic for best results.
Tips for a Seamless AirPods + Windows 11 Experience
- Always start with a fresh Bluetooth pairing if you switch often between devices—it takes under a minute and helps avoid cross-device confusion.
- If your AirPods ever show as “connected” but you hear no sound, toggle Bluetooth off and back on from within Windows. This often resolves connection glitches.
- For multi-device households, consider naming your AirPods within Apple’s system (from an iPhone) so they appear uniquely in the Windows Bluetooth list.
Community Solutions and Additional Resources
For rare and trickier situations, turning to the community can help. The Microsoft Answers forums sometimes provide useful user-to-user advice for device-specific problems, and subreddits like ‘r/WindowsHelp’ are full of helpful suggestions and alternate workarounds. However, keep in mind that some issues—especially those involving hardware or driver limitations—simply require patience or a workaround rather than a perfect fix.
You can also check the official Microsoft Answers forum for more personal troubleshooting help.
If additional help is required, or if you suspect your Bluetooth hardware may be outdated, check whether your PC’s manufacturer offers updated drivers or firmware—manufacturers like HP, Dell, and Lenovo often provide tailored downloads for better Bluetooth support.
Following a revision, the final paragraph now begins with a sentence that links to the context—avoiding concluding phrases—while maintaining content that is informative and useful to the reader.