
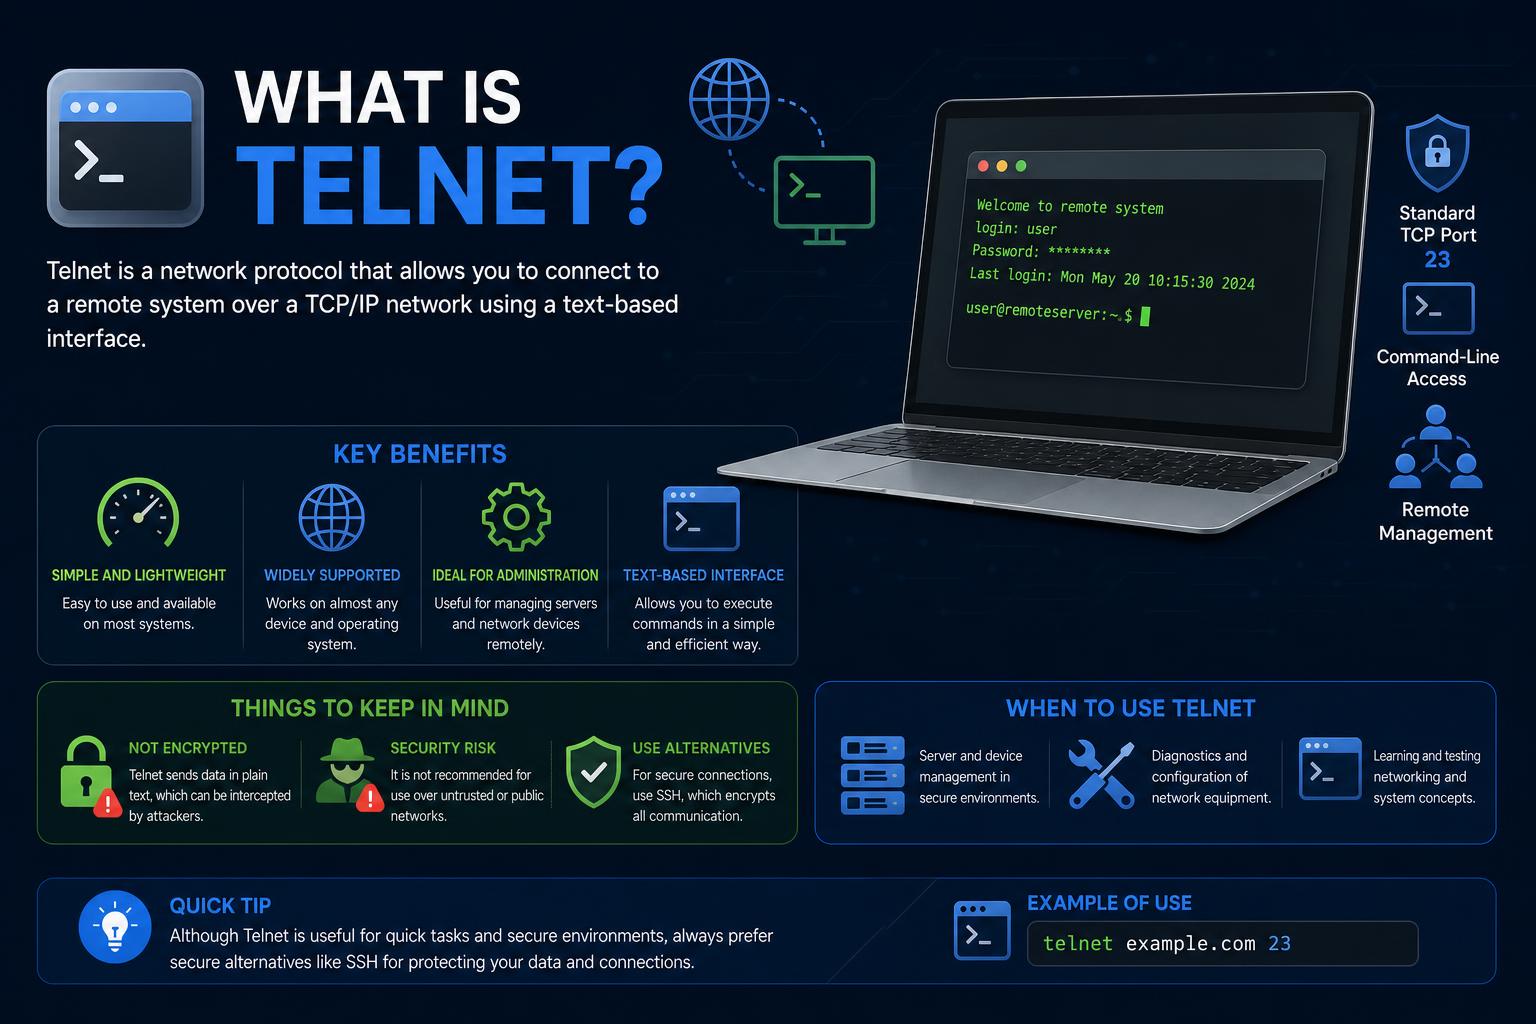
- Telnet is a foundational remote access protocol that shaped early network communication, allowing users to connect to and control computers over a network as if they were sitting right in front of the remote machine.
- The protocol's simplicity enabled wide adoption but its unencrypted nature led to major security concerns, which has relegated its use to trusted networks and legacy equipment today.
- Despite being replaced by more secure protocols like SSH for sensitive operations, Telnet's architectural concepts, command set, and troubleshooting value remain relevant for technical education, diagnostics, and certain niche applications.
For anyone who has worked in IT, networking, or just dabbled with old-school command-line tools, the word “Telnet” probably rings a bell. Once a staple of remote administration, testing, and troubleshooting, Telnet is the protocol that helped millions of users and admins connect to distant systems with little more than a command prompt. Even though times have changed and security needs have skyrocketed, Telnet’s story remains crucial to understanding both the roots of the Internet and why some technologies fade away.
Let’s peel back the layers on Telnet—what it is, why it was so integral to early networking, how it works behind the scenes, and why it largely gave way to more secure alternatives. If you’re a student, techie, or even an old pro looking for a refresher, you’ll get the full scoop here, including practical insights for those rare situations where Telnet still comes in handy.
What is Telnet?
Telnet is a network protocol and an application that originated well before the web as we know it. Designed in the 1960s, its purpose was simple but revolutionary at the time: let a user at one computer log in and interact with another computer (often a mainframe or minicomputer) across a network. Through Telnet, the user operates the remote system as if sitting at its command-line terminal—running programs, altering files, or performing administrative tasks.
The name itself, “Telnet,” is sometimes described as short for “Teletype Network” or “Telecommunications Network.” Regardless of its etymology, the core idea is the same: create a bidirectional, text-based communication channel between two machines. Telnet remains a key stepping stone in the evolution of remote access technology, forming the foundation for many of the concepts that power today’s cloud and server management tools.
A Look Back: The Origins and History of Telnet
The history of Telnet runs parallel with the early days of ARPANET—the research project that later birthed the modern Internet. In the late 1960s, computer scientists and researchers needed a way to access mainframes and minicomputers remotely, regardless of geographical distance. That’s where Telnet came in.
Formalized in 1983 with RFC 854 and RFC 855 (the duo that makes up Internet Standard 8), the protocol’s specifications reflected the collaborative, open ethos of the early networked world. Back then, network security wasn’t even on the radar, so Telnet focused on universality and ease of remote command execution.
By the 1970s and 1980s, Telnet was everywhere—from universities and research labs to mainframe installations across the world. No surprise: it enabled people not just to log in, but to manage resources, transfer files, and communicate in real time, all via simple terminal commands.
For decades, this protocol was the workhorse of remote system access, collaboration, and even early networked game development. Over time, as the Internet became more open and attackers got savvier, the glaring lack of security in Telnet pushed the community to develop safer alternatives—most notably, SSH (Secure Shell).
How Telnet Works: Under the Hood
Telnet operates strictly on a client-server architecture. One computer (say, your laptop) runs a Telnet client application and reaches out to another system where a Telnet server is waiting for connections. Once connected, you get what looks, feels, and works almost exactly like a local command-line session: commands you type are sent over the network and executed by the remote machine, which then sends the results back to your screen.
Here’s the play-by-play of a typical Telnet session:
- 1. Starting the Session: You use a terminal (Command Prompt, Terminal, or a dedicated app) and enter something like
telnet remoteserver.com(default is port 23, but you can specify another if needed). Your client reaches out using TCP/IP. - 2. Connection Established: If the remote machine is running a Telnet server that’s listening on the right port, you’re prompted for login credentials.
- 3. Command Time: Once authenticated, any command you type is sent to the remote server, which executes it just as if you were sitting at its console. Output and messages are sent back for you to read or interact with.
- 4. Ending the Session: When you’re done, you typically type
exitorquitto close the session.
One of Telnet’s key innovations was the use of the Network Virtual Terminal (NVT). The NVT acts as a universal translator—commands and keystrokes from your device are converted into a standard character set, so no matter what brand or type of system is on either end, they can communicate smoothly. This cross-compatibility made Telnet indispensable in a world full of unique, incompatible hardware.
Key Technical Features of Telnet
- Transport Protocol: Telnet rides on the TCP (Transmission Control Protocol) layer, almost always using port 23, though port 992 is reserved for Telnet over SSL/TLS (which is rare).
- Full Duplex, Character-Based: Data streams in both directions at the same time, supporting real-time command entry and output.
- Unencrypted Data Transmission: This is both Telnet’s superpower (speed, simplicity) and tragic flaw (security problems)—messages, usernames, and passwords are all sent in plain text.
- Extensible: Telnet defines a set of commands and options negotiated during the session. These include authentication, character handling, and auxiliary features like window sizing or terminal type.
Logging In: Local vs. Remote Sessions
Telnet works for both “local login” (where you log into your own machine via a terminal) and “remote login” (which is what most people mean when they say Telnet). In a local login, your commands are processed by your own operating system; in a remote login, your input gets sent over the network to another machine via the Telnet client, which then converts it using the NVT format before handing it off to the server.
During remote login, here’s what happens step by step:
- You type a command.
- Your OS accepts the keystrokes, but doesn’t process them—instead, it passes them to the Telnet client.
- The client re-codes the input to NVT format, then forwards the data through the TCP/IP stack to the other system.
- The Telnet server receives, decodes, and passes your input as if it came from its own keyboard.
- The remote system executes the command or request and returns output back along the chain.
For users, this process is usually invisible—you’re just typing commands and seeing responses just as if you were on the remote machine’s own console.
The Telnet Protocol: Commands, Options & Modes
Telnet Command Structure
Telnet’s protocol includes a suite of control commands—distinct from the operating system commands you might type at the prompt—built into the data stream. Each Telnet command is at least two bytes long. It always starts with the “Interpret As Command” (IAC) byte, which is 255 in decimal. The next byte is the action or option code. Here are some of the most important ones:
- WILL (251): Offer to enable a feature or acknowledge the other side’s request to enable it.
- WON’T (252): Refuse or disable a feature.
- DO (253): Request that the other party enables a feature, or approve their offer.
- DON’T (254): Instruct the other side not to enable a feature, or accept their refusal.
Commands go back and forth as Telnet negotiates session features like echo, terminal type, binary mode, line width, and more.
Common Telnet Options
- Binary Transmission (0): Treats the data stream as 8-bit binary, not just ASCII or text.
- Echo (1): Turns on echo (the server sends back what you type, useful so the client sees what the user is typing).
- Suppress Go Ahead (3): Removes the old-school “Go Ahead” signal—handy for modern, full-duplex comms.
- Status, Timing, Terminal Type, Line Mode, Terminal Speed: These allow the client and server to negotiate how to handle input/output, window sizing, editing, and character pacing.
Operation Modes
- Default Mode: Command input is echoed by the client and sent to the server in batches (typically, after a full line is completed).
- Character Mode: Each individual character is sent as soon as typed, allowing for real-time interaction. The server usually echoes back.
- Line Mode: Entire lines (with possible editing/echo handled on the client) are transmitted at once.
What Makes Telnet Unique? The Role of Network Virtual Terminal (NVT)
Because early computers used wildly different hardware, encoding, and protocols, Telnet introduced the Network Virtual Terminal (NVT). This is basically an abstract keyboard and display system that all Telnet clients and servers agree to “speak.” Before anything is sent, your Telnet client converts your keystrokes to NVT format, and the server on the other end decodes back from NVT. This universal language is the secret to Telnet’s cross-platform magic.
Practical Uses of Telnet: Classic and Modern Scenarios
- Remote Administration: System admins used Telnet to configure, troubleshoot, and manage networked devices including routers, switches, firewalls, and servers.
- Network Device Configuration: Even today, some legacy hardware (especially industrial or scientific devices) only supports Telnet for remote access.
- Troubleshooting and Diagnostics: Telnet can directly connect to any TCP/IP port, making it perfect for checking if a device/service (like SMTP, HTTP, or FTP) is responding.
- Testing Application Connectivity: Developers and QA teams use Telnet to debug how applications communicate with servers, or to send raw commands to services for manual testing.
- Accessing Legacy Systems: Some environments (older mainframes, IOT modules, industrial controls) still require Telnet for basic management tasks.
- Educational & Lab Use: Telnet is a favorite in educational settings for demonstrating client/server architectures and the basics of networking without the complication of encryption and modern authentication layers.
- BBS and Online Services: The heyday of dial-up bulletin boards saw Telnet as the gateway to online communities, multiplayer games, and news feeds—some BBSs still operate today, accessible via Telnet.
Security Weaknesses: Why Telnet Is No Longer Mainstream
This is the part where Telnet falls flat by today’s standards: every single character, password, and command you send travels the network unencrypted. Anyone sniffing packets on the network—whether a hacker, a rogue admin, or just someone connected to the same WiFi—can read everything you type, including sensitive logins or even entire remote sessions.
Main Telnet security risks:
- Data Sniffing: Without encryption, tools like Wireshark can capture all your session data, including credentials.
- Session Hijacking: Because Telnet sessions are not secure, a bad actor can intercept and even hijack ongoing sessions.
- Man-in-the-Middle Attacks: No native authentication means attackers can inject malicious commands or intercept and modify traffic mid-stream.
- Target for Malware and Botnets: Malicious actors scan for open Telnet ports (especially 23) to compromise unsecured devices, especially vulnerable IoT gadgets and poorly configured network gear.
The security gap here is glaring. That’s why the SANS Institute, network device vendors, and just about every security pro recommend SSH (Secure Shell) as a much safer alternative for remote access. SSH encrypts all traffic, verifies both ends of the connection, and supports modern authentication (including public key, certificates, and two-factor methods).
What About Telnet Over Secure Networks?
Sometimes Telnet is still used, but only within tightly controlled, trusted, air-gapped, or “internal only” networks. For instance, it’s sometimes allowed for accessing local equipment in labs or private company intranets where exposure is impossible. Even then, best practices require:
- Limiting Telnet use strictly to trusted networks.
- Enabling access controls (IP whitelisting) and strong OS authentication.
- Using a VPN to encrypt external hops. VPNs can, to an extent, shield Telnet traffic over untrusted links, but the Telnet session itself is still unencrypted once it hits the internal network.
- Considering Telnet over SSL/TLS (TelnetS), though this remains rare compared to SSH adoption.
Network monitoring and intrusion detection systems should also be used anywhere Telnet is deployed to quickly identify unauthorized activity.
Telnet vs SSH: How Do They Compare?
SSH (Secure Shell) is the modern, ironclad replacement for Telnet. Here’s a breakdown:
| Feature | Telnet | SSH |
|---|---|---|
| Encryption | No | Yes (strong) |
| Default Port | 23 | 22 |
| Authentication Types | Username/password (plain text) | Username/password, public/private key, 2FA, certificates |
| Other Features | Text-based remote access only | Text-based access, file transfer (SCP/SFTP), X11 forwarding, port forwarding |
| Modern Adoption | Rare; legacy-only | Industry standard for secure remote administration |
In short: SSH does everything Telnet does and much, much more, all while wrapping your session in a secure, encrypted tunnel.
When and Why Would You Still Use Telnet?
Despite all its issues, Telnet isn’t dead yet — there are still pockets where it’s not just useful, but necessary. Examples include:
- Legacy Systems: Devices or software (especially in manufacturing, science, and industrial settings) that never got an update for SSH or newer protocols.
- Educational Labs: Teaching networking basics, command line interactions, or protocol debugging in a safe, sandboxed environment.
- Network Service Testing: Want to check if a SMTP, HTTP, or custom TCP port is open and responsive? Telnet is a quick and easy way to send and receive plain text to any listening port. For example,
telnet mail.example.com 25connects to an SMTP server to test email sending. - BBS and Vintage Gaming: There are still thousands of Bulletin Board Systems (BBS) and even text-based games accessible by Telnet clients.
Just remember: any time you use Telnet outside a tightly secured network, assume every keystroke is visible to anyone listening. Never use Telnet to send sensitive data or credentials over untrusted networks.
Enabling and Using Telnet: Modern OS How-Tos
Windows
On most current Windows versions, the Telnet client is available but not enabled by default. Here’s how to enable it:
- Open Control Panel and go to “Programs and Features”.
- Select “Turn Windows features on or off”.
- Check “Telnet Client” and confirm. Wait for Windows to install the component.
To connect via Command Prompt:
- Open the command line.
- Type
telnet [hostname or IP] [port]. - If the connection succeeds, you’ll usually see a blank screen or a welcome message from the target server—you’re in!
macOS and Linux
- macOS: In many versions of macOS you can install Telnet via Homebrew (
brew install telnet), since it’s no longer included by default. On older versions, it’s included in the system by default. - Linux: Most distributions provide Telnet through their package managers. For example:
sudo apt install telneton Debian/Ubuntu-based systems, orsudo yum install telneton Red Hat and derivatives.
Once installed, open the terminal and use the same syntax:
telnet [IP address or hostname] [port]
Essential Telnet Commands (Within a Session)
Remember, there are two types of commands in Telnet: The ones you send to the remote machine (for example, ls on Linux or show ip on a router), and the Telnet protocol commands (control and option negotiation handled in the background).
- Telnet Client Commands: These start with the escape character (
Ctrl+]), which lets you enter Telnet’s command mode. From there, you can typehelpto see options likeclose,quit,status, oropento start a new session.
Some common commands after logging in:
- help: Lists the commands available on the remote system.
- show ip config: Shows the network configuration of the remote system (Cisco, Juniper, etc.).
- ping [host]: Tests connectivity from the remote system.
- exit/quit: Ends the session.
Telnet and Port Testing: A Modern Diagnostic Tool
One of Telnet’s modern capabilities is simple port testing. Even if you’re not using it for shell access, Telnet is great for confirming whether a port on a server is open and responding:
telnet mail.example.com 25– Is the remote SMTP server responding?telnet webserver.com 80– Is the HTTP server reachable?
When you connect to a port this way, you’re simply sending and receiving data over TCP, without actually speaking the Telnet protocol. It’s an essential technique for network administrators and engineers.
Telnet in Context: Interoperability with Other Protocols
Telnet is part of the classic “big three” of remote network protocols, alongside FTP and SMTP. It forms the basis for:
- File transfer (with FTP for File Transfer Protocol)
- Sending email (SMTP for Simple Mail Transfer Protocol)
- Handshaking with legacy applications that need plain-text, line-by-line input
Its command structure and negotiation model remain fundamental to many modern protocols used in network and IoT device management.
Applications and Tools That Support Telnet
Although the basic “telnet” command is widely available, there are third-party tools and emulators that add extra utility to the protocol:
- PuTTY: One of the most popular open-source terminal emulators, supporting SSH, Telnet, rlogin, and raw TCP connections (official site).
- SecureCRT, TeraTerm, ZOC Terminal: Commercial emulators offering scripting, session management, and multi-protocol support.
- cURL: Although not a classic Telnet client, cURL can interact with Telnet servers for automation.
- NCSA Telnet, SyncTERM, Rtelnet, Inetutils (a Linux package with both client and server support), and others.
Best Practices: Safe Use of Telnet (If You Really Must Use It)
Given its limitations, always avoid using Telnet on open or untrusted networks. If there’s no alternative, take these precautions:
- Restrict access via firewalls or at the device level, allowing connections only from trusted IPs.
- Use strong, unique passwords, even though the protocol can’t protect them—it’s your last line of defense.
- Consider using a VPN to encrypt all traffic when using Telnet outside of isolated test networks.
- Continuous monitoring with intrusion detection systems to catch unauthorized activity.
- Whenever possible, replace Telnet services with SSH as part of regular security reviews.
What Replaced Telnet?
SSH (Secure Shell) is the clear winner in the race for secure remote access. SSH’s support for public-key authentication, port forwarding, file transfers, multiplexing, and industrial-grade encryption has made it the standard for modern administrators and infrastructure professionals.
Protocols like RDP (Remote Desktop Protocol), VNC, and even web-based admin panels have also filled the niches Telnet once occupied, offering graphical interfaces or more robust encryption layers.
Even so, studying Telnet is like dusting off the blueprints of the Internet’s earliest days. It’s still used in teaching, as a diagnostic tool, and for accessing digital pockets that haven’t been updated or changed over time.
Although Telnet is no longer the star of secure remote access, its impact on network administration and cross-platform interoperability is undeniable. Understanding how it works can be useful for troubleshooting connectivity issues, checking services, or interacting with older devices. That said, always keep its vulnerabilities in mind and move to more secure protocols whenever you can. Like many older technologies, understanding Telnet is a journey through both innovation and its limitations in the world of networking.