
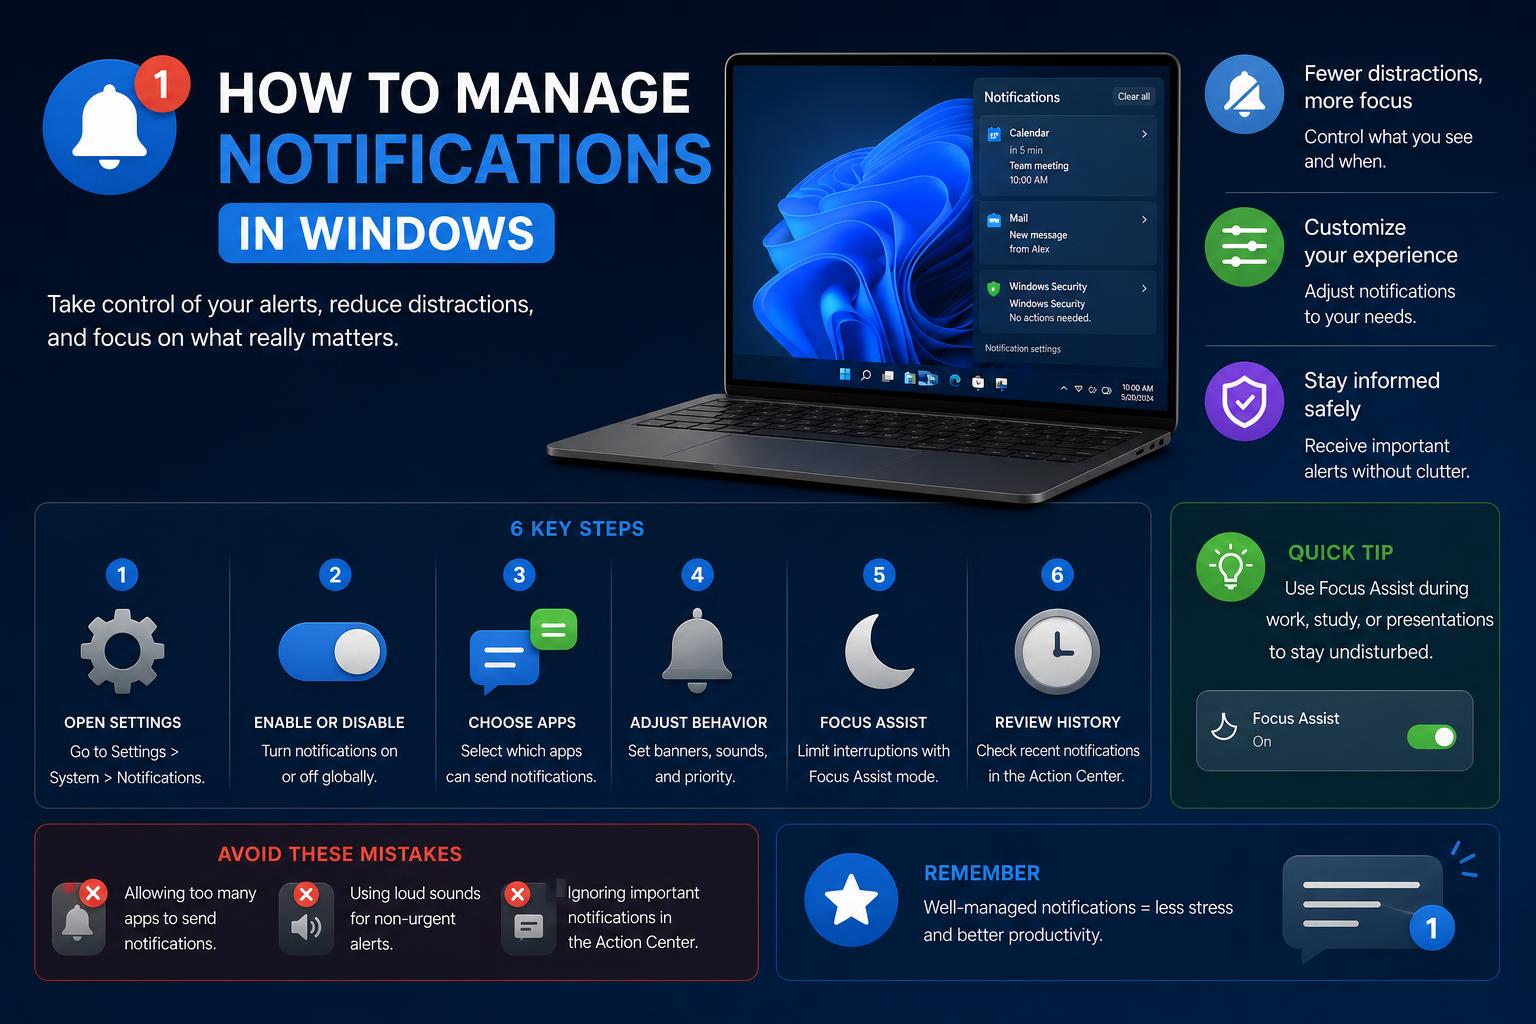
- Windows 11 notification settings allow detailed control—mute globally, by app, or customize banners and sounds.
- Focus sessions provide temporary relief from distractions without disabling vital system alerts.
- Special app integrations like Microsoft Teams offer granular notification management, including channel and meeting settings.
Non-stop pop-ups and beeps from your Windows 11 device can feel overwhelming. You’re definitely not the only one. Notifications help keep us informed, but their incessant buzz can kill productivity and make it tough to focus, whether you’re cranking out presentations or just enjoying your time online.
Windows 11 makes it easy to take the reins and manage, disable, or tweak notifications exactly the way you want—so you receive only what matters, when it matters. If you’re ready for a cleaner, less distracting experience, read on. Complete guide to Windows 11 notifications, special app controls (like Microsoft Teams), and explains how to reclaim your attention once and for all.
Understanding Windows 11 Notifications and Why They Matter
Windows notifications serve as alerts from apps, the operating system, and websites you interact with. They come in all shapes and sizes: a new Teams message, your favorite email’s arrival, system update reminders, calendar events, or even browser-based prompts. Too many notifications can add friction to your workflow, even when individual alerts provide value.
Beyond interruption, notifications can pose risks. Certain websites or suspicious browser extensions might send you malicious ads or spammy alerts. Windows does let you control and even block these individually, but it helps to know where to look and how to root out the source.
Fastest Ways to Access Windows Notification Settings
Before digging deep, let’s uncover the notification shortcuts so you can reach your notification controls in seconds:
- Taskbar Shortcut: Right-click the date and time section on the lower-right corner of the taskbar and choose Notification settings. This gets you directly to the notifications preference panel.
- Keyboard Shortcut: Hit Windows key + N to bring up the Notification Center, where you can quickly read or dismiss alerts.
Customizing or disabling notifications is all about knowing where to look. Comprehensive notification controls are available in Windows 11:
- Click the Start menu (Windows logo at bottom-left of your screen).
- Find and click Settings (the gear symbol).
- In the Settings sidebar, select System.
- Click Notifications on the right panel.
You’re now in the main notifications control center, where you can toggle global, per-app, and advanced settings.
Turning Off Notifications: Globally or App-by-App
The most immediate way to silence all notifications is flipping a single switch at the top of the Notifications page. This blocks all pop-ups, banners, and sounds—from every app and the operating system. But you don’t have to go nuclear: you can selectively mute only the noisy apps without losing system reminders or important updates.
- At the top of the Notifications panel, find the main Notifications On/Off toggle. Switch to Off to mute everything.
- To mute only certain apps (like browsers or games), scroll down to “Notifications from apps and other senders“. Locate the app, and flip its switch to Off.
- Tip: Apps with persistent nuisances, especially browsers with unwanted pop-ups, can be silenced here. If the alert comes from a shady browser plugin, consider clearing your cache and restarting the browser after disabling notifications.
Customizing Notification Banners, Sounds, and Priority Levels
Want to keep alerts but make them less intrusive? Here’s what Windows 11 lets you fine-tune:
- Show notification banners: These are the rectangular toasts that fly out at the top right. Each app lets you enable or disable banners, so you can keep them for critical apps and turn them off for less important ones.
- Show notifications in notification center: Choose if an app’s alerts stick around in the Notification Center for later review or not.
- Play a sound when a notification arrives: Don’t like notification chimes? Silence them per app—great if you want visual alerts only.
- Priority of notifications: Set how “loud” or urgent an app’s alerts are. You can choose between Top, High, or Normal priority. This controls their order and visibility within Notification Center.
To adjust these, click the app name from the notifications app list and you’ll get detailed options.
Focus Sessions: Temporary Relief from Distractions
If you need an undisturbed hour of deep work—but don’t want to turn off all notifications long-term—try Windows 11’s Focus feature. It’s an evolution of “Focus Assist” from past versions and acts like a DND (Do Not Disturb) shield that blocks notifications while you concentrate.
- Head to Start > Settings > System > Focus.
- Choose the duration of your focus session (use the +/- to set time).
- Before you start, check the options to:
- Show a timer in the Clock app
- Hide app badges on the taskbar
- Prevent taskbar apps from flashing
- Turn on Do Not Disturb
- Click Start focus session and enjoy a break from pings and pop-ups!
If you want to keep things distraction-free but still receive the most crucial messages, just adjust what is allowed through “During focus sessions” in settings.
Fine-Tuning: Managing Notifications from Apps and External Senders
Every installed app, from email clients to games and browser extensions, can send notifications. Windows makes it easy to manage each sender’s permissions:
- In Settings > System > Notifications, scroll down to Notifications from apps and other senders.
- For each app, you can individually:
- Enable or disable all notifications
- Allow/disallow banners
- Choose if messages appear in Notification Center
- Decide if sounds play with alerts
- Change notification priority
Special note for malicious browser pop-ups: If your browser appears here and keeps showing spam notifications, disable them for that browser. If pop-ups persist, inspect for rogue browser extensions, clear the cache, and restart the browser to flush out the culprit.
Deleting Specific Notification Entries (Advanced)
Sometimes, you’ll notice a lingering app or website in the “Get notifications from these senders” section—even after you’ve muted it. If you want to erase a notification entry completely, the only method is to uninstall the related app. Just disabling notifications won’t make the entry vanish from the list.
If an unfamiliar entry (“via Microsoft Edge”, for example) remains, double-check what app or extension is responsible. If it’s a browser-based source, disabling and clearing browser data or uninstalling related browser extensions usually suffices.
Getting Even More Granular: Teams and Other Microsoft App Notifications
Apps like Microsoft Teams have their own rich notification ecosystems, letting you set alerts for messages, meetings, status changes, and much more. To finely control Teams notifications:
- In Teams, click your profile photo, then Settings.
- Select Notifications and activity.
Within Teams, you can access granular notification controls:
- Mute all notifications except calls and meetings (especially for Windows users).
- Pick specific sounds for urgent messages or priority contacts.
- Choose whether message and content previews display in pop-ups.
- Control if notifications appear while in calls or meetings—keep things silent if you want undisturbed video time.
- Even relocate notification banners to the screen corner of your choice and set size (“Comfy” or “Compact”).
Activity Emails and Recap Summaries
Missed some notifications while away? Teams can send summary emails at intervals you choose—or you can switch them off entirely via the Missed Activity Emails setting.
Customizing Channels, Threads, and Meeting Alerts in Teams
Teams offers pinpoint control for where, when, and how notifications hit:
- For channels: decide if you receive alerts for all new posts, only mentions, or replies to threads you follow. You can “follow” threads to prioritize them.
- For meetings: toggle on or off notifications for meeting start, chats, and meeting join information.
- Presence/Status: Get pinged when key co-workers go online or offline—great for tracking collaboration windows.
- Calendar and meeting invites can be managed separately, letting you mute invites, updates, or cancellation alerts as preferred.
- App-specific: Each app integrated with Teams, like Power BI or Loop, may have its own custom notification settings. Use toggles to enable/disable or choose how banners display.
Teams on macOS: Integrating with Native Notifications
Teams notifications integrate seamlessly with the macOS notification system if you’re using Microsoft Teams on a Mac. Just make sure notifications are enabled at the OS-level:
- Go to System Settings > Notifications, select Microsoft Teams, and enable Allow notifications.
- If you’re mirroring or sharing your display and want to get banner notifications during presentations, confirm this option is enabled for Teams in the same Notifications panel in System Settings.
- Running Focus (Do Not Disturb)? Add Teams to your Allowed Apps to keep work messages flowing.
- For sound notifications, ensure “Play sound for notification” is enabled, and tweak Alert volume as desired.
You can also test notifications via the Teams settings panel to confirm everything’s set up right.
Managing Notifications on Windows 11 for Other Apps
Each application installed on your PC generally has its own notification options. Typically, you’ll find these within the app’s native settings or options menu. For the widest control, however, the system-level notifications menu brings everything under one roof. It’s especially vital for cross-platform apps like Microsoft Teams or Outlook, where you may want granular control for both work and personal accounts.
Tips for Proactive Notification Management
Even after you configure your perfect notification landscape, your needs might evolve. Here’s how to keep things tidy and productive:
- Regularly audit your notification list. New apps are often allowed to send alerts by default—review permissions periodically.
- Balance productivity with awareness: Turning off critical system or security notifications could mean missing important updates.
- Avoid notification fatigue. Use Focus sessions for deep work, mute unnecessary apps, and let only the essentials break through.
- Be vigilant for suspicious entries. If a new app or browser extension appears out of nowhere or behaves oddly, disable notifications and investigate further.
Managing notifications in Windows 11 transforms your PC into a hub that keeps you informed on your terms. You don’t have to settle for constant interruption—or total silence. With a few targeted tweaks, you can enjoy all the convenience of timely reminders and updates without the digital clutter or chaos.