
- Understanding DLL file roles, placement, and why correct location matters in Windows 11.
- Step-by-step guidance for identifying missing DLLs and safely adding or registering them.
- Risks and best practices to avoid malware or improper fixes when handling DLL files.
- When to use Windows built-in tools and when to contact support for persistent DLL issues.
Anyone who’s ever used a Windows PC has probably run into the classic “missing DLL file” error. It’s almost a rite of passage, especially when trying to fire up games, launch a favorite utility, or after upgrading to a new version of Windows – like the leap to Windows 11. These errors seem cryptic, but with the right approach, they’re both understandable and fixable.
In this guide, we’re cutting through the confusing advice you’ll find scattered across the web. We’re breaking down, step-by-step, not only where to put DLL files in Windows 11, but also why these errors happen, when you need to register DLL files, and the crucial security tips for handling these files safely. Whether you’re a casual user battling pop-ups or a budding developer shipping projects, this is your one-stop guide to all things DLL on Windows 11.
Understanding DLL Files: What Are They and Why Are They Crucial?
Dynamic Link Libraries (DLLs) are the backbone of the modular philosophy that powers Microsoft Windows. Instead of every program duplicating commonly used code, DLLs allow software to pull in shared functionality – think printing support, file dialogs, media codecs, or even advanced graphics. By referencing these libraries, developers save disk space, minimize memory use, and simplify updates across many applications.
When a program can’t find a specific DLL, it may refuse to launch, or certain features may stop working. Windows 11 keeps this modular approach, but sometimes files go missing due to incomplete installations, system updates, or even corruption caused by malware.
Why Do DLL File Errors Happen, Especially on Windows 11?
The story behind a missing DLL message isn’t always the same. Common scenarios include:
- Incomplete Software Installation: Something interrupted your install, or older installers aren’t fully compatible with Windows 11.
- System Updates: Major Windows updates can, in rare cases, leave an app looking for a DLL that got moved or replaced.
- Malware or Mistaken Deletion: Security tools, or even accidental user actions, might have deleted a file thought to be suspicious or unnecessary.
- Conflicting Program Versions: Installing different apps that each require a different version of a DLL can sometimes cause confusion.
Community experiences show that these problems aren’t rare. Adobe users, for example, report specific errors such as MSVCP140.dll, VCRUNTIME140.dll, and gamers run into errors like Physx3_x86.dll. These frustrations keep coming up on forums and official support channels – but fortunately, so do the fixes.
The Golden Rule: Always Use Official Sources First
Before downloading DLLs from random sites, keep this warning in mind: never download DLLs from untrusted sources. Many DLL download sites bundle adware, malware, or corrupted files. If your application needs a DLL, the first thing you should do is:
- Repair or reinstall the affected software – Most applications include the correct DLLs for your system. A clean install usually fixes the problem.
- Use official system tools if it’s related to Windows files – (see below).
If you’re unsure about where a DLL should go, check the official documentation for the application, forums, or support channels before acting.
Common Locations for DLL Files in Windows 11
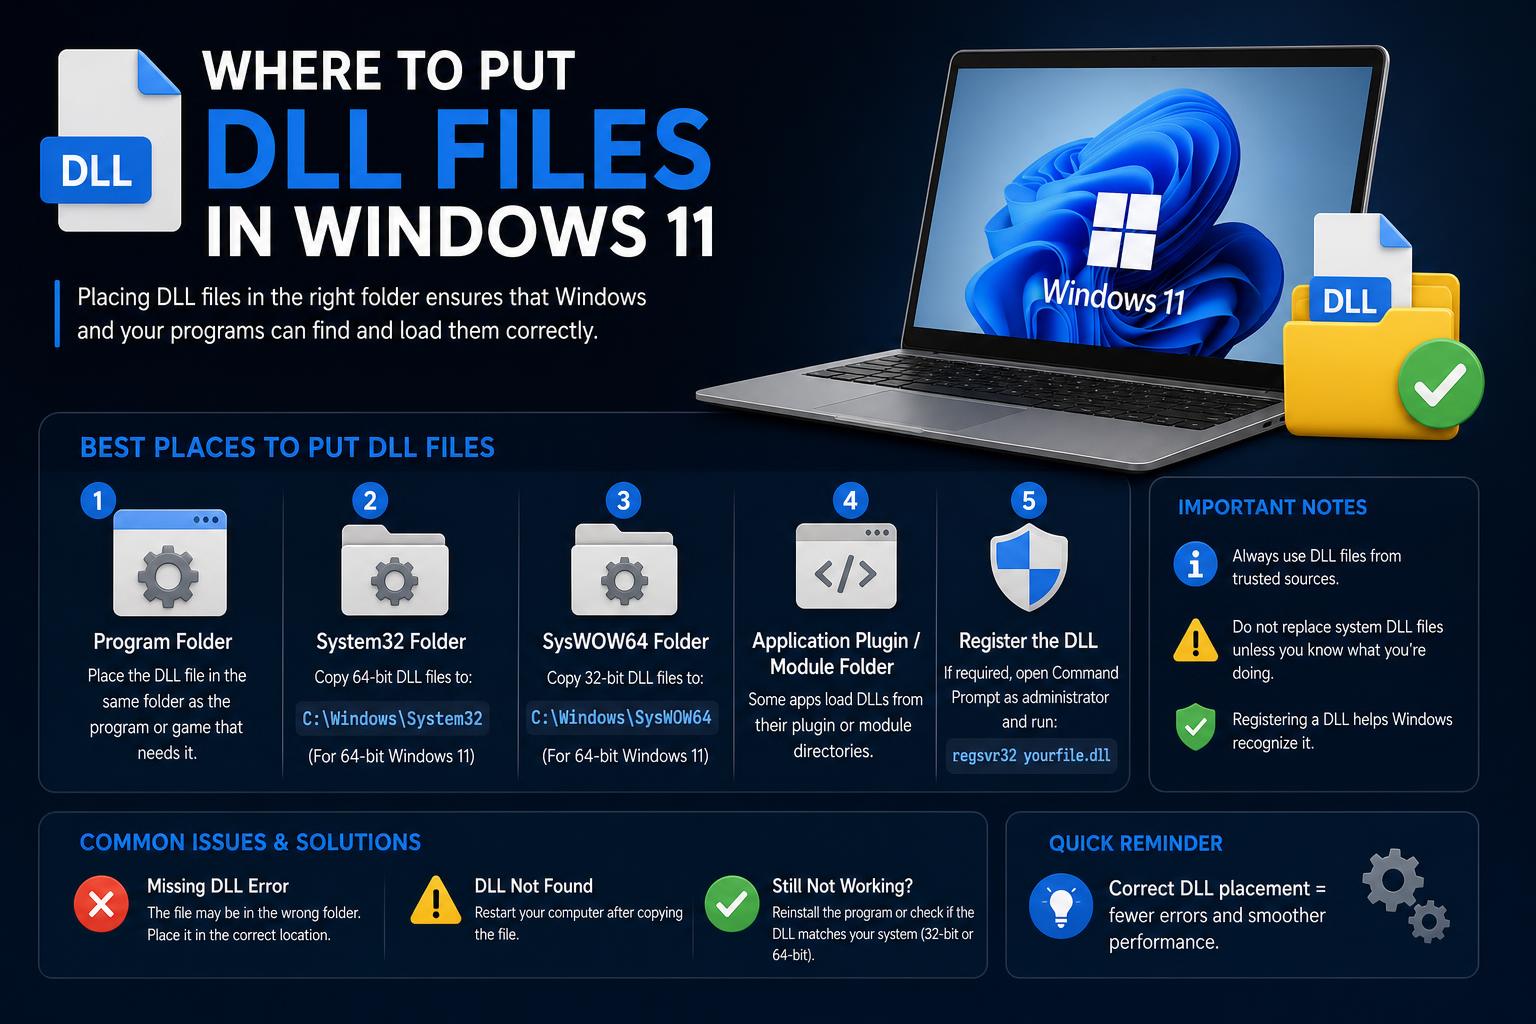
There’s no universal “install” button for a DLL. Where you place a DLL depends on what it is and which program uses it. In general, DLLs should be placed where Windows and your target application expect to find them:
- System32 (C:\Windows\System32): For core system DLLs – mostly 64-bit DLLs on 64-bit versions of Windows 11.
- SysWOW64 (C:\Windows\SysWOW64): Although it seems backwards, on 64-bit Windows, this is where 32-bit DLLs go.
- Application Directory: Some third-party or game DLLs are placed in the same folder as the executable (.exe). Check inside C:\Program Files\YourAppName or the custom directory you used.
When in doubt, read the error message. Many applications will specify exactly which DLL is missing and, sometimes, even which folder they’re looking for the file in.
A Step-by-Step Guide: How to Fix Missing DLL Files
1. Restart and Reinstall the Application
It sounds simple, but sometimes a simple restart fixes odd issues. If that doesn’t work, uninstalling and reinstalling the affected app can restore missing DLLs – especially if you previously downloaded a corrupted or incomplete installer.
2. Run System File Checker (SFC) and DISM
If the missing file is part of Windows itself (for example, system libraries or “MSVC” files), Windows 11’s built-in tools are your first option.
- Open the Start menu, search for “Command Prompt”, right-click it, and select “Run as administrator.”
- Type:
DISM.exe /Online /Cleanup-image /Restorehealth(wait for it to finish)- Then type:
sfc /scannow
This checks the integrity of system files, attempts to repair them, and replaces missing DLLs with clean versions if possible. Let both commands finish; they can take a while, especially on older hardware or slower drives. If SFC can’t fix it, search Microsoft’s official pages or forums for the exact error code.
3. Identify Whether the DLL Is 32-bit or 64-bit
Not all DLLs are the same. If you’re using Windows 11 (which is 64-bit by default), you need to know the “bitness” used by your application and the DLL:
- 64-bit DLLs are usually placed in C:\Windows\System32.
- 32-bit DLLs generally go in C:\Windows\SysWOW64.
The names are counterintuitive, so double-check with the vendor or use tools like Process Explorer to inspect running processes.
4. Only Download DLLs from Official, Trusted Sites
If you can’t get a missing DLL through repair or reinstallation, only download DLLs from official vendors or Microsoft’s official library. Never get a DLL from untrusted sites, as it may contain malware. For example, many Visual C++ or Adobe DLLs are available through the official Visual C++ redistributables.
5. Place the DLL in the Correct Folder
Once you have the correct DLL, put it in the right place. For most programs, this would be:
- In the same folder as the program that requires it (the most common method for games and third-party apps).
- If the documentation or error messages indicate so, in C:\Windows\System32 (for 64-bit DLLs) or C:\Windows\SysWOW64 (for 32-bit DLLs).
If you’re unsure about the location, check the program’s support site, documentation, or forums.
Do You Need to Register DLLs in Windows 11?
Many DLLs don’t need to be registered. Here’s the difference:
- Most DLLs bundled with applications just need to be placed in the correct folder.
- Some DLLs, especially system add-ons or plugins, require registration so Windows can take advantage of their self-registration routines.
Registration is done with the regsvr32 command:
- Open Command Prompt as Administrator.
- For a 64-bit DLL, type:
regsvr32 C:\Windows\System32\yourfile.dll - For a 32-bit DLL on 64-bit Windows 11, use:
C:\Windows\SysWOW64\regsvr32.exe C:\Windows\SysWOW64\yourfile.dll
But don’t register just any DLL: only do it if your vendor recommends it. Not all DLLs support registration, and forcing this on files that aren’t designed for it can cause more problems.
If you see errors like “DllRegisterServer entry point not found,” that means the file isn’t self-registering, and it’s not necessarily a problem.
Still Having Issues?
If none of these actions fix your DLL problem, try these additional tips:
- Check the error message: Sometimes an additional missing dependency could be causing the issue.
- Look for vendor-specific solutions: Some vendors offer comprehensive repair tools (for example, Adobe Creative Cloud’s repair features).
- Check official forums such as Microsoft Q&A or third-party support pages.
- Ask for help: Providing the exact error, system version, and when it occurs helps experts fix it.
Be wary of forum advice suggesting you mass-register a bunch of DLLs, or instructions that involve disabling security features like User Account Control.
How to Repair Windows 11 Using Command Prompt: Advanced Techniques & Best Practices
Are DLL Repair Tools Worth It?
You may have heard of programs like Fortect that claim to automatically scan for and fix broken or missing DLLs. These tools can save you time if you find them useful and don’t know where else to look.
How do these tools work? They generally scan your system, identify corrupted or missing DLLs, download them from trusted databases, place them in the correct folders, and sometimes register them automatically. While they can be helpful, it’s important to check their reliability and reviews before using them, and not use them as a substitute for official repairs from Microsoft or the software vendor when those are available.
Security Best Practices When Working with DLLs
DLLs are a frequent target for malware, so follow these recommendations:
- Scan any downloaded DLL with an up-to-date antivirus before copying it into Windows folders.
- Don’t replace or modify system DLLs unless you’re sure of the source.
- Always follow guidance from trusted vendors, reputable forums, or Microsoft documentation – don’t rely on advice seen on social media or unofficial forums.
If you’re working on a company or educational institution computer, ask your support team for help instead of trying to fix DLLs yourself – especially if permission errors show up.
Additional Solutions to Common DLL Problems
Sometimes a DLL error persists even after all the steps above. Here are some advanced recommendations:
- Check for software conflicts: Multiple versions of the same DLL in different locations can cause strange behavior. Use tools like Process Monitor to track where your application is looking for the DLL.
- Unregister DLLs: If the vendor indicates so (or as part of a cleanup process), you can use the /u switch with regsvr32 to unregister:
regsvr32 /u path\file.dll - File permissions: Sometimes DLLs fail to register or load due to a lack of administrative permissions. Try running your program as administrator.
- Keep Windows updated: System updates resolve issues with system files and dependencies.
Ultimately, fixing DLL problems can be tricky, but with accurate information, the use of official sources, understanding where to place DLLs in Windows 11, and following a systematic process, it’s possible to solve almost any error. Don’t hesitate to contact software support or Microsoft if you have questions, and always prioritize security over quick fixes.