
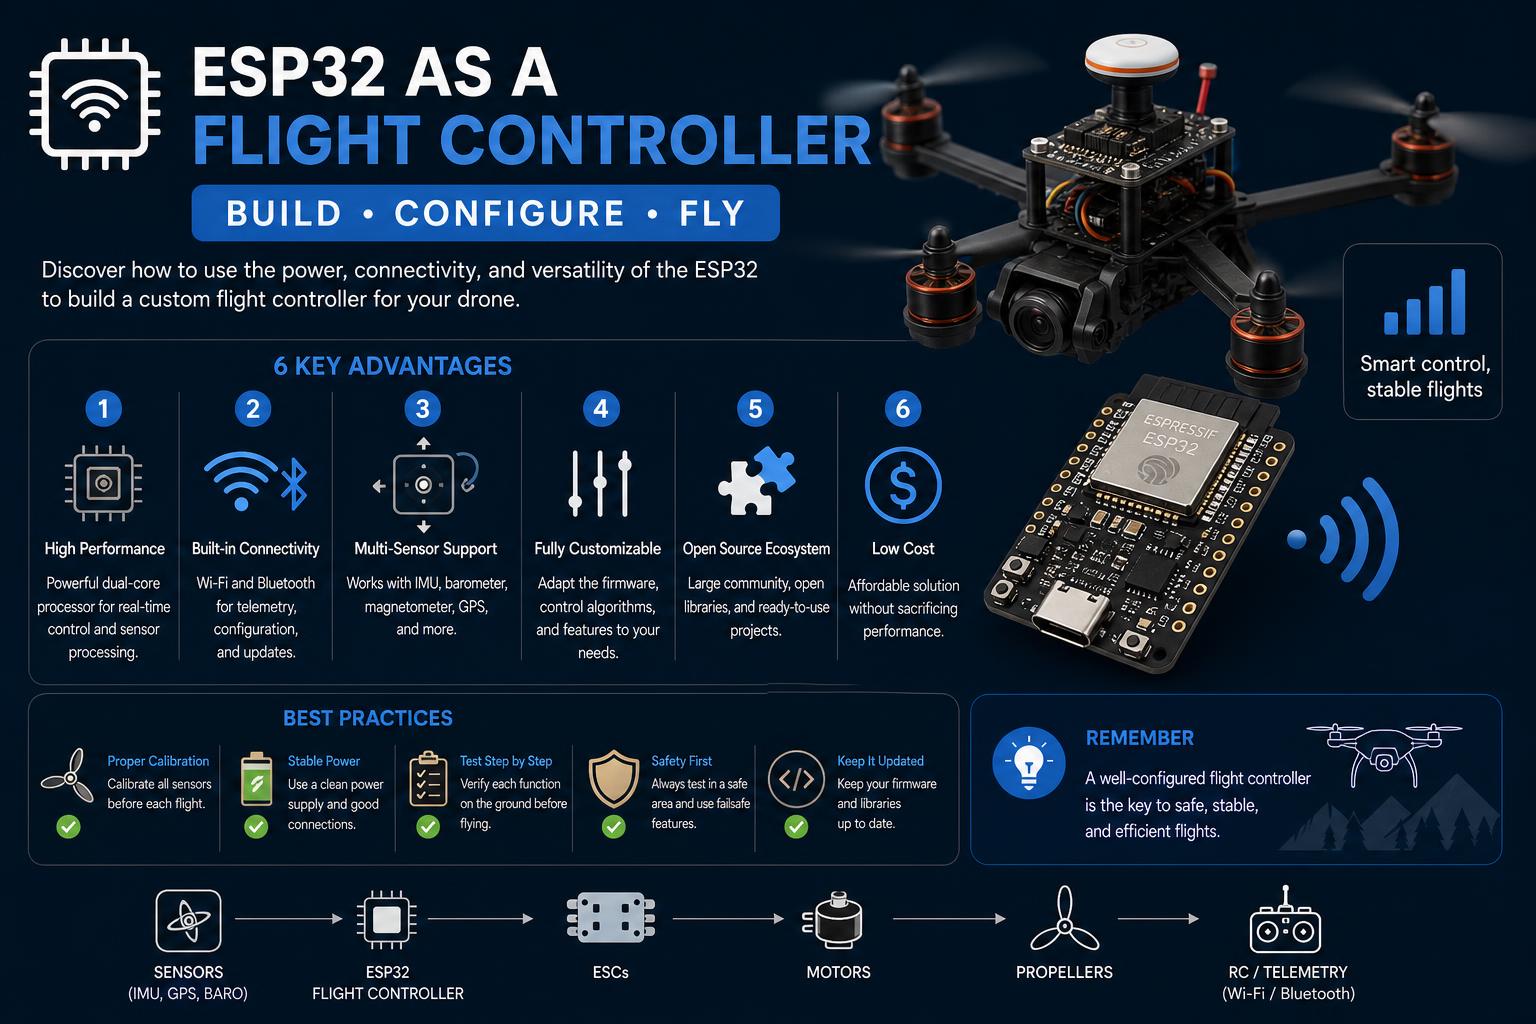
- The ESP32 enables low-cost, customizable flight controllers for drones
- Open-source projects offer modular software with essential safety and tuning features
- Thorough calibration, testing, and troubleshooting are critical for safe and stable flight
Looking to use the popular ESP32 microcontroller as a custom flight controller for drones or similar vehicles? You’re not alone—the open-source community has poured considerable effort into making the ESP32 a compelling, affordable alternative to specialized flight control boards. If you’ve explored the web, you might have noticed bits and pieces shared across project repositories, open discussions, or code-heavy guides. Here, we bring it all together, diving into every critical detail so you can decide if the ESP32 is your ticket to the ultimate DIY flight controller.
From real-world experiences and technical challenges to essential safety tips and software architecture, this guide blends the most relevant information from leading projects and user experiences. Whether you’re a hobbyist experimenting in your garage or an engineer searching for an alternative to mainstream controllers, this article covers all you need to know to build, configure, and troubleshoot an ESP32-powered flight controller.
Why Choose ESP32 for Flight Control?
The ESP32 is renowned for its high processing speed, integrated WiFi/Bluetooth, affordability, and professional-grade I/O capabilities. For DIY drone and UAV enthusiasts, these attributes offer the chance to design advanced, feature-rich flight controllers at a fraction of the cost of traditional solutions. All you need is a development board (such as an ESP32 or ESP32-S3 variant), readily available sensors, and a bit of ingenuity.
According to the explanation on what Kode Dot is, understanding the capabilities of the ESP32 increases the possibilities of creating a custom control system for drones. Furthermore, the extensibility and flexibility of the code for this platform are huge advantages, providing the ability to create exactly what your vehicle needs.
Key Hardware Components for ESP32-Based Flight Controllers
Building a flight controller around the ESP32 means choosing and wiring compatible hardware components. Users have successfully combined the ESP32 with:
- Inertial Measurement Units (IMUs): Popular options include the MPU6050, providing accelerometer and gyroscope data crucial for stabilization.
- Electronic Speed Controllers (ESCs): To power and control brushless motors. Typical builds use BLDC motors and compatible ESCs for drone propulsion.
- Radios/Receivers: For remote control, setups like the FlySky FS-iA10B receiver paired with an FS-i6X transmitter are confirmed to be compatible.
- Additional sensors: Depending on your ambitions, you might add a barometer (for altitude), magnetometer (for heading), or even a GPS module (for navigation waypoints).
- Battery monitors and LED indicators to provide feedback and warnings.
Pro tip: Carefully calibrate and test each component (especially the IMU, ESCs, and receiver) before integrating them into your main project.
Software & Libraries: From Foundations to Full Control
When it comes to software for flight control, several open-source projects stand out. One of the most well-featured is madflight, devised as a toolbox for high-performance control across various microcontrollers, including the ESP32 and ESP32-S3. According to the madflight documentation, the software is modular, readable, and easy to port, making it accessible for both beginners and advanced DIYers.
Main Features of madflight
- Simple, modular design optimized for clarity and portability, with a library of submodules for each aspect (sensor input, I/O, PID control, telemetry, etc.).
- Safety mechanisms: Motors are armed/disarmed via dedicated switches, with a clear arming procedure, kill switch, and failsafe routines that cut power if the radio link is lost.
- Attitude, altitude, navigation, and battery management all handled by dedicated submodules.
- PID control and motor mixing to achieve precise flight stabilization and responsiveness.
- Command Line Interface (CLI): For debugging, configuration, and calibration via serial communication.
- No external dependencies: All code is contained within the project, designed to run on the Arduino IDE or PlatformIO for rapid setup and development.
Servo: what it is, how it works, and why it is so important in automation
The madflight architecture uses standard Arduino setup() and loop() structures, and primarily leverages Arduino functions (Serial, Wire, SPI). Hardware abstraction makes it adaptable to variations in hardware and future upgrades.
Step-by-Step Hardware Testing & Calibration
Before your drone can take off, rigorous testing and calibration are fundamental. Following the reference from the pratikPhadte/ESP32-Flight-controller- repository, these are the key steps:
- Test each component individually:
-
- Receiver/Transmitter: Validate signal and response with dedicated test scripts.
- Use test code to verify that angles are accurately read from the sensor (such as the MPU6050).
-
- ESCs: Calibrate each ESC and confirm motor synchronization before including them in the flight controller code.
- Voltage detection: Test your battery monitoring circuit if available, although it is optional in initial prototypes.
- Web PID tuning: If your software supports dynamic tuning via WiFi (like in the web server script), perform initial tuning for response and stability.
- IMU Calibration:
- Run calibration scripts with the drone leveled; record the output values and configure them in the main flight logic.
- Verify motor direction and propeller orientation: Ensure they all spin in the correct direction and the propellers are mounted according to the schematic.
- Final safety checks:
- Connect everything correctly, verify outdoors before the first flight, and perform tests in an open area to reduce risks.
What is Kode Dot? The Ultimate All-in-One Device for Makers and Hackers
Careful calibration and modular testing routines help prevent hardware damage, injuries, or erratic flight behaviors.
PID Tuning: The Key to Stable Flight
Achieving smooth, stable, and controlled flight depends heavily on tuning the PID (Proportional, Integral, Derivative) parameters according to your hardware configuration. Based on feedback from advanced users building quadcopters with ESP32 and MPU6050, the most frequent issues in PID implementation are:
- Unequal motor speeds when leveled
- Abrupt jumps or spikes in motor output
- Oscillations or instability at high PID values
- Unexpected motor activity when the transmitter is disconnected (possible failsafe failure or signal noise)
These symptoms are usually due to:
- Poorly tuned PID gains, especially if copied from other frames or models
- Electrical noise and vibrations affecting the IMU’s stability readings
- Signal management issues from RC receivers or noisy ESC lines
- Software failsafe logic not implemented correctly
Best practice: Start with conservative PID values (like those recommended for standard frames such as the F450, even if yours is different). Use tools like a web interface for progressive tuning.
Check each axis separately and adjust the gain as you observe immediate effects. If you experience instability, lower the values and perform another calibration.
Built-in Safety Features and Best Practices
Any DIY flight controller, especially one as adaptable as the ESP32, must prioritize safety from the first code upload to the first flight. It is highly emphasized to follow these protocols:
- Motors remain disarmed until explicitly activated. Arming switches, kill switches, and LED indicators are essential for status feedback.
- Failsafe routines that immediately disarm the motors if the radio or communication signal is lost.
- Initial tests should be performed outdoors, away from people, animals, and delicate equipment.
- Verify all connections before uploading the final code, including soldering and sensor pins.
- Check propeller direction and motor mapping before applying any power. Incorrect orientation can cause dangerous spinouts.
Taking the time to focus on safety will save you future trouble. Even seemingly benign drones can have a destructive impact.
Software Organization and Portability
A standout feature of the madflight ecosystem is its clear division of functions into ‘modules’ that address specific sensor or output tasks. Some examples include:
- IMU: gathers sensor data (pitch, roll, yaw, acceleration)
- Barometer Module: for precise altitude estimations
- GPS Module: navigation and waypoint definition
- Battery Monitor: real-time voltage feedback and alerts
- Output Modules: for sending PWM signals to motors and servos
- Remote Control Link: management of RC input and telemetry
- PID Module: the core stabilization logic
- Command Line Interface (CLI): serial debugging and configuration
The code’s modularity makes it easy to upgrade sensors or hardware platforms (even switching to microcontrollers like STM32 or RP2040) with minimal code changes. Portability to non-Arduino platforms is also possible for advanced users who master build environments outside the Arduino IDE or PlatformIO.
Tips and Strategies for Troubleshooting Common Issues
Users have reported recurring issues and strategies to solve them:
- Motor synchronization issues: Often related to poorly connected ESC wires, errors in PID mixing, or skipped calibrations.
- Abrupt motor jumps: Check for electrical noise, use better decoupling capacitors, and improve sensor mounting to reduce vibrations.
- Oscillations with high PIDs: Lower proportional/integral gains, make progressive adjustments, and not all at once.
- Spurious motor activity (no signal): Review failsafe logic, ensuring motors disarm upon signal loss.
Remember: The flight controller is only as good as the quality of its inputs and outputs. When in doubt, simplify and perform systematic tests, consulting forums or GitHub issues for community support.
Open Source, Legal Aspects, and Community Support
The projects underpinning ESP32 flight controllers are open source, and authors make it clear that using the software is at your own risk. In the words of madflight, you must modify and use the software at your own risk, with no liability accepted for damage or loss.
Nevertheless, this philosophy of open collaboration drives innovation. If you encounter obstacles, communities on GitHub, Reddit (/r/diydrones), and specialized microcontroller forums are active and ready to help. Share your logs, look for solutions, and learn from similar experiences.
Integration and Final Perspectives
If you’re ready to build a cutting-edge flight controller for your drone, the ESP32 platform combines computational power, wireless connectivity, and multiple I/O options. With open-source projects like these, as well as shared experiences in communities, you have all the resources to achieve it. Take the time to calibrate, tune the PID, and prioritize safety. Keep an eye out for community updates and patches, and when that drone takes flight with stability, you’ll know all that effort was worth it.