
- Windows 11 supports a wide variety of printers natively, reducing the need for third-party drivers in most cases but knowing manual setup and legacy support remains important.
- Official and third-party methods exist to install, update, or troubleshoot drivers, offering flexibility for both typical users and more advanced needs like network integration or legacy hardware.
- Regular driver updates, removal, and reinstallation can resolve many printing problems in Windows 11, and understanding Windows Update alongside manufacturer resources is essential for optimal performance.
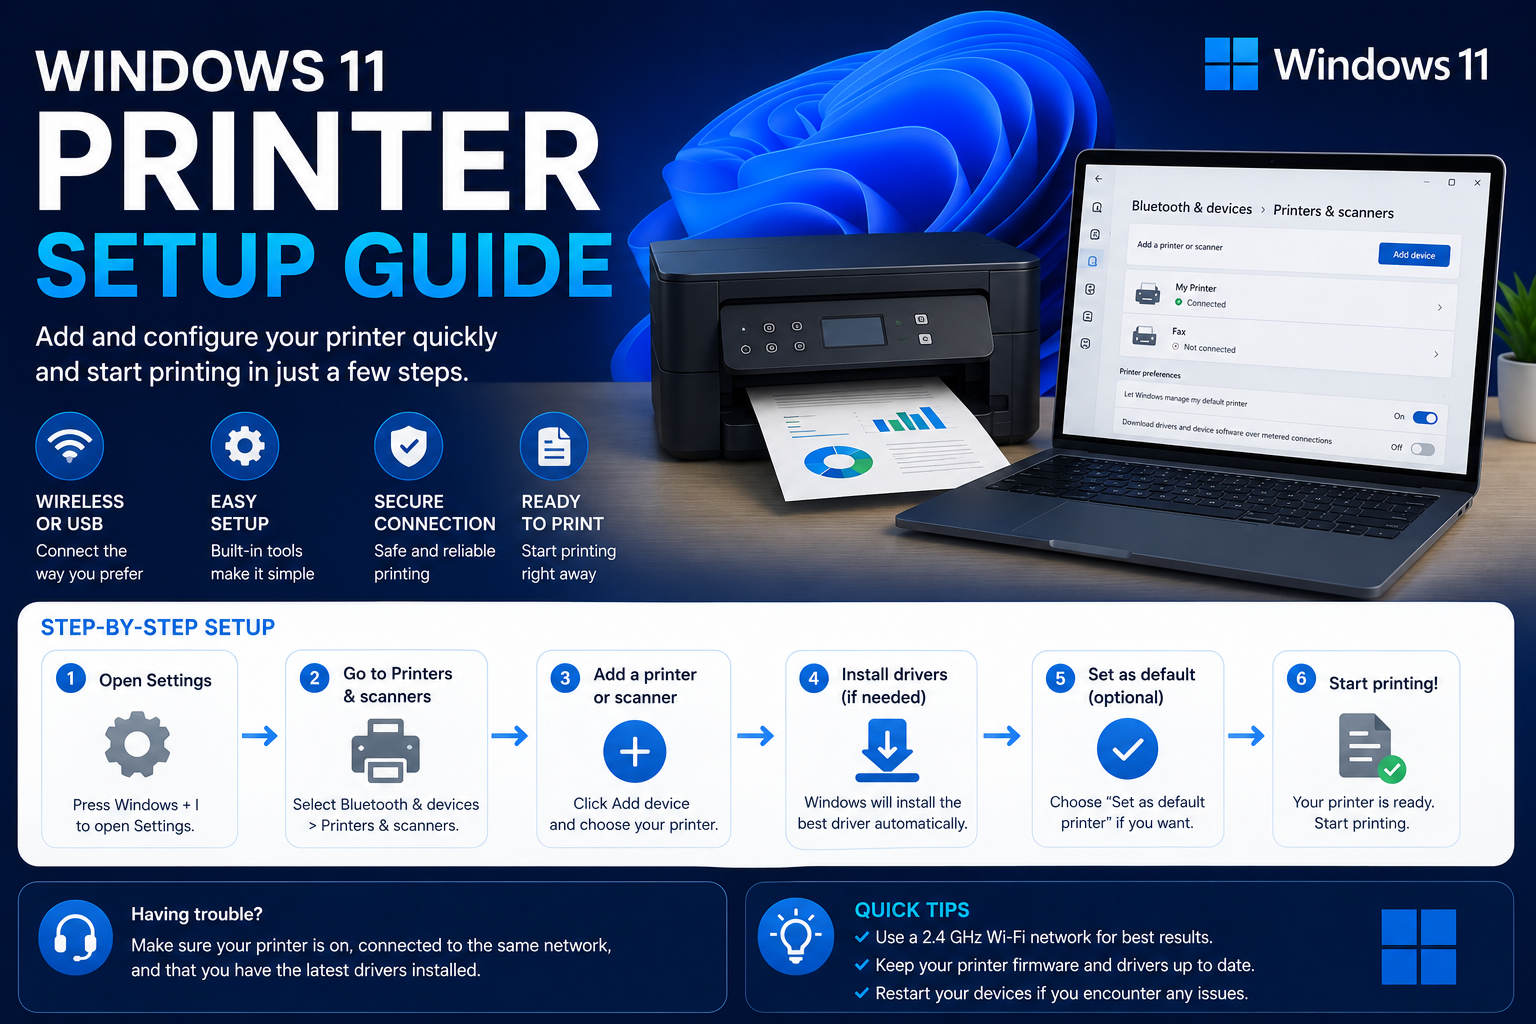
Getting your printer connected to a Windows 11 computer should be a straightforward task, but let’s face it—sometimes it ends up being surprisingly tricky. Whether you’re setting up a new device, switching printers, or just trying to get things working smoothly after a Windows update, having a complete, modern, and clearly explained guide can make all the difference.
With so many printer models and plenty of different connection types (USB, WiFi, network, Bluetooth), it’s easy to get a little lost in all the possibilities. This article is here to make sure your Windows 11 printer setup is not just possible but simple, reliable, and adaptable, even when the usual tools let you down. We’ll walk you through each method, from plug-and-play auto-detections to dealing with stubborn driver issues—so you’ll be ready for anything.
Printer Compatibility with Windows 11
Most modern printers are immediately recognized by Windows 11 as soon as you connect them by USB or over the same WiFi or wired network. This is thanks to Microsoft building in a massive database of printer drivers and support for the majority of common models.
For the average person, this high native compatibility means there’s no need to hunt for manufacturer software or struggle with installation discs. Still, having a grasp of how Windows deals with printers—and when you might still need specialized drivers—sets you up for success, especially if you run into odd problems later.
Automatic Printer Detection: Plug It In and Print
Windows 11 often handles printer setup automatically. When you connect a printer using USB or attach it to the same WiFi network as your PC, Windows will frequently notice and complete the installation process without any user input.
- Connect the printer physically or wirelessly to your Windows 11 device.
- Make sure the printer is turned on and, if it’s networked, that it’s on the same local network as your PC.
- Check under Settings > Bluetooth & devices > Printers & scanners for your device to appear on the list.
- If it’s visible, you’re all set! You should be able to print immediately.
Tip: If you just need basic printing and the printer has shown up, there’s often no need to install extra software from the manufacturer. However, if you need advanced scanning, duplex, or custom settings, consider the next section on drivers.
Manual Printer Installation: Steps if Automatic Setup Fails
Sometimes, Windows 11’s automatic wizard misses your device—especially with older or less popular models, or if your machine is configured with stricter driver policies. Here’s how to manually add a printer:
- Go to Settings using the Start menu.
- Navigate to Bluetooth & devices and then select Printers & scanners.
- Look for your printer under the available devices. If it’s not listed, choose Add device.
- Wait a moment for the full list of nearby printers to fill. If yours shows up, simply click Add Device.
- For networked or older printers, scroll down and choose Add manually. Here you can search by network path, IP address, or manually enter the printer details, often required for business or university environments.
Network and Wireless Printers: Getting Connected the Right Way
Connecting a wireless or networked printer is about ensuring your PC and the printer are talking over the same network. Here’s how to get it working in most cases:
- Check the printer’s network connection: Follow the device’s on-screen menus or consult the manufacturer’s website to make sure it’s on your WiFi or local area network.
- On Windows 11, revisit Settings > Bluetooth & devices > Printers & scanners and select Add device.
- When your printer shows up, click Add Device. If it’s not there, use the Add manually option and enter either the network path (for shared printers, such as \\printerserver\printername) or the printer’s IP address.
For university or business settings where network printers require specific names or access, check with your IT admin for the correct printer name or server details. If you need to change your default printer preference, see the section on Managing Printer Preferences below.
Bluetooth Printers and Specialized Pairing
Setting up a Bluetooth printer is a little different but still pretty straightforward under Windows 11. You’ll need to put the printer in pairing mode and then search for it within your PC’s Bluetooth settings. Once detected, follow the pairing prompts. For more on this, Windows offers a dedicated guide: official Microsoft printer installation guide.
Removing or Reinstalling Printers
If a printer stops working, or you’re replacing it with a new one, removing the device entirely can help prevent driver conflicts. The quickest path is:
- Go to Settings > Bluetooth & devices > Printers & scanners.
- Select the printer you want to detach and click Remove or Remove device.
Después de remover, puedes usar los mismos pasos para agregar el dispositivo nuevamente. Esto también puede hacer que Windows busque los controladores más recientes o corrija problemas causados por software desactualizado.
Getting and Installing the Best Printer Drivers
Printers need the right driver—a small piece of software that lets Windows talk to the printer correctly. While Windows 11 is good at finding drivers automatically, sometimes you’ll want to upgrade, fix an issue, or need features only available from the manufacturer.
Option 1: Let Windows Update Do the Work
By default, Windows Update delivers approved drivers for most hardware. Simply search for printer updates in Settings > Windows Update, and install available ones. This keeps things simple, but it can lag behind the printer maker’s site in offering the newest releases.
Option 2: Download the Latest Drivers from the Manufacturer
- Identify your printer model (usually printed on the device).
- Go to the official website of your printer manufacturer (e.g., Brother Support, HP, Canon, Epson, etc.).
- Look for a Support or Drivers section.
- Search for your model and ensure you download the drivers listed for Windows 11.
- Run the installer, follow the setup wizard, accept the license, and connect your printer when prompted. A restart of your PC may sometimes be necessary to complete installation or enable all features.
Tip: Always use the most up-to-date drivers for the best experience. New releases may fix bugs, speed up printing, or offer essential features like scanning or duplex printing.
Option 3: Install the Software That Came with Your Printer
If your printer came with a CD, DVD, or USB containing installation software, you can run these files just as you would a downloaded driver–though you may need to update from the manufacturer’s site for full Windows 11 compatibility. Check the packaging or documentation for more information, especially for older printers.
Manual Driver Installation: Device Manager and Add Printer Wizard
Using Device Manager
Sometimes automatic installation fails, or you need to perform a driver upgrade manually. Device Manager is the tool for this:
- Right-click the Start button and select Device Manager.
- Expand the Printers section.
- Right-click on the problematic printer and select Update driver.
- Choose “Search automatically” to let Windows try, or pick “Browse my computer for drivers” to manually install downloaded files.
Using Add Printer Driver Wizard
For rare cases—legacy printers, or when all else fails—the Add Printer Driver Wizard is a lifesaver:
- Go to Settings > Bluetooth & devices > Printers & scanners.
- Under Related settings, click Printer server properties.
- Select the Drivers tab, then Add….
- The wizard will open—follow each prompt, select your processor type and manufacturer, update the printer list using the Windows Update button, then select your model and complete the process.
This method primarily helps with older or less common models, particularly when Windows Update can’t find a matching driver. If a compatibility warning appears (e.g., “The software has not passed Windows Logo testing…”), you can usually click Continue Anyway for home use (always check corporate policy if it’s a work machine).
Manually Adding a Network Printer by Name or Address
On some enterprise, university, or shared networks, the automatic selector isn’t enough. You can manually add a printer by entering a network path:
- In Printers & scanners, click Add device, wait, and select Add manually.
- Pick Select a shared printer by name and input the network format (such as \\printer_server\printer_name).
- Follow prompts to finish the addition. If asked, install or browse for the right driver at this stage.
Customizing Printer Settings and Default Preferences
Windows 11 lets you fine-tune which printer is treated as the default. This is helpful at home or in offices with several connected devices.
- On the Printers & scanners page, locate your preferred device.
- Turn off Let Windows manage my default printer to take manual control.
- Click on your selected printer and choose Set as default.
Be aware that the operating system might change your default printer dynamically if the automatic setting is enabled, which can be disruptive if you switch between several locations!
Troubleshooting Common Printer Issues in Windows 11
General Steps for Connection Troubles
- Power cycle your printer (turn off and back on).
- Verify cables or that the printer is connected to the right WiFi/network.
- Remove and reinstall the printer in Windows if it’s still unresponsive.
- Check for any pending Windows updates—they can fix hidden bugs.
Driver Problems and Failed Installations
If Windows 11 hangs when trying to add a device or the Add Device button becomes unresponsive, there could be a deeper issue with the print spooler service or a miscommunication between the OS and the driver. If so:
- Run the built-in Windows Troubleshooter for printers (Settings > Troubleshoot > Other troubleshooters > Printer).
- Open Services from the Start menu, find Print Spooler, and restart it.
- Remove all printers, reboot, and try fresh installation steps as outlined above.
Occasionally, major Windows 11 updates can break or reset printer settings. Keeping both your OS and drivers updated is the most reliable defense.
Some workplaces or campuses restrict unauthorised device additions, or require you to manually input printer shares or names. Always refer to your IT help desk or internal documentation for the correct printer details and access permissions. Attempting to add enterprise network printers on a personal device may not be allowed according to policy.
Advanced Tips: Legacy Printers and Compatibility
For older printers, particularly those not officially supported by manufacturers for Windows 11, the Add Printer Driver Wizard is your friend. Also, notable brands like Brother, HP, and Canon all offer downloadable universal drivers, which often bridge the gap for basic printing—even when scanning or specialty features might be left out.
Extra Help and Manufacturer Resources
Each printer vendor has a library of guides, diagnostic tools, and updated drivers. Useful links include:
- Microsoft’s official printer setup support
- Brother Support and Drivers
- For HP, Canon, Epson, Samsung, and others, search the manufacturer’s name plus ‘drivers’ or ‘support’ for their latest resources.
Setting up a printer in Windows 11 doesn’t have to be a headache, even when things don’t work as expected. Understanding the tools at your disposal, from automatic installations via Windows Update to detailed control in Device Manager and advanced configuration options, allows you to handle any printing scenario with confidence. These steps and tips will help you connect your devices quickly, solve more complex problems, and avoid overly complicated technical instructions, making your Windows 11 experience modern, smooth, and frustration-free.