
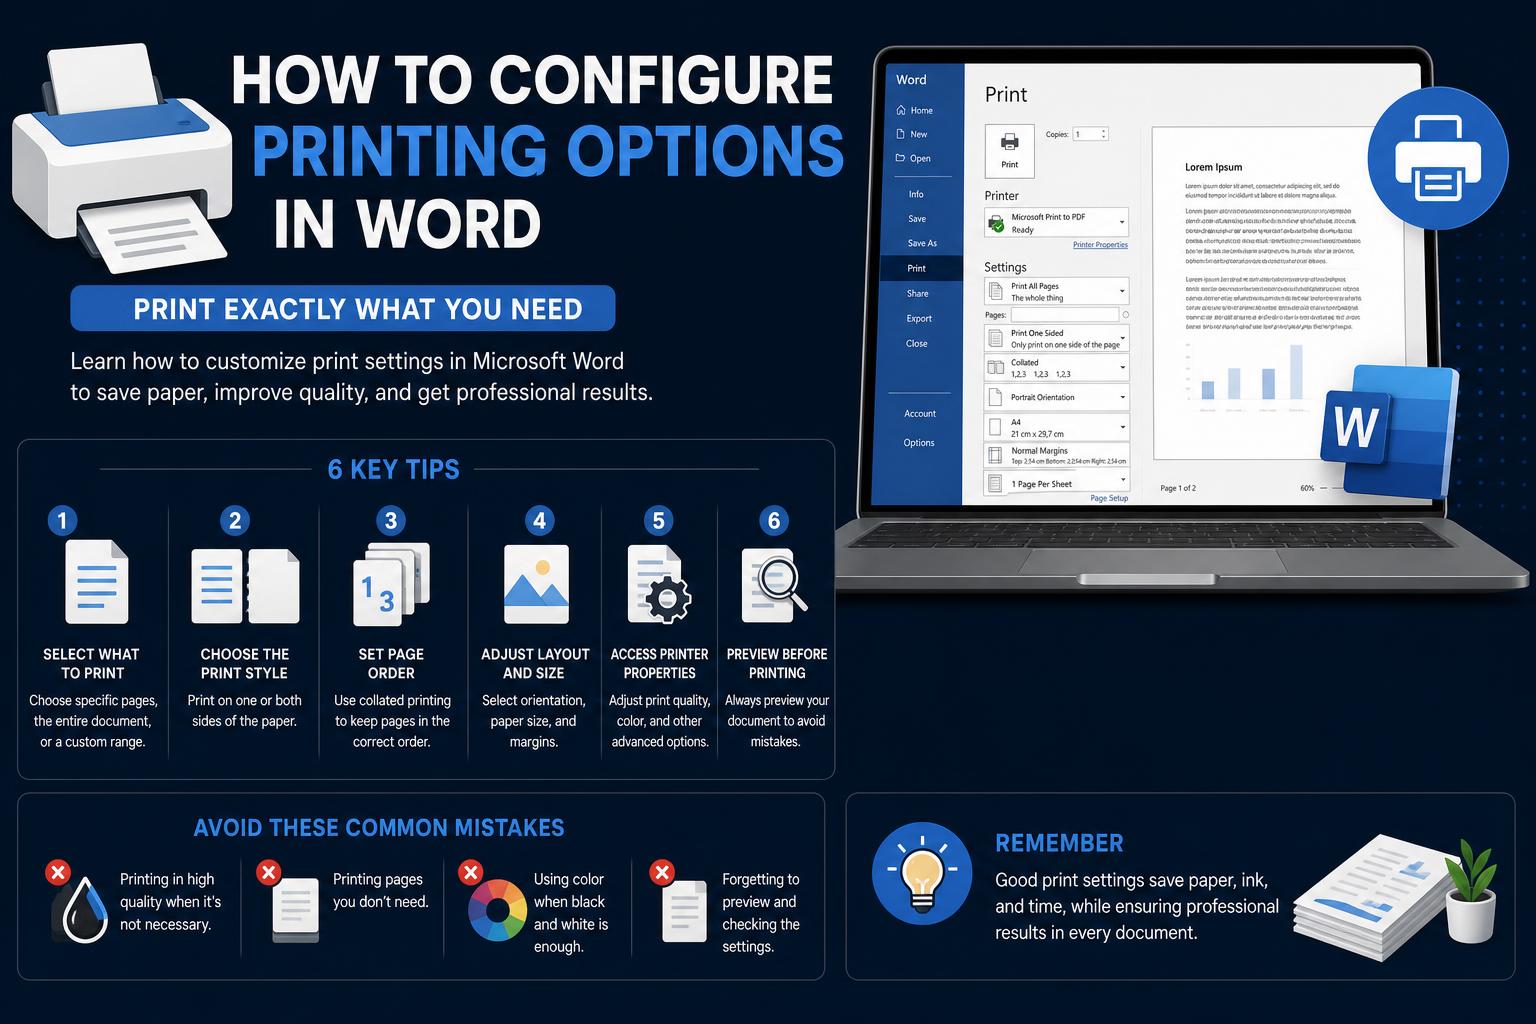
- Mastering Word's print settings allows fine control over your document's output and appearance.
- Understanding the roles of both Word and your printer driver ensures accurate customization.
- Previewing print jobs and exploring advanced options can prevent costly mistakes.
When you hit the print button in Microsoft Word, you’re expecting things to just work, right? But let’s be honest—sometimes it feels like your document’s destiny rests entirely on the whims of a mysterious set of print options and hidden settings. Learning how to configure print settings in Word is not only about making your page look good, but about saving time, paper, headaches, and even money in your daily workflow.
No matter if you’re a student preparing a thesis, a professional getting reports ready for a big meeting, or just someone wanting to print a letter at home, knowing your way around Word’s print settings will make sure your documents always come out looking exactly as you intended. Let’s unlock the practical secrets behind every print job—from basic settings everyone should know, to the advanced tweaks that save the day in a pinch.
Understanding the Relationship Between Word and Your Printer
One of the most common misconceptions is that Word controls every aspect of your printed document. The truth? Word handles the layout, content, and basic print configuration, while the printer itself—and more specifically, the printer driver installed on your computer—manages the more technical aspects, such as advanced duplex settings, print quality, and paper handling.
This division of responsibility means that some preferences, especially more specialized options like duplex printing, print quality, or margin overrides, may need to be set from your printer’s properties dialog in Windows or macOS rather than from inside Word itself. Understanding this handoff can save you lots of troubleshooting time, especially if settings don’t seem to “stick” or if you use multiple printers.
Quick Access: How to Open the Print Menu in Word
The first step, no matter what kind of print job you’re planning, is getting to the right place in Word.
- On Windows: Open your Word document, then click File > Print, or simply press Ctrl+P.
- On Mac: Open your document, then choose File > Print, or press Command+P.
You’ll land in Word’s Print pane—a central hub for all your print-related needs. Here, you get an at-a-glance preview, printer selection controls, access to core settings, and, just as importantly, a live preview of how each tweak changes your page.
Basic Printing Options in Word
The “Print” menu houses a handful of the most critical options you’ll use almost every time:
- Printer Selection: At the top of the pane, there’s a dropdown listing all installed printers and virtual devices (think “Microsoft Print to PDF”). Pick the device you actually want to use; if you routinely use more than one printer, double-check!
- Number of Copies: Enter the number of copies you need right beside the printer dropdown. If you’re printing large batches or handouts, setting this correctly saves time.
- Page Range: Decide whether you want to print the entire document, just the current page, or a custom selection (for example, “1-5,7”). This is extremely handy for large files or if you only need to update specific pages.
Each of these options helps you narrow down precisely what gets printed and to where. It’s always worth double-checking these fields before clicking print, especially on shared or large network printers.
Print Preview: Your Built-in Proofreader
Before you send anything to the printer, Word gives you a real-time Print Preview window. This feature is your last chance to catch any formatting, margin, or layout errors, and to confirm you’re printing the right range of pages.
- Navigate between pages using the arrows at the bottom of the preview window.
- Zoom in/out with the slider, so you can inspect headers, footers, and close-up details.
- Check for blank pages, unwanted markup, or leftover tracked changes, especially if you’re preparing professional or academic documents.
Skipping the preview is one of the quickest paths to wasting ink, paper, and patience!
Advanced Print Options and Customization
Word grants users much deeper control over the print process through its advanced settings. Here’s what you’ll find and how each can serve you:
1. Layout Options: Orientation, Paper Size, Margins
- Orientation: Choose between Portrait (vertical) and Landscape (horizontal). If your charts or images aren’t fitting on one page, landscape often does the trick.
- Paper Size: Select from standards like A4, Letter, Legal, and others that your printer supports.
- Margins: Change margin size from the Print window or under Page Setup. Custom margins can solve last-minute formatting headaches.
For precise projects like booklets, professional reports, or academic papers, verifying these settings ensures your document matches submission or presentation standards.
2. Duplex Printing (Double-Sided)
If your printer supports double-sided (duplex) printing, Word’s Print Settings will often provide the toggle—but sometimes you’ll need to dig into Printer Properties for more nuanced options.
- Print One Sided: Every page is printed on a separate sheet.
- Print on Both Sides: If available, select this to conserve paper and create booklet-style documents. Some printers let you choose between “flip pages on long edge” or “flip on short edge” for perfect binding results.
Remember: If you can’t find the duplex option in Word, check your printer’s drivers/settings through Windows’ Devices and Printers or the Mac’s Print dialog.
3. Collation Options
Collation determines how multi-copy print jobs are organized:
- Collated: Each set prints in order (1,2,3…1,2,3…)
- Uncollated: Pages are grouped together (1,1,1…2,2,2…3,3,3…)
This is crucial for distributing multi-page documents at meetings, workshops, or schools.
4. Print Quality and Color Options
- Print Quality: Within Printer Properties, you can select between Draft, Normal, and High quality. Draft saves ink and time—ideal for internal proofing. High quality delivers the crispest results, best for final copies.
- Color vs. Grayscale: Some printers let you force black-and-white output even from color documents, which is economical for text-heavy projects.
5. Printing Markup, Selection, or Specific Content
- Print Markup: Include tracked changes, comments, or other markup if you want to preserve editing history. This is essential for collaborative or revision workflows.
- Print Selection: If you only want to print a highlighted portion of your document, select the text first, then choose this option. Perfect for sharing excerpts or focused printouts.
Configuring Printer Properties in Windows & macOS
Some settings—like advanced paper handling (special trays, cover sheets), high-resolution image printing, or specific finishing options—can only be found in your printer’s driver dialog, which you access from the Print pane by clicking Printer Properties or Preferences.
Key tips:
- Each printer driver is unique. The dialog may look different depending on your printer’s brand or model.
- Duplex/Staple/Booklet/Watermark options are often only visible here, not in Word’s main print dialog.
- After making changes, save or apply your changes before closing the dialog.
On Windows, you can also set default printer preferences from Settings > Devices > Printers & Scanners. Choose your printer, click Manage > Printing Preferences. This allows you to set defaults for all programs, not just Word.
Saving as PDF: A Modern Printing Alternative
Sometimes, the best print job is a digital one. Word allows you to “print” directly to a PDF file using Microsoft Print to PDF or other PDF drivers. This gives you a locked-in version of your document that looks the same on any device—and is perfect for emailing, archiving, or professional online submissions.
- Select Microsoft Print to PDF as your printer in the Print menu.
- Click Print, choose a filename and location, and you’ll have a digital file instead of paper output.
This is also an excellent troubleshooting workaround if your physical printer is being fussy—print to PDF, check the results, and try again.
Word Retaining Last Print Settings: When It’s a Blessing and a Curse
Did you know that Word usually remembers your last print setup for each document? That means, if you printed in color yesterday, don’t be surprised if tomorrow’s printout follows the same rule—even if all you want is black and white. While this feature provides convenience for recurring tasks, it can also be the source of wrong settings if someone else previously used your computer or printer.
Always check key options—especially duplex, paper size, and color settings—before the final print. And if all else fails, reset to default in your printer’s properties.
Tips, Best Practices, and Troubleshooting Common Printing Issues in Word
- Always preview before printing. Catching layout mishaps in the preview pane will save you from wasted ink and paper.
- Use Print Selection for quick content checks. It’s a great way to test how headers, footers, or graphics will appear without committing to printing the whole file.
- Check driver updates. Outdated printer drivers sometimes lead to missing options or buggy printouts; keep drivers up to date via your printer manufacturer’s site.
- When switching printers, always review sizing and margins. Different printers can default to different margins or page formats, so confirm everything matches your needs.
- If printing fails, try printing to PDF first. It helps you determine if the issue is with Word, your document, or the printer hardware.
Printing in Word from Microsoft 365 and Other Office Programs
Microsoft 365 and various Office applications (like Excel, PowerPoint, OneNote) offer a consistent printing experience:
- File > Print brings together print controls and a live preview in one window.
- All key options—copies, page range, layout—are readily accessible under the Settings section.
- You can preview each page, adjust zoom, and even decide between different presentation formats (slides, notes, booklets, etc.), depending on the program.
If you want to dive deeper, Microsoft provides detailed, official guides at their Microsoft Support site.
FAQs About Word Printing Options
- Why doesn’t my duplex option show up?
- Check if your printer supports duplex printing and make sure the driver is properly installed. Sometimes, the setting is only visible in Printer Properties, not in Word’s main print dialog.
- Can I set default print settings for all Office programs?
- Yes, but you’ll need to do this via your operating system’s default printer preferences, as Word mostly remembers the last-used options for each document.
- How do I print only comments or track changes?
- Use the Print Markup or Review functions in Word, then choose these preferences in the Print pane before sending your job.
Having complete control over Word’s printing options transforms a potentially frustrating task into a smooth, efficient process. By understanding both what Word can do—and when to switch over to your printer’s built-in options—you can achieve professional results every time. Whether printing a simple note or an entire report, you’re now equipped with every tool and technique to fine-tune your output exactly the way you want.