
- iOS offers multiple layers of location privacy controls beyond a single switch
- You can customize which apps or contacts can access your location at any time
- Advanced methods (like spoofing, signing out, or using airplane mode) offer even greater privacy
Location tracking on your iPhone is more than just a handy feature for maps or finding lost devices—it’s at the core of your privacy and how much of your daily life your device shares with others. With apps increasingly hungry for your whereabouts and built-in iOS systems quietly logging movement patterns, it’s understandable to want more control over who sees your location and when. Whether you’re organizing a secret surprise, just need a little personal downtime, or simply value your privacy, understanding the full scope of location settings on your iPhone is essential.
If you’ve ever worried about an app tracking you in the background, or if you feel uncomfortable with how easy it is for friends or family to check up on your exact position via Find My or similar features, you’re not alone. Apple bakes location controls into iOS, but there’s more than one switch to flip—and knowing all the ins and outs, from completely disabling location services to more nuanced options (like hiding from specific contacts, tweaking system services, or even employing advanced tricks), gives you complete mastery over how your iPhone handles your location data. Let’s dive into the layered world of iPhone location settings and privacy tweaks, revealing powerful strategies even seasoned iOS users might not know.
Understanding Location Services on iPhone
Your iPhone uses Location Services to gather GPS, Wi-Fi, Bluetooth, and cellular data in order to determine your whereabouts for apps and system features. From navigating a city to checking the weather or using ride-hailing apps, these services can feel essential. However, when you want to limit this tracking or have more control, Apple provides a variety of toggles and granular settings.
The Basic Path: Turning Off Location Services Completely
If you’re looking to disappear from the location grid entirely, you can shut down all Location Services for your device with a few steps. Here’s how you can do it:
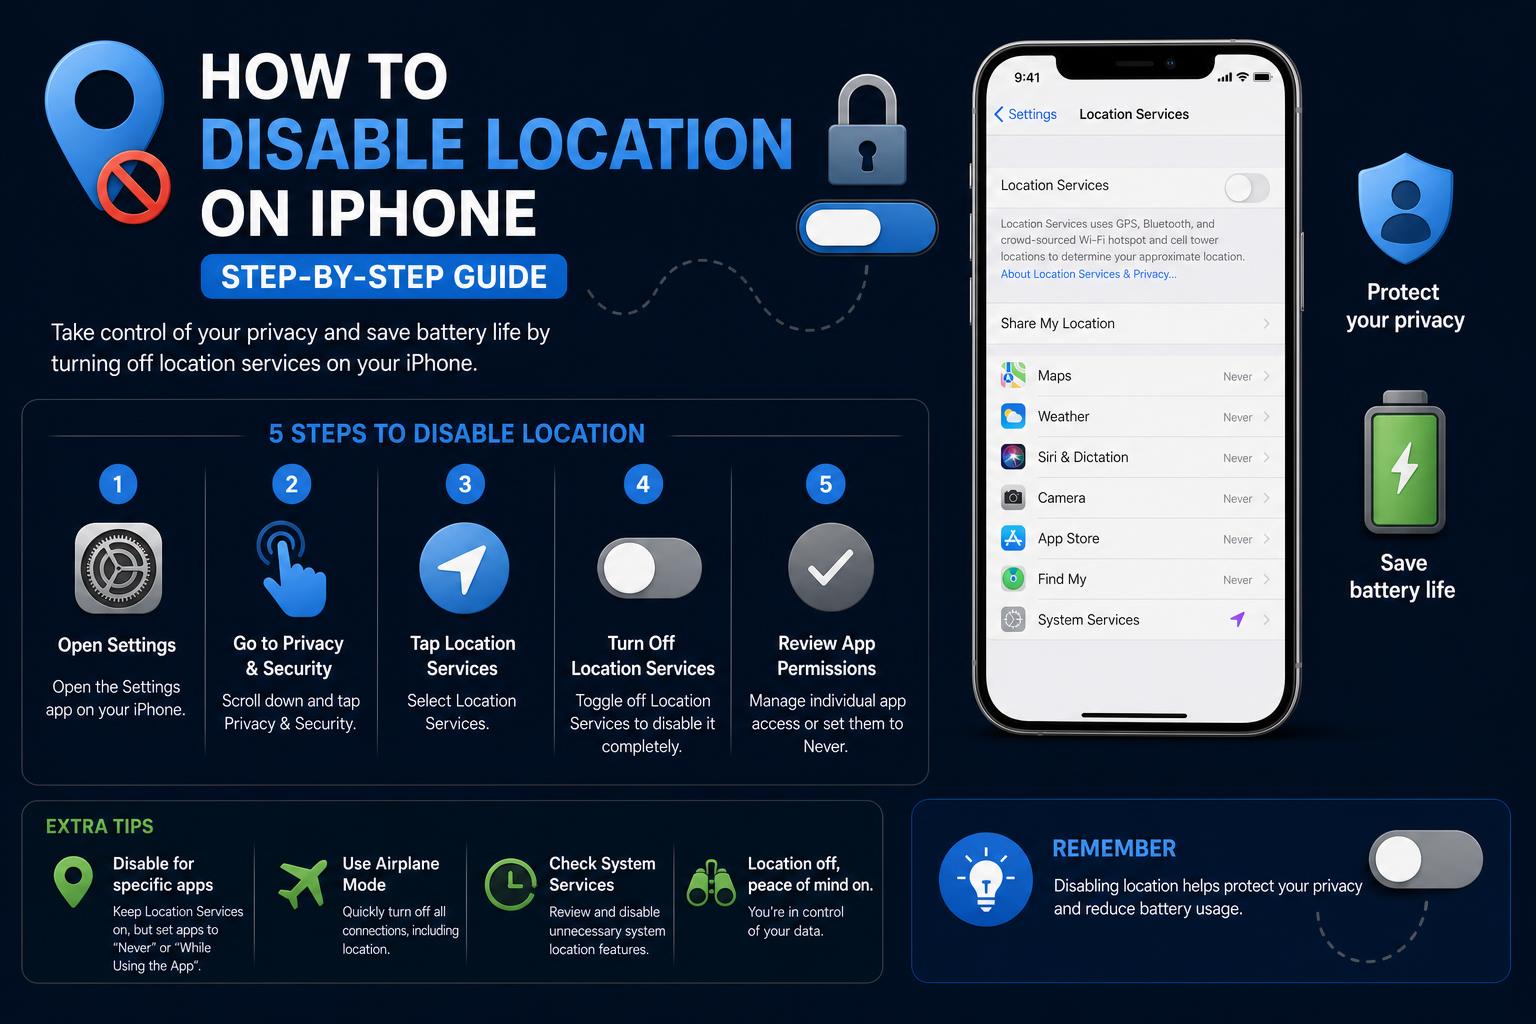
- Open the Settings app on your iPhone.
- Scroll down and tap on Privacy (or Privacy & Security in newer iOS versions).
- At the top, tap Location Services. If services are enabled, you’ll see “On.”
- To turn them off, toggle the green slider so it turns gray. You’ll get a confirmation message — select Turn Off to finalize.
Keep in mind: Disabling Location Services affects important iPhone functionality—apps like Maps, Find My, and others will lose access to your current position.
Tailoring Location Sharing by App and Contact
For most users, turning off all Location Services can create as many problems as it solves. Many essential apps require access for everyday tasks, while other apps may not need location permissions at all. Luckily, Apple lets you adjust permissions app by app:
- Go to Settings → Privacy → Location Services.
- Scroll to see a list of apps. Tap any app name.
- Options may include Never, Ask Next Time, While Using App, or sometimes Always. Pick what fits your privacy.
This selective approach keeps crucial services working while stopping unwanted tracking.
Disabling Location Sharing in Find My and iMessage
Apple’s Find My feature and location sharing through iMessage or Contacts can create privacy headaches if others—friends, relatives—are routinely checking where you are. Here’s how to take back control:
Hide Your Location from Specific People
- Open the Find My app.
- Tap the People tab.
- Select the contact you wish to stop sharing with.
- Choose Stop Sharing My Location.
Note: Stopping sharing like this can send a notification to the other person, which may not go unnoticed. For more discretion, try toggling location off entirely or looking into other solutions below.
Advanced Tip: Temporary Disabling Without Notification
If you want your status to show as “Location Not Available” temporarily without triggering a notification, your options are a bit craftier. You can:
- Turn off your phone or enable Airplane Mode (note: your phone goes offline completely, so no calls/messages).
- Sign out of iCloud temporarily: Go to Settings, tap your name, scroll to the bottom and tap Sign Out. This severs location sharing but removes iCloud functions until you sign back in.
- Use an Apple Watch as a decoy: Leave your phone (or watch) somewhere to simulate your presence at that spot.
Each approach has pros and cons depending on urgency and the functionality you want to keep.
Turning Off Important Location-Related System Services
iOS doesn’t just share your location for directions or friend tracking—it also logs ‘Significant Locations’ and collects location data for ads, traffic, and analytics. If you’re privacy-focused, turning these off is smart. Here’s how:
- Open Settings → Privacy → Location Services → System Services.
- Look for Significant Locations and toggle it off. Your frequent/favorite places won’t be recorded anymore.
- Review other system services here, like Location-Based Alerts, Suggestions, or analytics data, and turn off any you don’t need.
Disabling these further enhances privacy, especially if you’re worried about local logs or automated suggestions.
Managing Location Alerts and Maps in iOS
When you allow an app to use your location, iOS might occasionally warn you, showing a map of locations accessed by that app. If you’d rather keep this information private—even from yourself, or anyone else glancing at your screen—try this:
- Navigate to Settings → Privacy → Location Services → Location Alerts.
- Disable Show Map in Location Alerts. You’ll still get location alerts, but the map will no longer be visible.
This helps obscure your movement history from prying eyes or passersby.
Exploring More Cutting-Edge Location Privacy Tricks
Looking for advanced or creative ways to boost your iPhone privacy? There are a few extra tactics, but use these responsibly and understand the risks.
- Location Spoofing Apps: Certain tools (like iTools or similar) allow setting a fake GPS location. These can sometimes fool apps and services, but may be against terms of service and aren’t always reliable. Use caution.
- Airplane Mode: Instantly cuts network and location sharing when privacy is critical. Remember, you’ll lose connectivity for calls/messages/notifications until you turn it off.
- Leave items behind: If you use ‘Notify When Left Behind’ via Find My, you can create alerts for specific gear—leaving them behind can act as a reverse notification trick. You’ll know if someone’s tracking your devices, but it’s more a supplement than a cure.
- VPNs: A VPN won’t alter your GPS data, but can hide network-based location information from websites or apps using IP geolocation, giving a further layer of privacy.
Balancing functionality with privacy is key; don’t forget to restore settings you change if you need location-based services later.
What to Watch Out For When Disabling Location
Turning off or tweaking location services can impact more than just privacy; it may cause apps to function incorrectly or compromise device recovery options. Specifically:
- Find My iPhone: Turning off location means you can’t track a lost/stolen device yourself.
- Emergency Calls: Some regions allow emergency services to gather location even if location is disabled; this is for your safety.
- Weather & Navigation: Without accurate location, these apps won’t work properly or may display outdated/wrong data.
- Missed Notifications: Some critical notifications may rely on your location—review app needs before toggling things off long-term.
Always consider why you’re disabling features and whether a targeted approach (app-by-app) might suit best for your situation.
Keeping Your Settings Up to Date
Apple frequently updates iOS with new privacy controls and features. If you’re using an older device or software version, check for iOS updates to access the latest location privacy tools. Newer features like Hide My Location in Find My may require recent versions, so updating could open up additional ways to safeguard your whereabouts.
Extra Tips for Everyday Peace of Mind
- Test Your Changes: Whenever you toggle settings, try sending your location to a friend or using an app to confirm your privacy choices work as intended.
- Combine Methods: For ultra-privacy, consider turning off both Location Services and specific app permissions, or even going offline briefly if needed.
- Set Reminders: If you’re disabling features temporarily, scheduling reminders to re-enable them can prevent accidental long-term issues.
Your iPhone is powerful, but staying on top of privacy means taking active steps—try customizing, testing, and switching things up to fit your life best.
Personal privacy isn’t one-size-fits-all—even within iOS, there are plenty of choices to tailor location sharing to your preferences. Disabling location may be as simple as flipping a switch, but handling app-specific needs, controlling who can see your whereabouts, adjusting alert settings, and even mixing in third-party solutions lets you strike the perfect balance for your lifestyle. Remember to stay updated, double-check your choices, and always weigh the importance of convenience versus discretion. With these strategies, you can stop worrying about hidden tracking and start enjoying technology on your terms.
How to Safely Disable Unnecessary Windows 11 Services for Better Performance