
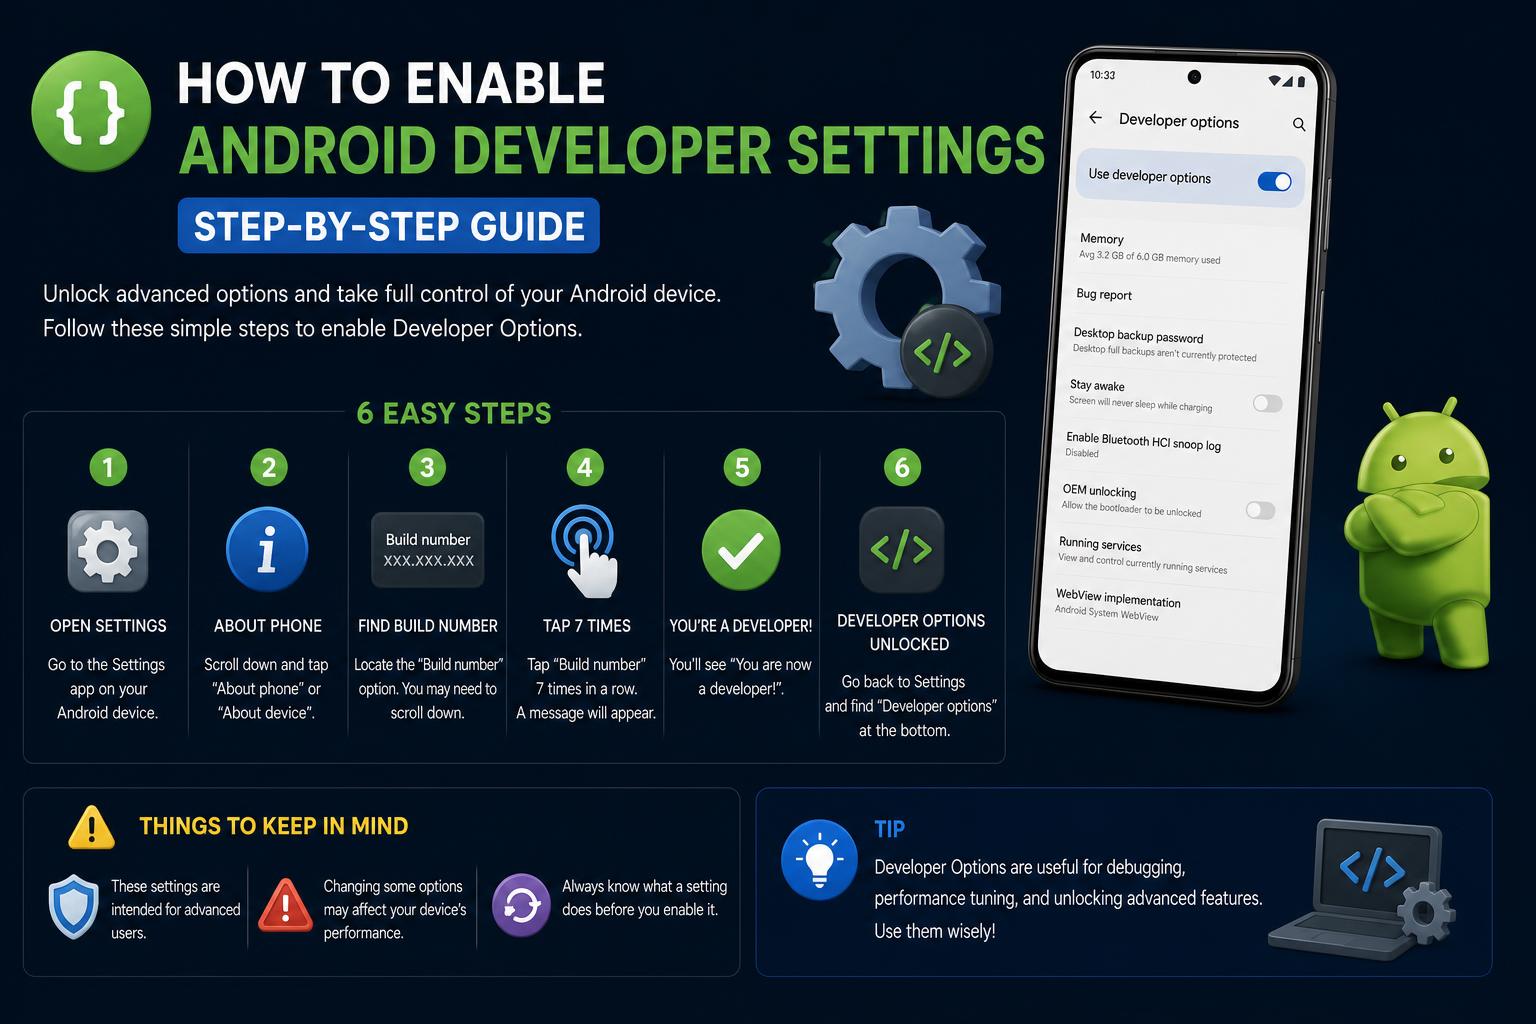
- Enabling developer settings on Android unlocks advanced customization, debugging, and system controls.
- Options such as USB debugging, animation scales, and Bluetooth configurations empower users and developers alike.
- Disabling developer options restores default security and stability to your device when finished experimenting.
Have you ever wondered what lies hidden within your Android device, just beneath the surface of your regular settings? If you’re curious, need to debug an app, or want to unleash some hidden power-user options, Android’s developer settings are where the magic happens. Activating these settings opens a whole new realm of control, sophistication, and customization—but also comes with responsibilities and potential risks.
In this all-in-one guide, you’ll discover how to enable Android developer settings across different phone models, what these powerful tools do, and how to use them safely. Whether you’re a developer, tech enthusiast, or simply seeking to personalize your phone, you’ll gain a clear, step-by-step path through this often-overlooked part of Android. We’ll also dive deep into the most valuable features and explain how to turn these settings off when you’re done experimenting.
Understanding Android Developer Settings
Developer mode is a hidden menu in every Android device, providing access to advanced tools designed for app development, debugging, and deep-level customization. While mainly intended for developers and advanced users, these features are also handy for anyone who wants to manipulate their device beyond what’s possible in the standard interface. With developer settings, you can unlock options such as USB debugging, animation tuning, monitoring system performance, and much more.
Main Benefits and Uses of Developer Options
- Enabling USB Debugging: This allows seamless communication between your Android device and a computer. With tools like Android Debug Bridge (ADB), you can install apps, capture system logs, and send advanced commands.
- Tuning Animations for Speed: By adjusting window, transition, and animator scale settings, you can make your phone feel snappier or slow things down for testing.
- Unlocking Further Customization: Many features—like detailed Bluetooth audio options or force GPU rendering—are only accessible through developer mode.
- Performance Monitoring and Debugging: CPU usage, GPU rendering profiles, and crash logs become visible, helping you diagnose issues or fine-tune performance.
Important: Developer mode unlocks powerful settings, but using them incorrectly can compromise your device’s stability and security. Always proceed with caution and only modify settings you understand.
How to Enable Android Developer Settings and Unlock Advanced Features
The process for enabling Developer Options is very simple, although menu names and steps may vary slightly depending on the Android version and manufacturer. Here is the universal process:
- Open the Settings app.
- Scroll down and tap About phone (sometimes shown as Software information or Android version).
- Find Build number. Sometimes you first need to select Software information or Version.
- Tap the Build number field seven times in a row. You will see an on-screen counter showing how many taps remain.
- Once completed, a message such as “You are now a developer!” or something similar will appear, confirming activation.
Congratulations! You have just unlocked the developer menu. To access it, return to the main Settings menu and look for Developer options, usually found under System or near the bottom of the list. If it does not appear immediately, check your device manual or search online for the specific location for your brand.
Where to Find the Build Number on Popular Devices
| Device | Path to Build Number |
|---|---|
| Google Pixel | Settings > About phone > Build number |
| Samsung Galaxy S8 and newer | Settings > About phone > Software information > Build number |
| LG G6 and newer | Settings > About phone > Software information > Build number |
| OnePlus 5T and newer | Settings > About phone > Build number |
| HTC U11 and newer | Settings > About phone > Software information > More > Build number or Settings > System > About phone > Software information > More > Build number |
| Google Pixel Watch | Settings > System > About watch > Versions > Build number |
If your device does not appear on this list, look in Settings for a section mentioning “About phone”, “Software information”, or “Version”. The location may vary depending on the manufacturer’s interface.
After unlocking Developer Mode, a new menu called “Developer options” will appear. On modern Android systems, it is generally located under Settings > System > Advanced > Developer options, although the path may vary by manufacturer and version. Inside, you will see a switch at the top to enable or disable all developer features. Make sure it is turned on before you start exploring.
Main Features and Settings in Developer Mode
Developer Mode does not just offer one or two interesting features—it unlocks an entire menu of very useful capabilities. Below are the key categories and most relevant features, explaining what they do and when they may be useful:
Debugging Options
- USB debugging: Crucial for developers because it allows communication between your Android device and a computer using ADB. It is also useful for flashing ROMs, transferring files, or running advanced commands.
- Wireless debugging: Lets you connect wirelessly to your development machine on newer Android versions. The path may be:
- Wear OS 6 and Android 16+: Settings > System > Developer options > Wireless debugging
- Earlier versions: Settings > Developer options > Wireless debugging
- OEM unlocking: If you want to flash a custom ROM or make advanced modifications, you need to enable this. Warning: This may void your warranty and can affect device operation.
- Bug report: Lets you collect system logs to share with technical support or evaluate app performance.
- Wait for debugger: Useful for programmers. The app will not run until the debugger is connected, making deep debugging easier.
- Quick settings developer tiles: Adds selected features to quick-access controls for greater convenience.
Performance and Monitoring Tools
- Profile GPU rendering: Shows in real time how the GPU draws each frame, helping detect bottlenecks and improve performance.
- Memory usage: Lets you inspect which apps consume the most RAM, how much they use on average, and how much is available.
Network and Interface Settings
- Default USB configuration: Choose how your device connects to a PC (charging, file transfer, PTP, MIDI, mobile internet connection, etc.).
- Aggressive Wi-Fi to mobile handover: For unstable connections, this option can enable faster switching to mobile data.
- Enable verbose Wi-Fi logging: Generates detailed logs to analyze failures or improve performance.
Bluetooth Audio Controls
- AVRCP version: Configures which Bluetooth protocol version to use, affecting compatibility with headphones or car systems.
- Codec, sample rate, and channel mode: Lets you customize wireless audio quality and performance.
- Optional codecs: Enable or disable additional codecs supported by the device and headphones.
- Bluetooth LDAC codec: Adjusts streaming quality, balancing quality, reliability, and adaptability.
Input and Usability Enhancements
- Show taps and pointer location: Displays touch interactions on screen, useful for demonstrations or creating tutorials.
- Show layout bounds: Draws borders and margins around interface components, which is very useful for UI developers.
- Simulate secondary displays: Creates a virtual display to test apps on multiple screens or at higher resolutions.
- Force RTL layout direction: Reverses the interface orientation to test right-to-left languages or layouts.
Animation and Visual Effects Customization
- Window animation scale: Changes how quickly windows appear on screen for faster navigation.
- Transition animation scale: Controls the speed of transitions between screens for a snappier or slower effect.
- Animator duration scale: Reduces or increases system animation duration for faster visual response.
Advanced Rendering and Hardware Features
- Force GPU rendering: Forces apps to use the GPU for 2D graphics, useful in older or poorly optimized apps, although it can increase battery consumption.
- Show GPU updates and GPU debugging: Visualizes how and when the interface is redrawn, helping detect performance issues.
- Disable HW overlays: Disables hardware overlays, which can fix visual issues but increases battery usage.
- 4x MSAA: Enables anti-aliasing in OpenGL ES 2.0 graphics to improve visuals in games, at the cost of higher graphics demand.
- Simulate color space: Emulates different types of color blindness, useful for accessibility development or visualizing color effects.
- Set GPU renderer: Selects the graphics engine, which can vary in performance and compatibility.
Monitoring Options
- Profile GPU rendering: Shows real-time graphics efficiency using performance bars.
- System UI demo mode: Hides notifications and shows a fixed status bar, ideal for screenshots or professional demos.
- Desktop backup password: Adds password protection to backups created through ADB.
Other Useful Features
- Stay awake: Keeps the screen on while the device is charging, ideal for monitoring or presentations.
- Background process limit: Controls how many processes can run simultaneously to optimize battery life or performance.
- Reset shortcut manager throttling: Lets you continue testing apps with shortcuts without being blocked by rate limits.
- Disable screen sharing protections: Temporarily turns off security measures on shared screens for demos or testing.
- Enable Bluetooth HCI snoop log: Creates a file containing Bluetooth packet information for advanced analysis with tools such as Wireshark.
What Is Simulink? The Complete Guide to MATLAB’s Graphical Powerhouse
Potential Risks & Responsible Usage
While Developer Options offer many possibilities, they also come with important risks. Settings related to debugging, bootloader unlocking, or networking can put your data at risk, affect normal operation, or even brick your device if used carelessly. OEM unlocking, in particular, may void your warranty and can leave the device unusable. Research each feature before changing it and avoid modifying settings you do not understand.
How to Safely Disable Developer Mode
When you are done testing, it is a good idea to disable Developer Mode to maintain system security and stability.
- Go to Settings.
- Select System (if applicable).
- Tap Advanced.
- Open Developer options.
- Turn off the main switch to disable all developer features.
When you disable Developer Mode, the settings and changes made in this section will return to their factory default values, removing any residual effects.
Resetting App Preferences (Optional, for Extra Peace of Mind)
If you changed app-specific settings while using Developer Options, you can easily restore them:
- Open Settings.
- Go to Apps or Apps & notifications.
- Tap the three-dot menu (usually in the top-right corner).
- Select Reset app preferences.
- Confirm the warning and tap Reset.
This will restore per-app preferences to their original state without deleting data.
Special Notes for Popular Brands and Models
Samsung Galaxy devices: After enabling Developer Options, you will find Developer options near the bottom of the Settings menu. Samsung sometimes customizes the available features and may move certain options, so check its official guide if you cannot find what you are looking for.
Other phones: The path is similar on most brands, but if you are unsure, check the official documentation or specialized forums. Brands such as OnePlus, LG, and Pixel generally follow the “About phone > Build number” method.
Your Gateway to Android’s Hidden Power
Enabling Developer Options is like opening a secret workshop for troubleshooting, tuning, and customizing your Android device. From advanced debugging with ADB to audio settings, animations, and performance monitoring—Developer Mode gives you far greater control. Although these features offer many advantages, it is important to use them carefully: only modify what is necessary, research settings before changing them, and disable the menu when you are finished. With proper care, you can unlock new capabilities while maintaining your device’s stability and security.
How to Fix the HYPERVISOR_ERROR Stop Code on Windows 11