
- The M5Stack Stick series packs advanced IoT features and sensors into a compact, modular body ideal for wearables and prototypes.
- All sticks offer multi-platform support (UIFlow, Arduino, ESP-IDF, PlatformIO) and integrate into the larger M5Stack hardware/software ecosystem.
- Project versatility includes smart home automation, STEM education, gesture-based controllers, and voice assistant development.
- Upgrading between versions and checking expansion compatibility ensures maximum performance and feature access.
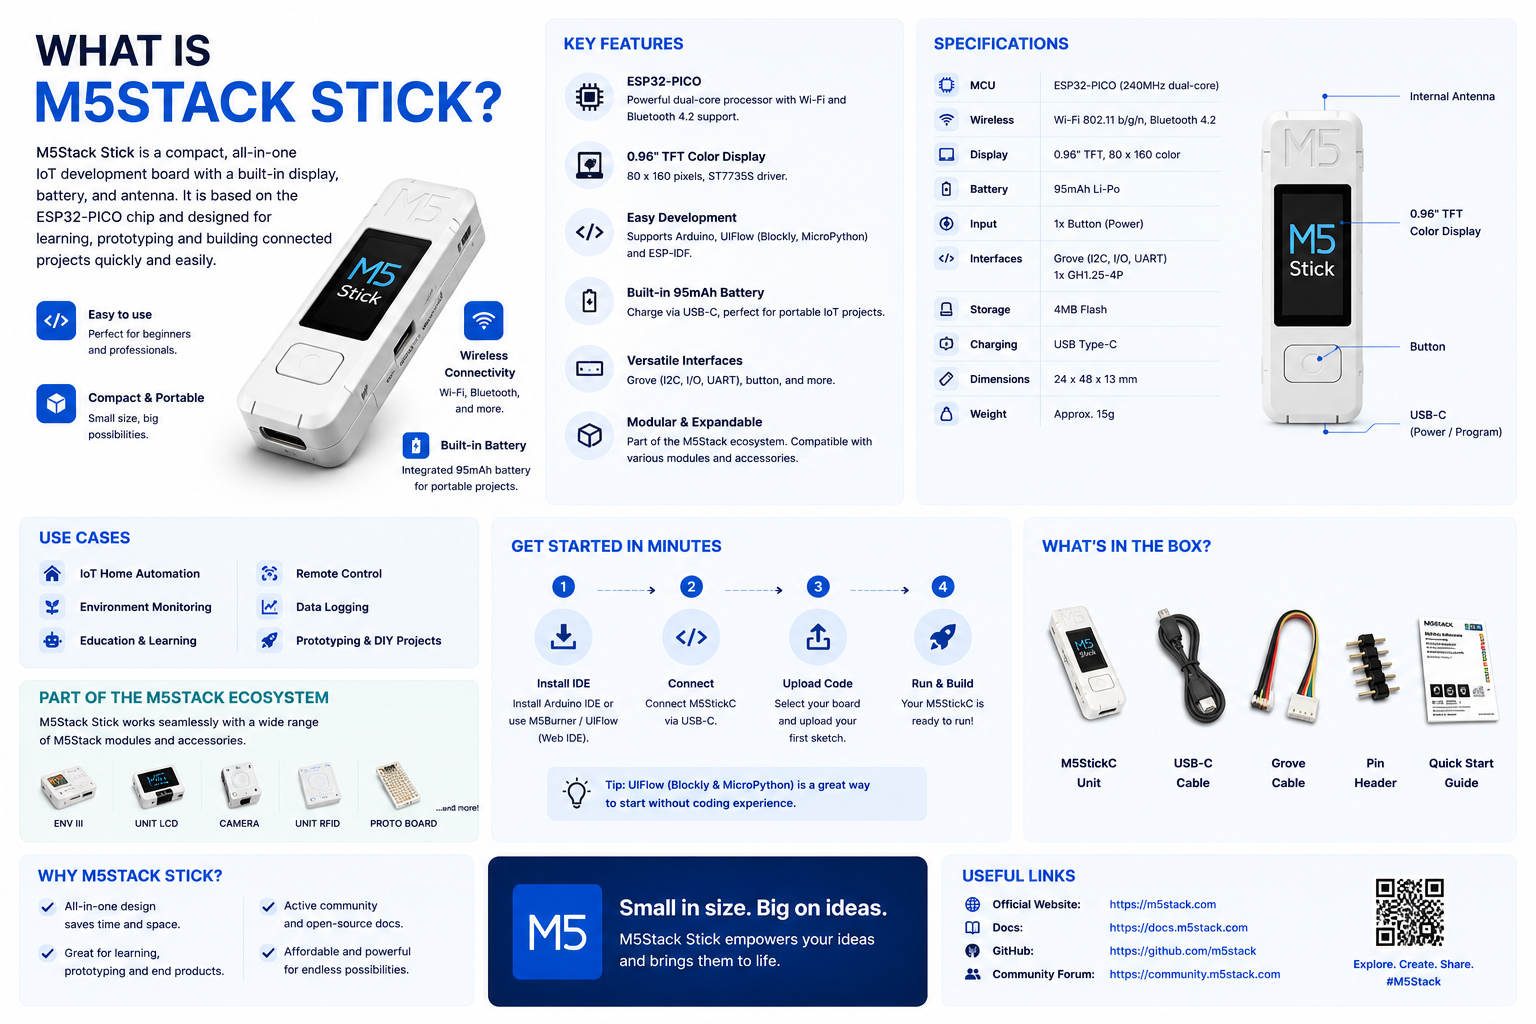
The world of IoT and wearable tech has been rapidly expanding, with compact yet powerful devices opening up a landscape of possibilities. Among the most intriguing tools available to makers and developers today is the M5Stack Stick family, with models like the M5StickC, M5StickC Plus, and StickS3. If you’ve stumbled upon these terms while looking into mini development kits or contemplating new projects, you’re in the right place. This article dives deeply into what the M5Stack Stick is, exploring its evolution, core features, common use cases, and how it fits within the vibrant M5Stack ecosystem—plus tips and nuances you won’t find just by skimming spec sheets.
Whether you’re an absolute beginner intrigued by the possibilities of IoT, a seasoned developer searching for robust prototyping tools, or a tech hobbyist curious about how to jumpstart your latest idea, understanding the M5Stack Stick series is essential. We’ll also unravel the distinctions between different versions, supported software platforms, and handy tips for getting started or troubleshooting, ensuring that you walk away with a complete grasp of what makes these mini devices so popular and useful.
What Is the M5Stack Stick Family?
At its core, the M5Stack Stick refers to a series of palm-sized programmable modules built primarily for IoT, prototyping, and education. The most commonly discussed models are the M5StickC, M5StickC Plus, and StickS3. All boast remarkable capabilities packed into a minimal footprint, often smaller than your average USB stick, making them ideal for wearable and portable applications.
The Evolution: M5StickC, M5StickC Plus, and StickS3
The family began with the original M5StickC, an affordable, ESP32-powered micro-controller that proved to be a game changer for compact prototyping. Recognizing the need for better readability and longer battery life, M5Stack introduced the M5StickC Plus, which increased the screen estate and bumped up the internal battery. The latest iteration, the StickS3, leaps forward by utilizing the powerful ESP32-S3 chip, delivering enhanced processing speed, dedicated AI acceleration features, better power management, and improved audio capabilities.
General Features of the M5Stack Stick Series
All devices in the M5Stack Stick series share a set of standout features designed to meet the needs of rapid development in IoT, wearable technology, and STEM education:
- ESP32-based development — PICO or S3 chips
- They include color TFT displays: 0.96″ for the M5StickC, 1.14″ for the M5StickC Plus and StickS3
- 6-axis IMU sensors for motion and orientation detection
- User buttons and programmable LEDs
- Integrated lithium battery, with capacities ranging from around 95 mAh — M5StickC — to 250 mAh — StickS3
- Rechargeable via USB Type-C
- Wi-Fi connectivity: 2.4 GHz thanks to the ESP32 microcontroller
- Integrated IR transmitters and receivers for remote control
- Internal RTC for time management
- Microphones — MEMS or SPM1423 — and speakers in some models, such as the StickS3
- Expansion ports for modular sensors and peripherals
The Ecosystem: M5Stack Expansion & Community
One of the biggest advantages of the M5Stack Stick is its integration with the M5Stack ecosystem. This includes compatible expansion modules — sensors, HATs, and other communication modules — as well as extensive open-source code and an active forum. This environment makes it easier to access and collaborate on innovative projects. For example, you can expand your projects by adding modules for environmental detection or motion control. Modularity increases its potential, and the community provides a support network for those starting out in development with these devices.
Platform Support: Programming the M5Stack Stick
The M5Stack Stick model supports several programming platforms, making it accessible for both beginners and advanced developers:
- UIFlow 1 and UIFlow 2: visual block-based and code-based environments, ideal for beginners and rapid prototyping. To understand the different platforms, it may be useful to consult What Is Kode Dot?.
- Arduino IDE: C/C++ programming with library and extension support.
- ESP-IDF: the official framework for full control and advanced applications.
- PlatformIO: a modern development workflow compatible with VSCode.
This multi-platform support is ideal for adapting to different skill levels and needs. When migrating to UIFlow 2, some users consult community guides or official forums to resolve incompatibilities.
Key Hardware Specifications
- Microcontroller: ESP32-PICO-D4 — M5StickC —, ESP32-PICO-V3-02 — M5StickC Plus —, ESP32-S3-PICO-1-N8R8 — StickS3
- Display: ST7735S controller — 0.96″ 80 x 160 on M5StickC —, 1.14″ color LCD on StickS3/M5StickC Plus. The larger screen makes advanced interfaces or visual feedback easier.
- Batteries: Capacities from 95 mAh to 250 mAh, depending on the model.
- Sensors: SH200Q or MPU6886 IMU, SPM1423 microphones, audio codec in the more advanced model.
- Inputs and power: buttons, USB-C ports, charging, and power management through the AXP192 chip.
Typical Applications and Use Cases
- Wearable devices: smartwatches, interactive rings, wristbands.
- IoT controllers: as control hubs for smart or remote systems.
- STEM educational kits: for classrooms, with visual software and adaptable hardware.
- DIY projects: from voice-controlled gadgets to custom automation systems.
- Home automation integrations: lighting control and security systems.
Getting Started: Power and Driver Installation
To get started, connect your M5Stack Stick to your PC via USB-C. If you are using Windows, you may need to install the FTDI driver. You can get it from the official FTDI website. Correct detection is confirmed when it appears in Device Manager as “USB Serial” or similar.
Power Usage, Controls, and Battery Management
Operating these mini modules efficiently requires a quick understanding of their hardware buttons. Typically, pressing the power button for 2 seconds turns the device on, while holding it for 6 seconds turns it off completely. Because the onboard batteries are small, power management chips like the AXP192 handle charging safety, battery level reading, and deep-sleep configurations to significantly extend operational life when running remote IoT nodes.
Software Ecosystem and Programming
Choosing your ideal software environment changes your development workflow completely. If you prefer low-code approaches, UIFlow allows you to drag-and-drop functional blocks to control screen layouts and sensor polling effortlessly. On the other hand, traditional embedded engineers will find comfort in the Arduino IDE or PlatformIO, where official M5Stick libraries provide comprehensive APIs to read the IMU, control the IR transmitter, or render custom graphical user interfaces.
Project Inspiration and Community Examples
The active maker community has built an impressive array of custom applications around these tiny sticks. Users have created everything from Wi-Fi packet sniffers and BLE keyboard remotes to mini retro-gaming consoles, desk clocks, and localized weather monitors using external HATs. Exploring open-source repositories on GitHub provides hundreds of fully functional examples ready to be flashed directly into your hardware.
Common Challenges and Solutions
New users often encounter a few common hurdles, particularly related to port connectivity and screen freezing. If your computer fails to find the device, make sure you are using a data-capable USB-C cable rather than a charge-only one, and double-check your driver installation. If the screen remains blank after flashing custom firmware, it usually implies an incorrect display orientation or driver initialization parameter in your code library, which can be fixed by referencing the specific model setup in the official examples.
Choosing the Right M5Stack Stick Model
Selecting the correct version depends heavily on your project requirements and budget. For simple learning tasks, low-cost remote switches, or basic sensor tracking, the classic M5StickC or Plus works beautifully. However, if your project involves advanced audio processing, visual applications, speech recognition, or heavier multi-threaded coding routines, investing a little more in the StickS3 will provide the processing power and extra memory necessary to handle those demands seamlessly.
Key Tips for New Users
- Start simple with UIFlow and move on to Arduino or ESP-IDF as your confidence and programming experience grow.
- Keep the firmware updated and review resources in specialized forums.
- Check the official documentation and participate in the community to solve problems or find inspiration.
- Verify the compatibility of modules and accessories before integrating them into your projects.
What is Kode Dot? The Ultimate All-in-One Device for Makers and Hackers