
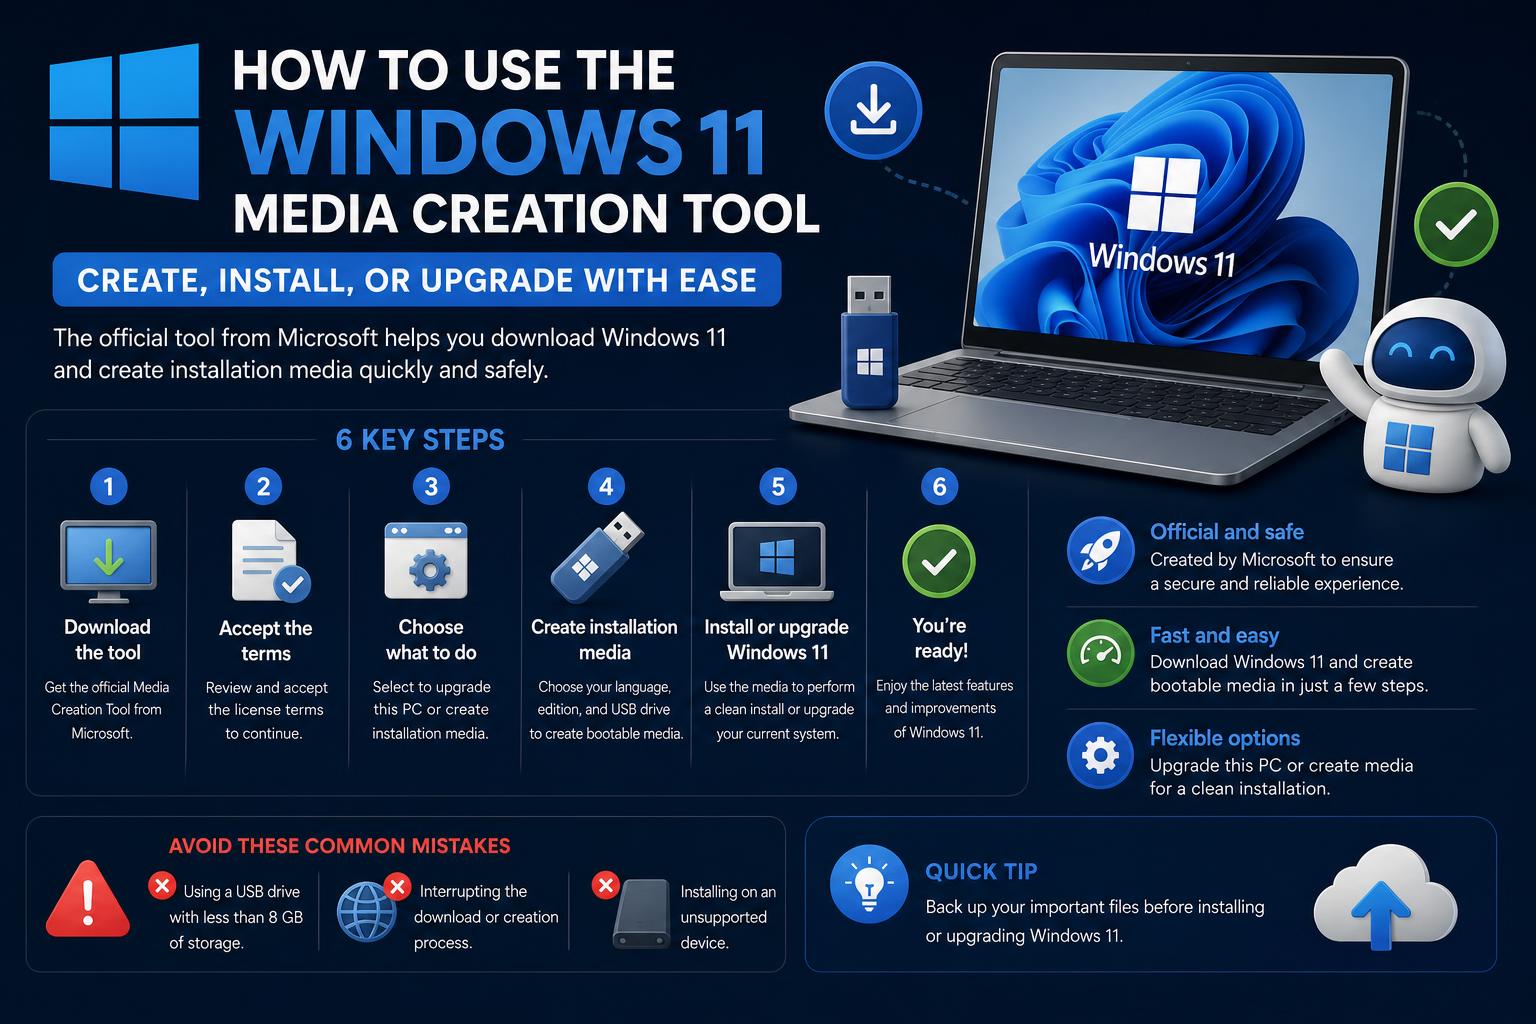
- Windows 11 Media Creation Tool allows for official, flexible OS installations and upgrades.
- Checking hardware compatibility and backing up data are essential prerequisites.
- The creation tool supports both USB and ISO media for diverse installation scenarios.
- Troubleshooting and activation tips ensure a smooth installation process for all users.
When it comes to upgrading or clean-installing your PC with Microsoft’s latest operating system, using the Windows 11 Media Creation Tool is the most official, flexible approach you can take. However, the exact steps, best practices, compatibility notes, and troubleshooting tips aren’t always obvious from the official documentation, and as anyone who’s ever tried to prepare a bootable USB can tell you, it pays to know what you’re doing ahead of time. In this article, we’ll break down everything you need to know about the Media Creation Tool for Windows 11—covering who should use it, preparation tips, step-by-step processes, and common pitfalls—so you’re not left guessing or fumbling during the process.
Let’s take a deep dive into the different situations where you’d want to use the Media Creation Tool, whether you’re installing Windows 11 fresh on a new device, upgrading from Windows 10, using a digital license, restoring Windows after an issue, or just want a backup installer for future use. By following along, you’ll be equipped with more than just basic instructions: you’ll have the insights only available from carefully pulling together the hidden gems buried in official docs, forums, and expert commentary.
Understanding the Media Creation Tool: What Is It and Who Needs It?
The Media Creation Tool is Microsoft’s official utility for generating bootable installation media (such as a USB flash drive or DVD) to perform upgrades, clean installs, or repairs for Windows 11. This is not just a utility for tech enthusiasts—it’s a valuable resource for any user wanting to reinstall Windows 11, move to a new device, or troubleshoot critical errors by performing a fresh installation. The tool is developed and maintained by Microsoft, so you can always expect that you’re getting genuine, secure media straight from the source. Access the official Media Creation Tool here.
Situations where the tool shines include:
- Upgrading a compatible Windows 10 device to Windows 11 when the usual Microsoft Update route doesn’t work.
- Preparing a bootable USB drive for fresh installations or repair work after a critical error.
- Deploying Windows 11 on multiple PCs, such as setting up several new computers at work or home.
- Creating an ISO file for virtual machines (VMs) or future installations.
Checking Requirements: Do You Qualify for Windows 11?
Before you even think about running the tool, you’ll need to check that your existing hardware meets the minimum system requirements for Windows 11. Microsoft publishes the full list here. Here are the essentials you absolutely can’t skip:
- 64-bit CPU: Windows 11 does not support 32-bit CPUs. Confirm your CPU type in Settings > System > About, or search “System Information” and check under “System Type.” Media Creation Tool only generates media suitable for x64 processors. If you’re using an ARM-based PC, you must wait for the Windows Update notification supporting your model.
- Sufficient storage space: You need at least 8GB of free space on the USB or DVD you’re burning the installer to. For the computer you’re upgrading, ensure there is room for installation and Windows updates.
- Internet connection: A stable, reliable network connection is essential. The faster, the better, as you’ll be downloading multi-gigabyte files directly from Microsoft’s servers.
Internet service provider fees may apply if you’re on a limited plan. - Compatible hardware: Not all features are available on all devices. Some require additional components (like TPM 2.0 and Secure Boot). Check your device manufacturer’s site for the latest drivers and compatibility steps.
- Language and Edition: The installer language should match what you’re currently using, especially if you plan to upgrade rather than do a fresh install. This ensures all drivers and features remain compatible.
Important: Installing Windows 11 on a PC that does not meet the minimum requirements is possible but NOT recommended. Your PC won’t be officially supported, may not receive updates, and the manufacturer may void your warranty due to compatibility issues. Be sure to check Microsoft’s warnings before proceeding.
Prepping for the Installation: What You Should Do First
Before creating your Windows 11 installation media, take these crucial steps to avoid common headaches:
- Backup All Important Data. Regardless of whether you’re upgrading or doing a clean install, back up your files. Use an external drive or a trusted cloud storage service to save your documents, photos, and settings. That way, you won’t risk losing anything if something goes wrong.
- Secure a Valid Product Key if you’re planning a new installation. For digital licenses, your key is often stored in your device firmware and will apply automatically. If not, have your 25-character Windows 11 product key handy. Unsure how to find it? Microsoft has a guide to product keys.
- Prepare a blank USB flash drive with at least 8GB of storage. The Media Creation Tool will erase everything on the drive during setup! Double-check that you’ve saved anything valuable before starting.
Step-by-Step: Using the Windows 11 Media Creation Tool
Here’s a comprehensive walkthrough to create your own Windows 11 bootable installer using the Media Creation Tool: more details on how to use the Media Creation Tool for Windows 11.
- Download the Media Creation Tool from Microsoft’s official website. .
- Run the downloaded MediaCreationTool.exe as administrator. For best results, right-click it and select “Run as administrator” to avoid permission errors. If you skip this step, you may be prompted for it later.
- Review and accept Microsoft’s license terms to continue. You won’t be able to proceed without accepting.
- Select ‘Create installation media (USB flash drive, DVD, or ISO file) for another PC’. On the screen asking what you want to do, choose this option and click Next.
- Set your preferred language, edition, and architecture. The tool usually detects your system settings and pre-selects them, but you can adjust them if you need a different configuration.
- Choose the media to use: USB or ISO file.
- USB flash drive: Insert your blank USB drive with 8GB or more. The tool will list the eligible drives; select the correct one and click Next. Be very careful: the process will erase all data on the selected USB drive.
- ISO file: Save the ISO to your PC if you plan to burn it to a DVD or use it in a virtual machine. After downloading, right-click the ISO and use Windows’ built-in disc burner or third-party software if needed. If you get a “disk image is too large” message (especially for DVDs), try a dual-layer DVD.
- The tool downloads Windows 11 and writes the installer to your media. This may take a while, depending on your internet speed and USB transfer speed. Don’t disconnect your computer or the USB drive until the operation is complete.
- When it’s done, the tool will notify you that your USB or ISO is ready. Click Finish and safely eject your USB drive if needed. You now have a fully functional bootable Windows 11 installation media.
How to Use the Bootable Media to Install or Repair Windows 11
Once your installer is ready, here’s how to use it on the target computer:
- Insert the bootable USB drive or DVD into the PC where you want to install Windows 11.
- Restart the PC. Most will try to boot automatically from the USB drive if detected. If your PC boots into its previous system, you’ll need to manually access the boot menu or change the boot order.
- Access the boot options screen as soon as your PC starts up. This usually involves pressing F2, F12, Del, Esc, or another key depending on the manufacturer. To find out which one, check your device’s manual or support page.
- If your device has Secure Boot enabled, you may need to temporarily disable it to allow booting from external media. For step-by-step instructions, check the manufacturer’s documentation.
- Access the Windows installation screen. Here, select your language, time zone, and keyboard preferences—then click Next.
- Click Install now. Enter the product key if prompted, or skip it if you’re using a digital license. Follow the wizard to choose between an upgrade or a custom installation (if you want to start fresh, select Custom and delete partitions if needed).
- After installation, don’t forget to revert the boot order changes so the computer boots from its drive normally in future sessions.
If you run into trouble, you can check out how to reinstall Windows 11 to fix possible technical errors and make sure you always have a way to recover your system.
What Else Can the Media Creation Tool Be Used For?
While its main use is installing or upgrading to Windows 11, the tool can also:
- Reinstall Windows after a major system failure.
- Reset your PC using the created media if the system’s recovery options don’t work.
- Create media for deploying Windows 11 across multiple devices, useful for businesses or IT environments. For that, check out the official Microsoft documentation on deployments.
- Create an ISO for use in virtual machines or specialized scenarios without needing a physical USB drive.
Troubleshooting and Common Issues
If you run into problems during setup, don’t panic! Here are some common issues and how to fix them:
- Media Creation Tool can’t find your USB: Make sure it has at least 8GB and is fully formatted (FAT32 or NTFS). Remove any other unused USB drives before starting.
- Boot menu won’t recognize USB/DVD: Verify that the media was created correctly. On older PCs, you may need to change the Secure Boot option in the BIOS/UEFI to allow booting from external devices.
- Installer asks for license key when you think you have one built-in: Most modern devices have the key stored in firmware. If it’s not detected, check that the edition matches and try again.
- Receiving unreadable disc/USB errors: Try recreating the media. For DVDs, use a dual-layer disc and burn at a lower speed for better results.
- Post-install issues or missing drivers? Visit the manufacturer’s site to update them. Microsoft offers drivers for Surface devices here.
Special Considerations: Windows 11 Pro and Digital Activation
If you plan to install Windows 11 Pro, the Media Creation Tool will ask for a key during setup. Just enter it and the correct edition will be installed. Devices with digital licenses stored in firmware will activate automatically if they have the same edition. You can check all of this in our article on what a Windows digital license is.
For those upgrading from earlier versions with linked licenses, if the system recognizes the digital license in firmware, you won’t need to enter the key again—this avoids errors during official installations and ensures automatic activation.
Alternatives and Additional Resources
Microsoft recommends using its own tool to guarantee authenticity and support. However, other tools like Rufus also let you create USB media with an ISO, which can be ideal in specific cases for greater control over partitions or file systems.
For more technical help, check specialized forums or the Reddit WindowsHelp community. But remember that the precise instructions in this article will give you a clear and safe guide for creating your installation media.
Windows 11 Media Creation Tool: Complete Guide to Installation, Compatibility and Alternatives